Fabrications – All in a Row (part two)

For the flower centers, I used a similar Stitch Witchery technique. First, I cut a small square of fabric and Stitch Witchery. I then backed the fabric square with a fusible interfacing.

Stitch Witchery

Second, I painted the Stitch Witchery square with Lumiere Pearl Magenta.

Painted Stitch Witchery

Third, I dropped some metallic threads on top of the fabric square. I then topped it with the painted Stitch Witchery and covered the layers with parchment paper. I pressed them on a wool setting for about 10 seconds.

Metallic Threads

Fused Threads

Using a small circle template, I penciled cutting outlines on the back of the fabric and then cut out the circles.

Marked interfacing

Next, I placed the circles on the background fabric in a somewhat random fashion. The only important thing here was to leave enough room between them for the petals. When I was happy with their positions, I tacked them down with a tiny dab of fabric glue so that they would stay in place as I continued working.

Placement of Center Flowers

The next step was the flower stems. I decided to use green quarter-inch organza ribbon. To get a nice rounded shape, I twisted the ribbon as I couched it down using the Bernina free motion couching foot. (This could be done just as easily with a cording or braiding foot or an open toe foot.)

Couched Organza Ribbon

The flower petals were created with Moda Dea Jai Alai (Bloom) eyelash yarn. I couched the yarn around the center, first working in a loopy motion to form the petals and then taking a final round at the outer edge of the center.

Free Motion Couched Yarn Petals

A free motion couching foot would be necessary to apply the yarn exactly as I did. However, you could achieve very nice petals through bobbin work with perle cotton or another heavy thread or fiber of your choice. To do this, sew a straight stitch around each circle. Wind your bobbin by hand and then prepare your machine for free motion work. Turn your fabric to the wrong side and stitch the petals around the previous sewing lines. (It’s always a good idea to work on a test piece first to make sure your tensions are correct.)

When my flowers were complete, I chose a leaf stitch on my sewing machine and added leaves to the stems. I could have thread painted the leaves, but sometimes I like to use the built-in stitches on my sewing machine simply because they so often go unused!

Machine Stitched Leaves

To complete the piece, I added a yellow glass bead to each flower. Instead of sewing the beads on with the hole to the side, I stitched them with the hole facing up and used a lighter yellow thread. The stitches formed a small “Y” design on the surface of each bead.

Bead Work

I really liked the role that Stitch Witchery played in this project. It performed well both as a fusible and as a paint transfer medium without leaving its own footprint.

Note: I’ve added another colorform file (fjsquare.dst) to the Fem-Gratis box in the sidebar. Enjoy!

~~~~~~~~~~~~~~~~~~~~~~~~~~~~~~

Rene
Time Treasured

SaveSave

Fabrications – All in a Row (part one)

Sometimes I order fabric online. Occasionally, it’s not what I had hoped for so it becomes a makeover candidate. This floral print came with a grainy looking surface that I disliked.

I thought it might be nice to trap some snippets on the surface. When considering what kind of fusible to use to accomplish this, I decided to experiment with Stitch Witchery. First, I cut a piece the same size as the floral background fabric. I then painted it with Liquitex Medium Viscosity paint, mixing burnt sienna and green for the dark green area. I used magenta for the corner.

Painted Stitch Witchery

While the paint was drying, I placed painted (Lumiere Pearl Magenta) Cariff .50 stabilizer snippets on the surface, creating a heavier concentration in one corner.

Painted Cariff Snippets

I then placed the painted Stitch Witchy square over the fabric and snippets, covered it with parchment paper, and pressed the layers for about 10 seconds on a wool setting.

Altered Surface

Owing to the web-like quality of the Stitch Witchery, the resulting surface retained some of the background while allowing the snippets to shine through without being totally subdued. However, the original floral was now completely transformed.

Next, I set up my sewing machine for free motion quilting and threaded the needle with Valdani 35 wt. Green Grass cotton thread. After stabilizing the fabric with thin cotton batting and backing, I stitched the green surface with a free form leaf design.

Free Motion Leaf Design

For the magenta area, I used Valdani 35 wt. Hawaiian Orchid cotton thread and stitched a meandering design.

Meandering Quilting

In part two, I’ll share how I created the flowers.

For those of you experimenting with the colorform shapes, I’ve uploaded another file (fjpaisley.dst) to the Fem-Gratis box for you to download.

~~~~~~~~~~~~~~~~~~~~~~~~~~~~~~

Rene
Time Treasured

SaveSave

Felted Finery – Floral Fluff (part two)

With the center motif completed, we now turn to the two red fluffy flowers. You will need some cotton fabric for the base of the flower and some organza in the same color. I used red, but you can choose any color you like for your flowers. You will also need some perle cotton #3 or #5.

You may have noticed a new widget in the sidebar. I’m not so sure I like the color so that may change, but within the box you will see a JPG file. I have uploaded the flower template file (ib1.jpg) for you to download. If you have a graphics program, you can adjust the size to fit your needs.

From time to time I will upload files for you to use with the tutorials. If you see an empty box, it means your browser can’t display the widget. For example, it doesn’t display in Mozilla using a Linux OS. I’m sorry, but I have no control over it. For those who can use it, you are welcome to download any files I place there for your personal use.

Now on to the flowers-

Cut two pieces of red fabric a little larger than the flower template. Back these with a fusible such as Wonder Under. Place the flower template on the paper side of the fusible and draw around it with a pencil. Next, cut the flowers out.

Peel the paper backing off of your fusible and position your flowers wherever you would like them. Press according to manufacturer’s directions.

I wanted my flowers to have a little more glitz, so I topped them with red organza. You can skip the next step if you like.

Cut two pieces of organza a little larger than your flowers. Lightly spray the back of each piece with a spray adhesive such as 505 and place them over the fused flowers.

You can add the perle cotton edging using any of the following methods:

(1) Attach a cording or braiding foot and slowly work your way around the flower, couching the perle cotton.

(2) Attach a free motion couching foot and couch the perle cotton around the flower. When using the Bernina Free Motion Couching Foot, I like to move my needle one position to the right and set the machine on a zig zag stitch at about 0.5 stitch width. Perle cotton #3 works best with this foot.

(3) Sew around the edge of the flower using a regular straight stitch (or free motion stitch around it). Wind your bobbin with perle cotton and work around the flower from the reverse side of your project, using the previous stitching as your guide. Always use a separate bobbin case that you can adjust for specialty bobbin work. Test your bobbin tension before working on your project.

To neatly secure the ends of the perle cotton, attach an open toe foot and set your machine on a zig zag stitch. Clip the beginning tail of perle cotton right where your stitching began. Wrap the ending tail around the back of your needle (from left to right) and pull the perle cotton towards you. Zig zag stitch over a small portion of the tail, take a few securing stitches, and then clip the remaining tail off.

Place your project on a glass surface (or any other heat proof surface) and burn away the outer edges of organza with a stencil cutter or wood burning tool. Do this in a well ventilated area.

In part three, we will give the flowers a nice fluffy center.

~~~~~~~~~~~~~~~~~~~~~~~~~~~~~~~

N. Rene West
Time Treasured

Fabrications – In Bloom Three (part two)

Many great products that we use for quilting and fiber art come from other sources. I purchase freezer paper at the grocery store, rubber finger tips at the office supply store, Tri-flow at the bike shop, magnetic trays at the hardware store, and the list goes on and on. In this tutorial we will be using Glad Press’n Seal, a product you can find at the grocery store near the freezer paper. Press’n Seal is slightly tacky and transparent, making it perfect for transferring designs, positioning them on fabric, and stitching over them. It’s very easy to remove and doesn’t put strain on your stitches the way some other products do. I also use Press’n Seal to secure thread ends on large spools. With our background complete, we now begin the thread work. Place a large piece of Press’n Seal over your drawn (paper) design and mark double stitching lines between each of the individual template pieces. These lines should be 3/8 of an inch apart. Remove the Press’n Seal and position it on your fabric background.

Using a strong thread, such as polyester, stitch over the lines using a stitch length of 4.0 mm.

When you’ve completed stitching all the marked lines, gently tear away all the Press’n Seal. Then set up your sewing machine with a 5-hole or 7-hole cord foot.

If you’ve never used this foot before, you thread individual cords through the small holes from the top of the foot, working them under the foot. I used #5 perle cotton in five colors, but you could use as many as seven colors. Choose a stitch on your machine that will catch all the cords as you sew. Decorative stitches work well here.

Slowly sew the cords through the center of all the double stitching lines, using care to not stitch over any of the double stitching lines themselves since you will need these to be free for other techniques. Leave about an inch of cord tails at the beginning and ending of each section.

Next, attach a braiding foot or a free motion couching foot and apply a heavy decorative thread, such as #3 perle cotton, to the edges of any fused design elements. Remember to drop your feed dogs if using the free motion couching foot.

You could also accomplish this using bobbin work. Simply sew a straight stitch on the surface to mark the outline of the design and then reverse your work, wind your bobbin with your decorative thread, and stitch from the reverse side. Test your stitches first to make sure you have set the correct tensions. In part three, I’ll share a special beading technique that I think you will find interesting and easily adaptable to many projects. ~~~~~~~~~~~~~~~~~~~~~~~~~~~~~~~ N. Rene West Time Treasured

Fabrications – In Bloom Two (part three)

While shopping in a local craft store, I noticed these plastic shapes with raised surfaces.

I believe they’re used to create imitation stained glass. I purchased a few of them and found them to work quite well as rubbing plates with Shiva Paintstiks.

Using the same Kona cotton fabric as used in part two (prewashed), I rubbed the flower design onto the surface using a white Shiva Paintstik. After allowing it to dry and giving it a gentle wash (see part two), I set up my sewing machine with white rayon thread and lowered the feed dogs.

I then did a free motion outline stitch around the smaller flowers and filled in the centers.

Next, I attached the Bernina Free Motion Couching Foot and couched a #4 cotton around the larger flower. This could also be done by winding the heavy #4 cotton onto a bobbin and stitching the design from the back side of the fabric.

This simple design resulted in a beautiful embellishment that took very little time to create.

For the dragonfly, I decided to stipple his wings and thread paint his body. I began with the wings.

Then I filled in his lower body with a brown cotton embroidery thread. Next, I filled in his head with Holoshimmer.

Finally, I outlined his body with gold Holoshimmer.

Shiva Paintstiks made the transfer of the shapes simple and quick. Once on fabric, there were many things I could have chosen to do with each design. I hope you’ll do a little experimentation and enjoy the versatility that these paintstiks offer in the studio.

~~~~~~~~~~~~~~~~~~~~~~~~~~~~~~~

N. Rene West
Time Treasured

Fabrications – Garden Gazing (part two)

Free motion embroidery is a very relaxing activity. With just a few stitches in your repertoire, you can thread paint beautiful embellishments onto a variety of projects. In Garden Gazing, I used several stitches that I would like to share with you. Remember to stabilize your fabric well before thread painting. All those stitches need something to wrap themselves around.

Probably the most versatile of stitches is the free motion zig zag stitch. By changing the position of your fabric, the width of the stitch, or your tensions, you can alter the look to suite your purposes.

I often slant my fabric ever so slightly so that my grasses take on a wavy effect.

Other times I alter the width of the stitch or use a lighter or darker thread in the same color family.

In the following photos, you can see the progression of thread painting grass. In the first two photos, I used a stitch width of 0.7. When I switched to a darker color in the third photo, I also changed the stitch width to 0.9.

A wide stitch width can be used for filling in background areas where you don’t need definition. By moving your fabric quickly, you can cover a large area in a short amount of time. You can also layer this stitch, using a variety of colors for an interesting effect.

To thread paint ferns or variegate your flora, the whip stitch comes in handy.

To accomplish this stitch a little machine adjustment is needed. First, tighten your top tension. On a Bernina, I set the top tension at 7. Next, loosen your bobbin tension slightly and fill your bobbin with a decorative thread, such as rayon. Use a cotton embroidery thread (or something similar) in the needle. Make sure you use two different color values when choosing threads. Set your machine on a zig zag stitch, drop the feed dogs, and free motion stitch a pretty little plant or fern.

To thread paint small leaves, simply us a narrow free motion zig zag stitch and move slowly as you create your shapes. You can use even tension adjustments or play with the tensions for interesting effects.

Flowers are formed in a similar fashion.

For the tall hyacinth, I used a stitch width of 1.3 and created “V” shapes, covering my stitch path twice.

For hanging flowers, I used the same stitch but changed the shape of the flower.

Individual petals are very easy to stitch. I used a 1.1 stitch width in this example, forming the outline first and then filling in the petal. You can also build these stitches up for more texture.

Although I didn’t use them in this project, built up free motion straight stitches can be used to thread paint fields of grass, leaf veins, tree trunks, flowers, fruit, and a host of other wonderful things. They’re also very useful in shading.

If you’ve never tried your hand at free motion embroidery, I hope you will experiment with a few of these techniques and begin embellishing your projects with a little thread painting.

~~~~~~~~~~~~~~~~~~~~~~~~~~~~~~~~

N. Rene West
Time Treasured

Fabrications – Gilded Gardens (part four)

Gilded Gardens

[Note: Part three and four of Gilded Gardens provide a greater amount of technical information than most of my tutorials. Therefore, I would recommend that you read them through at least once before beginning the second level of thread work.]

The final stage of this secondary thread work involves working with perle cottons #3 and/or #5. These heavier threads cannot go through a machine needle so we must use other methods. The most common way of using these decorative weight threads is through bobbin work.

Before the day of specialty bobbin cases, I would simply bypass the tension mechanism on my Bernina 1230 and bring the bobbin thread up directly. This worked okay for very heavy threads and ribbon floss, but wasn’t ideal. I then purchased a second bobbin case and made adjustments as I mentioned in part three. Sewing machine companies now produce specialty bobbin cases, and if you like using decorative threads in your work, they are a nice accessory to have.

Specialty Bobbin Cases

To begin the second phase of heavy thread work, hand wind your bobbin with perle cotton #3 or #5, place it in the specialty bobbin case (or adjusted secondary bobbin), and set up your machine for free motion embroidery (according to your previous test results), making sure the feed dogs are in the down position.

Hand Wound Bobbin

Specialty Bobbin Case

Turn your work to the backside and position the needle at a point on the circumference of one of your circular flowers. Sounds like geometry, doesn’t it?

Backside Bobbin Work

Now check to make sure the bobbin thread tail is positioned towards the back of the machine so that it doesn’t get caught up in the securing stitches and make an unpleasant mess on the front side of your work. Take a few slow securing stitches moving every so slightly forward, clip your top thread tail, and then begin working your way around the circle. Before the second pass, clip your bobbin thread tail. On the second pass, work some spirals, scrolls, and circles in the areas surrounding your flowers.

Bobbin Work

Bobbin Work on Surface

Surface View of Bobbin Work

When you are happy with the decorative bobbin work around your flowers, go back to some of the flowers and fill the interior completely with stitches, working in a spiral motion. Next, work some vein stitching on one or two of your leaves.

Leaf Veins

On other leaves, work a row of stitching down one side and continue in a winding motion past the tip of the leaf.

Leaf Bobbin Work

An alternative to free motion bobbin work would be standard bobbin work. Keep your feed dogs in the normal up position and sew around your flower circles from the back side of your project. It’s possible to make scroll designs around your flowers using this method, but you will need to keep your lines simple.

Another alternative would be to use a couching or braiding foot and couch the thicker threads around your flowers.

Braiding Feet

Couching and Braiding Feet

Couching allows you to use a contrasting top thread color to add even more interest to your work. Make sure you switch to a needle plate that allows for zig zag stitching and adjust your stitch length and width. Leave a small top thread tail and sew over it in your second pass.

Couching Perle Cotton

Couched Perle Cotton

Work slowly so that you can keep your thread close to the previous round of stitches. When you complete your couching, do a few stationary zig zag stitches to secure your thread and then clip it.

Couching Heavy Threads

My favorite way to apply heavy threads is with the Bernina Free Motion Couching Foot #43. I hope other sewing machine companies will produce a similar foot for their machines because it’s a wonderful accessory that I wouldn’t want to be without. The look of free motion couching is quite similar to bobbin work. I did free motion couching on two of the leaves in Gilded Gardens. (This design work can also be created through free motion bobbin work.)

Free Motion Couching

Bernina Free Motion Couching Foot

If you have this accessory, I recommend that you move your needle one position to the right and set your machine on a zig zag stitch width of 1.1 mm. This helps to catch the threads or yarns with every stitch. Some decorative threads are too thin (perle cottons #8 and #12) or too thick for this foot, but many work well. I especially like using this foot with perle cotton #3.

Perle Cottons

One of the special stitches in Gilded Gardens is the pod stitch.

Pod Stitch

This stitch is formed by building repeated rounds of stitches on top of each other. I created some of my pod stitches with the Bernina Free Motion Couching Foot and some with bobbin work. Your feed dogs must be down in order to work on such a small design.

Pod

Pod Stitch

Begin by forming your outer circle and then spiral in towards the center, allowing the thread to build up on top of itself. You can only go so far with this before your machine needle or bobbin case will say “enough.” By that point, you should have a nice round pod decoration formed on the surface of your work. I would suggest that you practice this on a test piece before attempting it on your project.

So, with all the above options, you’re sure to find one that suites you well and aides you in completing this phase of the project.

Your work should now look complete. However, we still have several flowers and leaves that beg for further embellishment, which they will receive in part five.

~~~~~~~~~~~~~~~~~~~~~~~~~~~~~~~

N. Rene West
Time Treasured

Fabrications – Gilded Gardens (part three)

[Note: Part three and four of Gilded Gardens provide a greater amount of technical information than most of my tutorials. Therefore, I would recommend that you read them through at least once before beginning the second level of thread work.]

We now have our background and garden contents stitched down and embellished with various decorative free motion stitches. We could call it a day at this point and still have a nice piece of appliqued floral artwork. However, why stop the fun when there’s so much more of it to be had!

At this point, a little technical information is required for those who have never worked with decorative threads. The next stage of our project involves perle (pearl) cottons and similar heavy threads. I used perle cottons in sizes 3, 5, 8, and 12. I also used a #4 cotton matte thread. An alternative to perle cottons would be crochet threads in comparable weights. (With so many wonderful threads and fibers on the market, I can’t possible list them all. Simply choose your favorites and use the information below as a guideline.)

There are multiple ways to use these threads with your sewing machine, so if one way doesn’t work for you, another probably will. Additionally, sewing machine companies have responded to the demand for specialty feet and bobbin cases that make using these threads much more pleasurable. I will be mentioning a few that I’m acquainted with, but it’s best that you check with your own dealership to see what’s available for your particular sewing machine. Even if you have no desire to purchase more gadgets, you can still complete this project using simple tools.

Perle cottons #8 and #12 can be stitched with a topstitch needle or jeans/denim needle, which have larger eyes. I used needle sizes 90/14, 100/16, and 110/18. When using thick threads through the needle, wind your bobbin with a heavier thread as well. I used 35 weight cotton, but any heavy weight thread up to the size in the needle could be used.

You will need to adjust your bobbin case to accommodate thicker threads. I recommend that you keep an extra bobbin case on hand just for heavier threads, and mark it so that you don’t get it confused with your regular bobbin case. Since threads come is various weights, this bobbin case will need to be adjusted with each use.

When making adjustments, place the bobbin case in an enclosed area, such as a bowl or Rubbermaid container, so that the little adjustment screw doesn’t get lost in case it falls out of its hole. You only need to remember one thing when adjusting bobbin screws: right is tight. Make all adjustments in small increments and then test your stitches.

Bernina Bobbin Case

If your bobbin work is loopy, turn your bobbin tension screw to the right to tighten it (remember small increments). If it lies on the surface undefined, turn your screw to the left to loosen the tension. You may also need to adjust your top tension to get the stitches you desire.

Make notes of combinations that work well (e.g., 35 wt @ 2 o’clock) so that you can refer to them in the future. Testing your stitches is crucial to the success of your projects, so please don’t skip this step.

Now, let’s begin. Using a topstitch or jeans/denim needle, thread your machine with a #8 or #12 perle cotton, and fill your bobbin with a heavy thread. Loosen your top tension. Perle cottons feed well from a thread stand. I actually used a coffee cup holder that I purchased from a kitchenware store and have included a picture so that you can see what a perfect thread dispenser it makes. If you leave your feed dogs in the up position, use an open embroidery foot for clear visibility (although I used a standard presser foot with no problem). Also, increase your stitch length to about 3.5 mm.

Begin stitching around some of your flowers. Do not sew into previous stitching since this will cause your thread to fray and break. Make several passes until you are happy with the way your flower looks. We will be using heavier threads in the next stage and yarns in the final stage, so leave some flowers bare, including your center flower (unless you would like to complete your garden at this stage).

To form your spirals, scrolls, and circles, you will need to lower your feed dogs and switch to a free motion embroidery foot if you haven’t already done so. I’m not going to tell you that this is an easy, carefree technique. If you move your fabric too slowly, you may very well have an instant bird’s nest form on the back of your work. At the same time, you don’t want to run your machine so fast that you fray your thread.

I recommend using perle cotton #12 since it is finer than #8. Practice on a test piece in order to become comfortable with the technique before attempting it on your project. The results are worth the extra effort, I assure you. However, if your machine is too finicky or you’re not at ease with the technique, don’t worry. Either skip this step or use a heavy embroidery thread to accomplish the same task. I used a 20 weight thread on my test piece with no problem and the results were similar to the #12 perle. I simply used stitch buildup to replicate the look. If there’s a will, there’s a way, correct?

#12 Perle Cotton on Left – 20 Wt. Thread on Right

Work the decorative shapes off the sides of some of your flowers, keeping them simple. If your machine has a needle down option, this is a good time to use it so that your work doesn’t shift at your starts and stops. You may also like to do some meandering, ending the winding trail with a filled circle.

In part four, we will begin working with perle cottons #3 and #5, learn how to create a pod stitch, and conclude the second level of thread work.

~~~~~~~~~~~~~~~~~~~~~~

There has been some kind of technical issue with my WordPress blogs for the past two days. I’m sorry if pictures have not loaded correctly or you have had trouble viewing the blog.

N. Rene West
Time Treasured

Tool Trove (4) – Bernina Needle Punch Accessory Set (also called Decorative Punch Tool)

Bernina Needle Punch Attachment

I debated whether to make this purchase for about a year, but finally decided that it would be good to have a backup for the Babylock Embellisher. Also, since I write so many machine needle felting tutorials, I thought it would be helpful to know how well they work when using different equipment.

Bernina packs the accessory set with a helpful CD that walks you through the steps necessary to set up the attachment (along with some basic tutorials). There are quite a few steps involved, but all of them are easy to perform. For example, you must remove the bobbin, bobbin case, and shuttle hook from the lower part of your machine. Then you remove the presser foot, needle, needle holder thumb screw, and stitch plate. I would suggest that you have a special container handy in which you can place these items. If your studio or sewing area looks anything like mine, you’ll understand the wisdom in this.

Next, you insert the special stitch plate with the large hole, mount the needle punch needle holder with its large screw, attach the Needle Punch presser foot, and drop the feed dogs. The bobbin case door remains open while using this attachment.

Bernina Parts

Bernina Needle Punch Attachment Parts

Much of what I say from this point on will be framed as comparisons and contrasts with the Babylock Embellisher. As I began experimenting with the Bernina Decorative Punch Tool, I immediately noticed some differences.

The Bernina Needle Punch reminds me more of hand needle punching for several reasons. First, the five needles enter the fabric directly and go through an open hole. There is no resistance in the downward or upward motion so the fabric has more force on it in both directions, much like hand felting. The Babylock Embellisher has seven needles, seven small holes in its needle plate, and seven small holes in its cloth presser (which can be adjusted up and down). The individual holes of the needle plate and cloth presser provide resistance, keeping your fabric in a more stationary position.

Babylock Needle Plate and Cloth Presser

Babylock Embellisher Needle Plate and Cloth Presser

If you do free motion quilting, you’ve probably encountered the difference a straight stitch needle plate makes on your stitches since the fabric isn’t forced down into the larger hole of the zig zag needle plate. Although stitches are not the issue here, I found some fabrics ( such as organza) a little more difficult to work with using the Bernina attachment. Hooping proved to be an adequate solution.

Of course, I tend to use fabrics that aren’t traditionally thought of as felting prospects. Bernina clearly states in the “application” section of its instruction sheet that its Needle Punch attachment is designed for wool fibers, wool yarn, felt, and boiled wool (the CD also mentions denim). The attachment does a beautiful job on all of these fibers.

In regard to the resistance/nonresistance issue, there is another consideration. The small individual holes in the Babylock needle plate give little room for error. If you twist your fabric or your needle gets bent, you’re more likely to experience needle breakage with the Babylock. As I stated previously in my review of the Embellisher, felting needles are expensive.

Second, owing to its large, open presser foot, the Bernina Needle Punch provides clear visibility of the needle action just as you would have with hand needle felting. The Embellisher’s cloth presser is opaque, so you don’t see the needles enter the fabric. I really enjoyed watching the interaction of needles with fiber. Do exercise caution on the open right side of the Bernina presser foot. It’s possible for your fingers to get dangerously close to the needles.

As you can see from the graphic below, there is a big difference in the size of the needle holders. Additionally, there is a larger separation between the Babylock’s seven needles than the Bernina’s five needles. The Babylock has an individual screw for each needle. The Bernina has one screw that tightens or loosens all of its needles. The Bernina needle holder is simple to install; the Babylock takes a little more adjusting in the line up of needles with the needle plate holes.

Needle Holders

Babylock Needle Holder (left) – Bernina Needle Holder (right)

I like both of the needle placements for different reasons. The Babylock’s larger size means your work goes faster. The Bernina’s smaller size makes couching and detail work a simple task. I change the number of needles I use on the Babylock frequently, something I won’t have to do as often with the Bernina. As an added benefit, the Bernina and Babylock needles are interchangeable although not identical (the Babylock needles are a little thinner).

Since the Bernina is also a sewing machine, lint buildup is a concern. I would recommend using the vacuum attachment made for computers after every felting session. If you practice good bobbin case hygiene, this shouldn’t be a problem. On the plus side, the features of the Bernina sewing machine such as needle up/down position and speed control are also available while felting. I really like having the needle holder stop in the up position so that I don’t accidentally bend my needles.

For day to day use, having a stand alone machine facilitates in a projects flow since you don’t have to stop and reconfigure your machine. The downside of a stand alone machine is the price. Needle felting attachments cost much less than a dedicated felting machine. Also, in some circumstances having one machine that does it all can be a great convenience. Classes, group projects, travel, and space immediately come to mind. The decision really comes down to personal preference and what works best for each individual.

After about five minutes of using the Bernina attachment, I noticed that I was no longer thinking of the differences between the two machines but rather enjoying the felting itself. I’m thankful that Bernina offers this optional attachment to its customers (on CB hook models) so that more people can enjoy this wonderful craft.

~~~~~~~~~~~~~~~~~~~~~~~~~~~~~~~

N. Rene West
Time Treasured

Fembellish Footnotes – March 12, 2007

Felted Flower

(News, notes, and fiber art related information that might be of interest to you.)

1. Bernina is celebrating their 75th anniversary. To commemorate the occasion, they have set up a special anniversary web site.

2. March 17th is National Quilt Day.

3. The March/April 2007 issue of Fons and Porter’s Love of Quilting magazine contains an informative article on the production of batik fabrics. “Behind the Batiks” by Bruce Magidson takes you on tour through an Indonesian batik factory, revealing the centuries-old practice of dyeing and waxing with complex designs.

4. If you do a Google search on “Carriff,” you will find several links to forum discussions on the 0.5 stabilizer that I use for my felting projects. It is my understanding that the Carriff Soil Separator (0.5 weight) sold at Lowe’s and Home Depot is essentially the same product. If you’re interested in trying this product, you might check these stores to see if they have it in stock.

5. The Eagle-Tribune (MA) has an article on the popularity of wool felting: Wool Whimsy Felting: A hot hobby for any age. Newspaper article links change quickly, so if you’re interested in reading it you might do so sooner rather than later.

~~~~~~~~~~~~~~~~~~~~~~~~~~~~~~~

N. Rene West
Time Treasured

Tool Trove (3) – Twenty Things I Love About the Bernina Aurora 440 QE

Bernina Aurora 440 QE

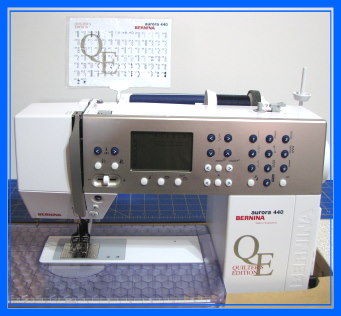
There’s been a lot of interest in the Bernina Aurora 440 QE (Quilter’s Edition) from the time it entered the market place. The focus of all the attention rests on the BSR (Bernina Stitch Regulator) attachment. The 440 QE is not the only computerized free arm sewing machine that Bernina offers with this attachment, but it is a midrange Bernina machine, making it more widely available to those who can’t swallow the price of the 730 model or simply don’t need all the features that a top-of-the-line machine offers. (A friend of mine describes the price tags this way: “These are machines you drive home.”)

Although the BSR attachment is deserving of the attention it has received, the 440 QE offers sewers, quilters, fiber artists, and other artisans a host of other features worth noting. I can’t promise that this post will cover every single bell and whistle, but I will give you a list of my favorite things about this wonderful sewing and embroidery machine.

1. The Manual – Bernina writes a great manual that is detailed and easy to understand.

2. Reinforced Soft Cover – Bernina includes a carrying case with compartments for accessories.

3. Accessory Box – I love this thing. It attaches to the back of the machine for easy transport. It detaches for desk top use. There are compartments for bobbins, presser feet, sewing machine needles, and two drawers for other small parts.

4. Walking Foot – A two sole walking foot with seam guide comes standard with the machine.

5. Needle Threader – It works; what more can you ask for. (There are also three thread cutters on the machine.)

6. Clear Slide On Table – There are seam allowance markings on the table as well as a ruler in inches and centimeters. Although listed as optional, my machine came with a slide on seam guide that is fully adjustable the entire length of the table.

7. Bobbin Winder – Bernina makes a great bobbin winder with a separate motor. This one even has a little thread cutter on the on/off switch. A collapsible vertical spool pin on the right side of the machine makes winding bobbins while sewing or embroidering quite easy.

8. Cool Fluorescent Light – What a difference this makes. I’ve actually burned my hand from the heat buildup on other machines.

9. Manual Presser Foot Pressure Dial – This dial is on the head frame, making it easily accessible.

10. Free Hand System – My Bernina 1230 has this feature as well. With a little push from your right knee, the presser foot raises and lowers.

11. Horizontal and Vertical Spool Pins – Sewers need both and Bernina provides them.

12. Thread Tension Adjustment Wheel – I like having the ability to adjust the upper thread tension manually. I use many different threads and make adjustments frequently. I also like having the dial in constant visual range rather than having to open a menu to see what my tension is set at.

13. Push Button Feed Dog – The feed dog button is easily accessible from the lower right hand side of the machine.

14. Slide Speed Control – I use this feature constantly. It also works when winding bobbins and with the BSR attachment.

15. LCD Screen – The LCD screen displays a lot of important information while you’re sewing, such as needle position (there are eleven to choose from), stitch width and length, needle up/down position, recommended presser foot, presser foot pressure, stitch selection (there are 379), mirror image, pattern begin/end, BSR, memory display, service notifications, and more. It’s a lot to take in at first, but after a little use your eyes become trained and it all becomes second nature.

16. Memory – Up to 90 stitches, letters, or numbers can be saved in memory along with stitch length, stitch width, and needle position alterations.

17. Multiple Brand Sewing Machine Needles – You can use various brands of sewing machine needles. I mention this because it’s not true of all machines. I have a top-of-the-line machine manufactured by another company that can only use Schmetz needles.

18. Quick Reverse Button – Bernina has conveniently located this button in the lowest position on the front of the machine (above the needle), making a few quick reverse stitches super easy. A continuous reverse function is also available.

19. Stitch Selection Card with Holder – Sometimes the stitches displayed on the LCD screen don’t match up well with the actual stitch, so Bernina has included a double sided stitch card with a picture of each stitch and its corresponding number. The machine handle has a clamp that holds the card.

20. Versatility – This is the thing that I find most endearing about the 440 QE. For general sewing, the machine has all the features you need, along with a powerful motor. For quilting, the machine has 32 built in quilting stitches and comes with a walking foot, a real bonus. Of course, the star of the show is the BSR attachment.

Additionally, the 440 QE is an embroidery machine when purchased with the optional embroidery unit. You will often find that midrange sewing/embroidery machines come with smaller embroidery fields. Not this machine. The large (145 x 255 mm) oval embroidery hoop is standard.

One more optional feature is the Bernina Needle Punch Accessory Set. I just purchased this attachment a few days ago as a backup to my Babylock Embellisher and will do a review once I’ve had time to work with it.

There you have my twenty favorite things about this sewing machine. I believe it only fair to mention a few things that I wish were different. The extent of the stitch width is 5.5 mm. It would have been nice to have at least 6 mm if not 7 mm. Also, since this machine is named “Quilter’s Edition,” patchwork foot #57 with the side guide should be standard. Instead, Bernina packs it with the patchwork foot #37.

So much goes into the decision making process when shopping for a new sewing machine. Give a lot of thought to the features you really need and test different brands and models. Also, visit online groups that focus on the machines in which you are interested. Here are the addresses for the Bernina Aurora 440 QE Yahoo groups:

http://groups.yahoo.com/group/Bernina_Aurora/
http://groups.yahoo.com/group/BSRfunction/

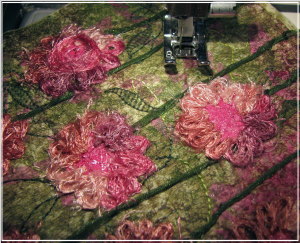
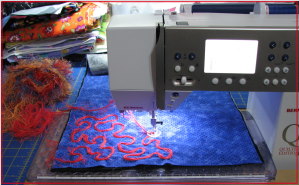
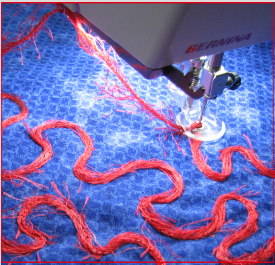
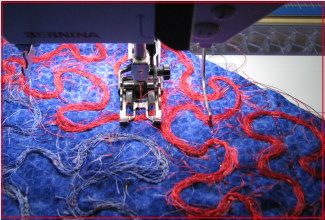
And now a little about the BSR. Whenever you try something new, it’s going to be a little awkward at first. If you’ve done any amount of free motion quilting, you know that a certain feel and rhythm develops over time. The BSR has its own feel and rhythm. The more you use it, the more accustom you become to it. At first, I considered it akin to training wheels on a bike. However, I now find myself using it more and more.

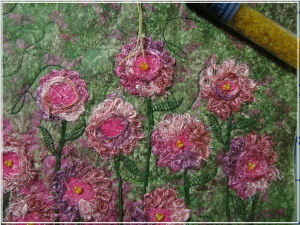
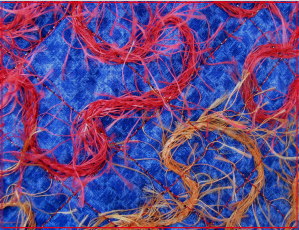
If you’ve been given the impression that it always makes perfectly even stitches, let me disabuse you of that idea. The human factor remains. If you jerk your hands you will have jerky looking stitches. However, if you keep a nice even flow to your movements, you will be rewarded with some of the nicest looking quilting stitches around.

The BSR does have a few quirks. It hates basting sprays, some more than others. I can get away with a light touch of 505, but anything else and I’ll have skipped stitches. Some have found that the BSR works best with top stitching needles. Others think it works best with silk thread. I have used Organ sharps with cotton quilting threads of different weights quite successfully, making tension adjustments along the way (it helps to make a chart of needles, threads, and tension adjustments).

The BSR that comes with the Aurora 440 QE only does straight stitches. The BSR included with the 730 also does free motion zig zag stitches. Personally, I don’t think I would use it for zig zag stitches even if had that capability, but it’s something to consider. There are two modes of operation to choose from and three free motion feet included with the attachment.

I hope you find this information helpful. If you’re interested in this machine, please visit your local Bernina dealership and give this fine machine a trial run.

~~~~~~~~~~~~~~~~~~~~~~~~~~~~~~~

N. Rene West
Time Treasured

Fabrications – Furry little meanderings

One of my favorite Bernina feet is the Freemotion Couching Foot (#43). Various yarns and fibers can be threaded through the small opening on one side of the foot and then couched with any thread that can go through the eye of a sewing machine needle. This foot is a virtual playground for embellishers.

Meandering

For this example, I cut a piece of fabric and layered it with stabilizer that I attached using a basting spray. I chose a Fun Fur eyelash fiber with long variegations of about 160 inches. Beginning in one corner, I simply meandered my way around until the whole piece was covered with the furry fiber.

Threading the foot

Next, I changed to a metallic needle and threaded my machine with red Superior Halo. I attached my walking foot along with the seam guide and worked across the surface in a crosshatch pattern. This resulted in a unique and colorful piece of embellished fabric ready for another project.

Needles and Halo thread

If you have this attachment and haven’t used it, you’re in store for a whole new world of creativity.

Crosshatch

Crosshatch pattern with Halo thread

~~~~~~~~~~~~~~~~~~~~~~~~~~

N. Rene West
Time Treasured