Fabrications – Sand In My Shoes (part two)

Batiks serve as the perfect fabrics for making these little flowers since they are tightly woven and quite colorful.

Once you have completed the free motion stitching on each of the circles, remove the Solvy from you hoop. Clip around each flower, leaving all the loose extended threads in place.

Circles Clipped from Solvy

Place each flower circle on a terry towel and spray with water to remove the Solvy. Spraying rather than soaking works well here because some of the melted Solvy remains in the fabric, adding a little stiffness to the bubbly texture.

Sprayed Circles

When you circles are semidry, center the small circles on top of the large circles. If you have used an assortment of colors, you may like to mix and match until you are pleased with the results.

Layered Flowers

Apply beads or buttons to embellish the flower centers. I used “tye dye” glass beads.

Tye Dye Beads

Take each flower and scrunch it into a little ball. Gently open the ball and shape it back into a flower.

Scrunched Flower

Allow to dry completely, and your flowers will be ready to add colorful embellishment wherever you place them.
~~~~~~~~~~~~~~~~~~~~~~~~~~~~~~~

Rene
Time Treasured

Fabrications – Encased (part four of case construction)

Our case is now ready for the final steps that will bring it to completion. First, cut a strip of your base fabric on the straight of grain 2″ x 10″. Fold both long raw edges evenly towards the center (wrong sides together) and press. Fold again at the center line; press.

Topstitch along both sides.

Topstitch Edges of Band

Cut your strip into six 1 1/2″ pieces. Fold each one in half and zig zag stitch along the raw edges. These pieces will form the bands that secure the cording to your case.

Six Bands

Take a measurement for the length you want your case’s cording. I measured from the base point of where I would want my case to be positioned up around my neck and back down again. Using three coordinating colors of rat’s tail, make a knot at one end (leaving about a 5-6 inch tail), braid the cords the desired length, knot again, and then trim, leaving an equal length of tail.

Cording

Take your six bands and string them onto your braided cording.

Cording With Bands

Fold your case in half and position the cording with three bands on each side. Using fabric glue, place each band within the folds of the case at bottom, center, and top. The bands should fit snugly in order to secure the cording.

Attaching Bands

Stitch along the folded edges using a stitch length of 2.5mm. You may like to backstitch at each band for extra security.

Final Stitching

I hope you enjoy making these little cases as much as I do. They make great “canvases” on which to experiment with all types of fiber art techniques.

~~~~~~~~~~~~~~~~~~~~~~~~~~~~~

Rene
Time Treasured

SaveSave

Fabrications – Encased (part three of case construction)

With our fabric embellishments complete, we now move on to the basic construction of the case. First, measure across the top or bottom of your fabric. Cut two strips of the base fabric 1 1/4″ wide by the length of your measurement plus an extra inch. For example, my strips measured 1 1/4″ x 7 1/4″.

Place one strip at the top of your fabric, right sides together, and stitch. Repeat this step at the bottom of your fabric.

Top and Bottom Strip

Fold the raw edge, press, and fold again, lining the folded edge up with the seam line. Pin in place (or secure with Glue Pins) andtopstitch. Trim the edges so that they are flush with the sides.

Topstitching

Now measure the length of your fabric sides. Cut two strips that measure 1 3/4″ wide by the length of your measurement plus an extra two inches. Stabilize these strips with fusible interfacing.

Side Strips

Place the first strip on one side, right sides together, with an inch extending on each end. Stitch using a 3/8″ seam allowance. Repeat this step on the opposite side.

Side Strips with 3/8″ Seam Allowance

Take your project to your pressing area and make a 3/8″ fold down the raw edges of both strips. Press in place.

Pressed 3/8″ Edge

Next, turn the fold back on itself (right sides together), lining it up with the seam line on the right side of the fabric. Mark a line at each corner even with the finished edge of the top and bottom. Stitch all four lines, securing the beginning and ending stitches with a few back stitches.

Stitched Corners

Your project should now look like this.

Untrimmed Corners

Trim each corner, leaving about 1/8″ seam allowance at each edge.

Trimmed to 1/8″ Seam Allowance

Turn each of the corners to the right side. You may like to use a stiletto to get nice crisp edges. Press the sides in place and pin (or use Glue Pins).Topstitch down each side.

Finished Corners

Topstitched Sides

If you feel the sides of your project, the finished trim should extend a little beyond the inner seam allowance. This will be helpful when we begin the next phase of the project.

~~~~~~~~~~~~~~~~~~~~~~~~~~~~~~

Rene
Time Treasured

SaveSave

Fabrications – Encased (part one of case construction)

We’ll come back to the felted floral round created in the previous tutorial during part three. For the next step, you will need a base fabric, a sheer print fabric, some Angelina, and a stiff stabilizer such as Timtex, and fusible interfacing. These supplies will be transformed into the body of the MP3 case/carrier.

First, cut two pieces of base fabric twice the length of your desired case size. For example, my case is 6 1/2″ wide and 6 1/2″ tall. So I cut my fabrics 6 1/2″ x 13″. (The finished fabric will be folded in half to form the case.)

Cut Base Fabric

Next, press fusible interfacing to the back side of each base fabric piece.

Interfaced Base Fabric

From your sheer print fabric (I used a print organza), cut one piece using the same measurements as you did for your base fabric. This is probably the most important element of this project since the sheer print totally changes the appearance and texture of the base fabric. Although I used yardage, sheer print scarves would probably work quite well in this project.

Sheer Print Organza Layer

To stabilize the case, cut a piece of Timtex or similar heavy stabilizer the same size as your base fabric. If you would prefer a softer case, a cotton batting would make a good substitute. Set it aside for now.

Heavy Stabilizer

Take one piece of your base fabric and spray it with 606 fusible spray, following the directions on the can. I chose 606 because it leaves no evidence of its presence when working with sheer fabrics.

606 Fusible Spray

After your spray dries for a few minutes, pull a small amount of Angelina and sprinkle the fibers on top of the sprayed fabric. (I used Ultraviolet and Peacock.)

Angelina Fibers

Place the sheer print on top of the fibers and move the piece to your pressing area. Top the layers with parchment paper and press for about three seconds on a silk setting. The layers should adhere to each other and now form a single piece of fabric.

Pressing Layer Together

Next, spray the surface of your heavy stabilizer with 505. Position the second (unmodified) piece of base fabric evenly on the stabilizer, and press it in place with your fingers. Turn the stabilizer over, spray the second side with 505, and position your transformed fabric in the same manner.

505 Spray

Your project is now ready for stitching, which we will take up next time.

~~~~~~~~~~~~~~~~~~~~~~~~~~~~~~

Rene
Time Treasured

SaveSave

Quick Tips – How to Use Every Last Scrap of Solvy (WSS)

Sulky Solvy and other film-type water soluble stabilizers have wonderful recycling attributes. I use a lot of this stuff and always place the little leftovers into a glass jar. When the scraps start to add up, I do one of two things with them:

1) I iron small pieces together to make one new larger piece. To do this, I arrange the WSS scraps on parchment paper or a Teflon pressing sheet (you can also use a brown paper grocery bag) so that they all overlap and form a solid shape. I then place parchment paper over the scraps and press for about 8-10 seconds on a wool setting or until the pieces adhere to each other. Allow the parchment paper to cool before touching it.

or
2) I make Solvy soup by mixing the scraps with water. Here is the general recipe.

Ingredients:

About a 1 yard equivalent of WSS scraps
1/2 cup hot distilled water
2-3 tablespoons rubbing alcohol

Directions:

Place WSS scraps and hot water in a glass jar and shake well until dissolved. If the solution is to be stored, add the alcohol and keep the covered jar in your refrigerator.

To apply, dip a sponge brush or small paint brush into the WSS solution and paint onto your fabric. Allow to air dry or use a hair dryer to speed the process. When dry to touch, cover with a press cloth and quickly press with a dry iron to remove any remaining moisture. Stitch as usual and then remove WSS with water (I usually spritz it away).

~~~~~~~~~~~~~~~~~~~~~~~~~~~~~~

Rene
Time Treasured

Tool Trove (5) – Tri-Flow Superior Lubricant with Teflon

Tri-Flow

I learned about Tri-Flow years ago on an embroidery forum, and I’ve been using it ever since. If you suffer from skipped stitches when using fusibles or sprays, you will welcome this product to your studio. I always apply it to my needle when using the BSR attachment since this little gadget is very fussy when it comes to “stickies.”

The lubricant is also a great aide when doing free motion work at high speeds since it eliminates friction. Simply put a few drops on a Q-tip and coat your sewing machine needle. With fusibles, you may need to recoat the needle several times throughout the sewing session.

Although Tri-Flow is advertised for bicycles, bearings, and the movable parts on machinery, many sewing machine technicians use this product in their workshops. At home, you can clean your bobbin area (metal parts) with Tri-Flow and remove dirt and dust from the surrounding surfaces. It displaces moisture and prevents corrosion. If you use metal bobbins, you can coat the interior before winding them with thread.

However, Tri-Flow is NOT a replacement for your sewing machine oil. If your machine requires oiling, follow your manufacturer’s instructions and only use the sewing machine oil recommended in your manual.

You can find this product in bike shops, online, and at some sewing centers. For studio use, purchase the 2 ounce fluid (not the spray).

~~~~~~~~~~~~~~~~~~~~~~~~~~~~~~

N. Rene West
Time Treasured

April Showers

I’m taking a bit of a detour with this post so that I can share with you two special events that were supposed to happen in April. One will probably go as planned, but the other completely surprised all of us by happening a month early. Noah Christian, my new little grandson, decided March was a much better month to be born!So I’ve been busy making a few things to celebrate his arrival and the expected arrival of my other grandson later this month.

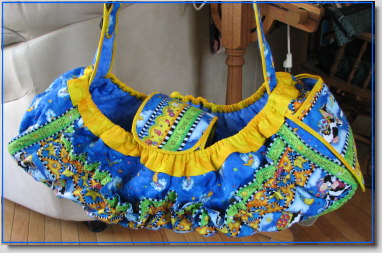
Baby Carrier

I designed this carrier for my daughter-in-law because her home office is upstairs. I placed elasticized pockets across both sides for bottles, pacifiers, toys, and all the other little items that babies need. For diapers and wipes, I put a large pocket on one end.

There is a safety belt in the middle and the strap is fully adjustable. I also included a swivel hook for a cell phone case or whatever else might be needed.

My other daughter-in-law loves Beatrix Potter so I made four sets of bibs and burp cloths for her. I still have quite a bit more to make, but I love every minute of it.

Saturday evening I spent painting (fabric and fiber, of course), snipping, fusing, and doing other fun stuff in the studio. The result was a very interesting “fabric” that I’m presently incorporating into a quilt. I should have a tutorial explaining the process posted in the next day or so. Until then, I hope you are busy creating lots of wonderful things!

~~~~~~~~~~~~~~~~~~~~~~~~~~~~~~

N. Rene West
Time Treasured

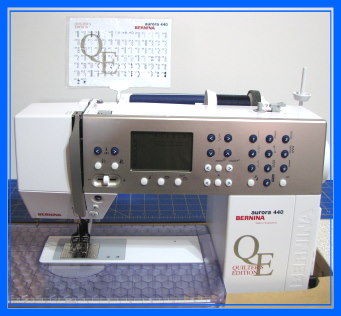
Tool Trove (3) – Twenty Things I Love About the Bernina Aurora 440 QE

Bernina Aurora 440 QE

There’s been a lot of interest in the Bernina Aurora 440 QE (Quilter’s Edition) from the time it entered the market place. The focus of all the attention rests on the BSR (Bernina Stitch Regulator) attachment. The 440 QE is not the only computerized free arm sewing machine that Bernina offers with this attachment, but it is a midrange Bernina machine, making it more widely available to those who can’t swallow the price of the 730 model or simply don’t need all the features that a top-of-the-line machine offers. (A friend of mine describes the price tags this way: “These are machines you drive home.”)

Although the BSR attachment is deserving of the attention it has received, the 440 QE offers sewers, quilters, fiber artists, and other artisans a host of other features worth noting. I can’t promise that this post will cover every single bell and whistle, but I will give you a list of my favorite things about this wonderful sewing and embroidery machine.

1. The Manual – Bernina writes a great manual that is detailed and easy to understand.

2. Reinforced Soft Cover – Bernina includes a carrying case with compartments for accessories.

3. Accessory Box – I love this thing. It attaches to the back of the machine for easy transport. It detaches for desk top use. There are compartments for bobbins, presser feet, sewing machine needles, and two drawers for other small parts.

4. Walking Foot – A two sole walking foot with seam guide comes standard with the machine.

5. Needle Threader – It works; what more can you ask for. (There are also three thread cutters on the machine.)

6. Clear Slide On Table – There are seam allowance markings on the table as well as a ruler in inches and centimeters. Although listed as optional, my machine came with a slide on seam guide that is fully adjustable the entire length of the table.

7. Bobbin Winder – Bernina makes a great bobbin winder with a separate motor. This one even has a little thread cutter on the on/off switch. A collapsible vertical spool pin on the right side of the machine makes winding bobbins while sewing or embroidering quite easy.

8. Cool Fluorescent Light – What a difference this makes. I’ve actually burned my hand from the heat buildup on other machines.

9. Manual Presser Foot Pressure Dial – This dial is on the head frame, making it easily accessible.

10. Free Hand System – My Bernina 1230 has this feature as well. With a little push from your right knee, the presser foot raises and lowers.

11. Horizontal and Vertical Spool Pins – Sewers need both and Bernina provides them.

12. Thread Tension Adjustment Wheel – I like having the ability to adjust the upper thread tension manually. I use many different threads and make adjustments frequently. I also like having the dial in constant visual range rather than having to open a menu to see what my tension is set at.

13. Push Button Feed Dog – The feed dog button is easily accessible from the lower right hand side of the machine.

14. Slide Speed Control – I use this feature constantly. It also works when winding bobbins and with the BSR attachment.

15. LCD Screen – The LCD screen displays a lot of important information while you’re sewing, such as needle position (there are eleven to choose from), stitch width and length, needle up/down position, recommended presser foot, presser foot pressure, stitch selection (there are 379), mirror image, pattern begin/end, BSR, memory display, service notifications, and more. It’s a lot to take in at first, but after a little use your eyes become trained and it all becomes second nature.

16. Memory – Up to 90 stitches, letters, or numbers can be saved in memory along with stitch length, stitch width, and needle position alterations.

17. Multiple Brand Sewing Machine Needles – You can use various brands of sewing machine needles. I mention this because it’s not true of all machines. I have a top-of-the-line machine manufactured by another company that can only use Schmetz needles.

18. Quick Reverse Button – Bernina has conveniently located this button in the lowest position on the front of the machine (above the needle), making a few quick reverse stitches super easy. A continuous reverse function is also available.

19. Stitch Selection Card with Holder – Sometimes the stitches displayed on the LCD screen don’t match up well with the actual stitch, so Bernina has included a double sided stitch card with a picture of each stitch and its corresponding number. The machine handle has a clamp that holds the card.

20. Versatility – This is the thing that I find most endearing about the 440 QE. For general sewing, the machine has all the features you need, along with a powerful motor. For quilting, the machine has 32 built in quilting stitches and comes with a walking foot, a real bonus. Of course, the star of the show is the BSR attachment.

Additionally, the 440 QE is an embroidery machine when purchased with the optional embroidery unit. You will often find that midrange sewing/embroidery machines come with smaller embroidery fields. Not this machine. The large (145 x 255 mm) oval embroidery hoop is standard.

One more optional feature is the Bernina Needle Punch Accessory Set. I just purchased this attachment a few days ago as a backup to my Babylock Embellisher and will do a review once I’ve had time to work with it.

There you have my twenty favorite things about this sewing machine. I believe it only fair to mention a few things that I wish were different. The extent of the stitch width is 5.5 mm. It would have been nice to have at least 6 mm if not 7 mm. Also, since this machine is named “Quilter’s Edition,” patchwork foot #57 with the side guide should be standard. Instead, Bernina packs it with the patchwork foot #37.

So much goes into the decision making process when shopping for a new sewing machine. Give a lot of thought to the features you really need and test different brands and models. Also, visit online groups that focus on the machines in which you are interested. Here are the addresses for the Bernina Aurora 440 QE Yahoo groups:

http://groups.yahoo.com/group/Bernina_Aurora/
http://groups.yahoo.com/group/BSRfunction/

And now a little about the BSR. Whenever you try something new, it’s going to be a little awkward at first. If you’ve done any amount of free motion quilting, you know that a certain feel and rhythm develops over time. The BSR has its own feel and rhythm. The more you use it, the more accustom you become to it. At first, I considered it akin to training wheels on a bike. However, I now find myself using it more and more.

If you’ve been given the impression that it always makes perfectly even stitches, let me disabuse you of that idea. The human factor remains. If you jerk your hands you will have jerky looking stitches. However, if you keep a nice even flow to your movements, you will be rewarded with some of the nicest looking quilting stitches around.

The BSR does have a few quirks. It hates basting sprays, some more than others. I can get away with a light touch of 505, but anything else and I’ll have skipped stitches. Some have found that the BSR works best with top stitching needles. Others think it works best with silk thread. I have used Organ sharps with cotton quilting threads of different weights quite successfully, making tension adjustments along the way (it helps to make a chart of needles, threads, and tension adjustments).

The BSR that comes with the Aurora 440 QE only does straight stitches. The BSR included with the 730 also does free motion zig zag stitches. Personally, I don’t think I would use it for zig zag stitches even if had that capability, but it’s something to consider. There are two modes of operation to choose from and three free motion feet included with the attachment.

I hope you find this information helpful. If you’re interested in this machine, please visit your local Bernina dealership and give this fine machine a trial run.

~~~~~~~~~~~~~~~~~~~~~~~~~~~~~~~

N. Rene West
Time Treasured

Fabrications – Pretty in Pink (part two)

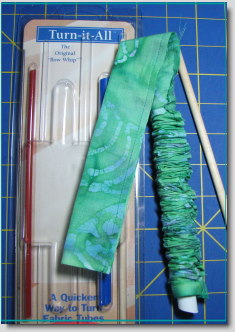
When the quilting stage was complete, I picked out a green batik fabric for the stem of my flower and for the decorative ruched trim. Both of these were constructed the same way. For the stem, I cut a bias strip of fabric 1 1/4 inches wide. For the ruched trim, I cut a strip on the cross grain 3 inches wide. After folding the strips right side together, I sewed a 1/4 inch seam down the length of the strip. I then turned the strips right side out using a tube turner and pressed them, centering the seam line on the back side.

Tube Turn

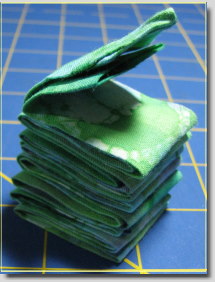
To form the ruching, I accordion folded the strips about every inch.

Accordion Folded Tube

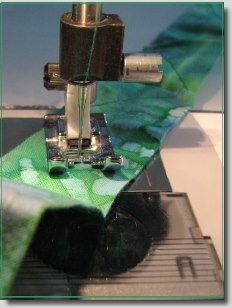
I then set up my sewing machine with a straight stitch at 4.5 mm in length. Starting at one corner, I sewed diagonally from fold to fold (a zig zag pattern), letting my stitches comes as close to the edge as possible without leaving the fabric.

Sewing Zig Zag Pattern

When I completed the stitching, I then took one thread tail in hand and gently pulled on it while pushing the fabric in the opposite direction. I continued doing this until the complete strip was gathered and ruched.

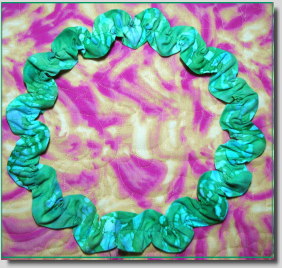
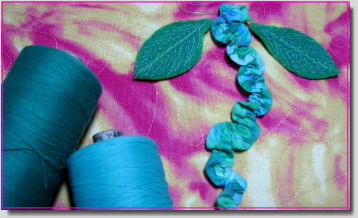
Ruched Tube

With the flower and stem complete, I now moved on to the leaves. Using green craft felt, I cut a 4-inch square and backed it with Decor Bond. I then used a fabric pen to draw two basic leaf shapes on the felt. I wanted my leaves to have the same coloring as the stem, so I picked out a few thread colors that matched the batik fabric. Starting with the darkest shade, I thread painted the interior leaves. I then detailed them with the lighter colors.

Leaves

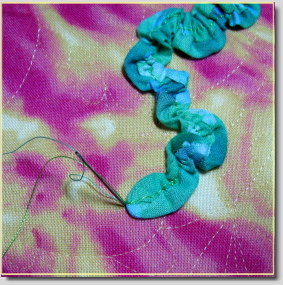
My flower was now ready to be placed on the quilted fabric. First, I positioned the ruched stem and lightly tacked it down with a dab of fabric glue here and there. Next, I placed the leaves in position the same way. I then threaded a hand sewing needle with the tail of thread from the tip of the ruched stem and brought it to the back side, where I secured it with a knot.

Thread Tail

Finally, I attached the flower. When all was in place, I hand stitched the whole composition from the back side, bringing this project to completion.

I hope you will try some of these techniques in the near future. These little flowers are wonderful on prom dresses, hats, handbags, and other similar items. Have fun!

~~~~~~~~~~~~~~~~~~~~~~~~~~~~~~~

N. Rene West
Time Treasured

Fabrications – Pretty in Pink (part one)

Pretty in Pink

The temperature is supposed to reach 60 degrees here today and I’m thinking flowers! For this project I chose a commercial pink print that kept most of its color on the back side.

Fabric

Using a rotary cutter with a pinking blade, I cut a bias strip of fabric 1 1/2 inches wide.

Bias Cut Strip

Next, I set up my sewing machine with a straight stitch at 3 mm and attached a gathering foot. Generally, the longer the stitch length, the greater the gathers. A little trick I use is to put my finger behind the foot as I’m sewing and gently give the fabric feed a little resistance. This foot is easy to use and always does what it was designed to do.

Gathering Foot

To form the flower, I folded right sides together at the stitch line and finger pressed the fabric. I then held one end with my fingers and began wrapping the folded, gathered fabric around the center. When the flower reached the size I desired, I clipped off the remaining fabric strip.

Rolling the Flower

To keep the flower together, I threaded a needle and hand sewed the back, using large stitches.

Back of Flower

I then cut a round piece of craft felt a little smaller than the circumference of my flower and glued it to the back with fabric glue. That completed the flower.

Felt on Back

Flower Front

I then cut my main fabric the size I needed for my project. I backed it with Decor Bond and a thin quilt batting. After threading my sewing machine with a matching thread, I lowered the feed dogs and free motion quilted the top, using a floral design that I thought up as I stitched.

Free Motion Qullting

In part two, I’ll share with you how I made the ruched stem and trim, and the thread painted leaves.

Note: Some of you have asked about the Bernina Aurora 440 QE. I hope to write a little review of this wonderful machine in the next few days . Hang in there!

~~~~~~~~~~~~~~~~~~~~~~~~~~~~~~~

N. Rene West
Time Treasured

Tool Trove (2) – The Happy Union of Needle and Thread

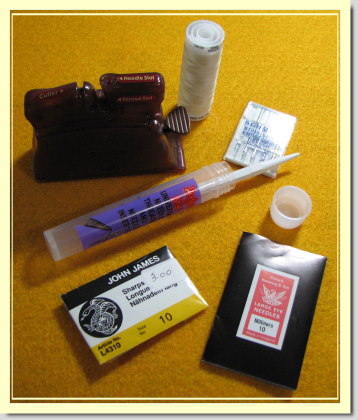
Needle Threaders

Quilters and fiber artists love their tools. They love buying them, talking about them, and most of all using them. Even those little tools that most of us take for granted can be pretty exciting for someone who didn’t know such a thing was available. Also, we’ve all made purchases that we regretted later. So when a friend or acquaintance recommends something, we feel a little safer parting with our money.

I realize that needle threaders don’t conjure up the same interest as the Babylock Embellisher, but they play a very important role in the studio. My favorite two are pictured above, and I don’t know what I’d do without them.

The first is manufactured by Clover. You place your hand sewing needle head first into the needle slot provided on the top. Next, you drape your thread through the thread slot. To the right you will see a little spring handle that you push down, resulting in a threaded needle. There’s even a thread cutter to the left of the needle slot. All parts are clearly marked. Occasionally, there’s a needle with too small an eye, but for the most part the Clover does a great job. You can find this tool online or at most fabric and quilting stores.

An even more versatile little tool is the Universal Needle Threader and Needle Inserter. Manufactured in Australia by Perfect Sew, this needle threader works on hand needles, sewing machine needles, and serger needles. Even though many of us have high tech machinery in our studios, there are times when built in needle threaders do not work owing to the interference of a particular presser foot or to the wire bending and missing the hole. (I have one machine that this happens to frequently.) This tool comes to the rescue every time. Eventually, the little wire on this tool does break, but all is not lost; you still have a needle inserter. I purchase this tool at Nancy’s Notions.

~~~~~~~~~~~~~~~~~~~~~~~~~~~~~~~

N. Rene West
Time Treasured

How To Make Ribbon Trim to Match Your Projects

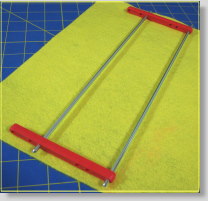
Hairpin Lace Maker

Do you know what this is? To be perfectly honest, I had to go by the craft store where I originally purchased it to find out myself. I often shop with an eye as to how something can be used rather than what the manufacturer intended. In this case, the picture above is of a hairpin lace maker. I’ve never made hairpin lace and I doubt I ever will, but I have found a great use for this simple little tool.

Notice the holes on the red side pieces. The metal tubes can be adjusted, creating several different widths. When I saw this tool hanging next to the crochet hooks, I knew I had found the perfect trim maker!

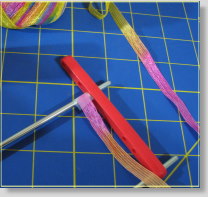
Here is how I make special ribbon trims to coordinate with my designs. First, I decide how wide I want my ribbon and adjust the metal tubes on the hairpin lace frame. Next, I tape the end of the ribbon to one of the metal tubes near the red tube holder but not so close that it will interfere with the presser foot.

Secured Ribbon

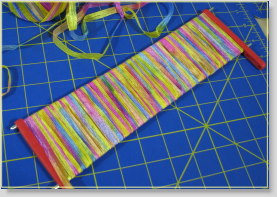
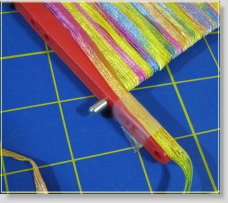
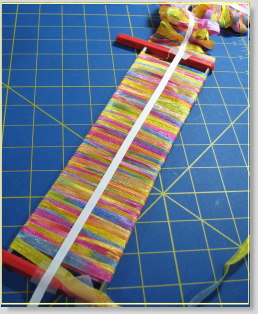
With ribbon end secure, I now wind the ribbon around the tubes, overlapping each ribbon about 1/4″. When I reach the end, I tape the ribbon tail to the red holder.

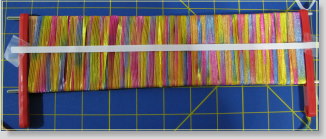
Wrapped Ribbon

Secured Ribbon End

After checking the ribbon to make sure there are no gaps, I then tape twill tape along the entire length of the wrapped ribbon. Do not cut the twill unless you only need your trim one length of the tubes. Just let it hang over the edge.

Twill Tape

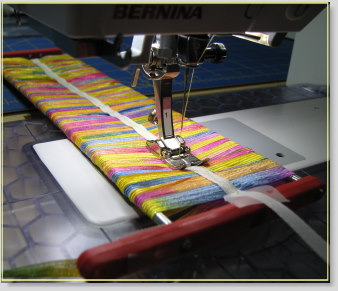
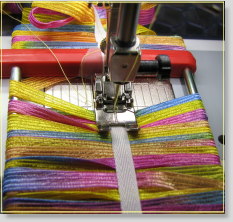
I set my sewing machine on a straight stitch at 2.5 mm and use a bobbin thread that matches my ribbon. With presser foot raised, I carefully position the ribbon so that the twill tape is centered under the needle. With my left hand, I pull gently pull the ribbon towards me (just a little) so that the needle comes down right before the ribbon starts. It’s a good idea to take a few securing stitches.

I then sew all the way to the other end of the ribbon and take a few more securing stitches.

Sew End to End

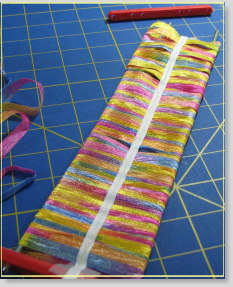
I now remove the red tube holder from the end where I began and slip the sewn ribbon off of the tubes.

Remove Red Tube Holder

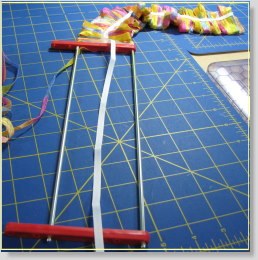
When I come to the end, I replace the red tube holder and start the process all over again, securing the loose ribbon with a small piece of tape. (Do not cut the ribbon from the previous length; just tape it.)

Slide Ribbon Off Tubes

When I have completed wrapping the ribbon, I take the twill tape that is hanging from the previous length and tape it end to end and sew down the middle once again.

Rewind Ribbon

Begin Second Length

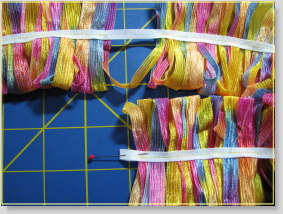
I do this over and over again until I have the length that I desire. I then locate all the gaps, fold them right sides together, pin, and sew a seam close to the ribbon. After the gaps are taken care of, I dab a little fabric glue on each seam extension (the little loops I just sewed) to flatten the twill tape.

Sew Gaps

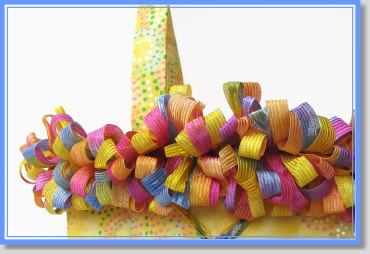
I now have a beautiful piece of ribbon trim that perfectly matches my project design!

Completed Trim

~~~~~~~~~~~~~~~~~~~~~~~~~~~~~~~

N. Rene West
Time Treasured

« Older entries