Fabrications – Pretty in Pink (part one)

Pretty in Pink

The temperature is supposed to reach 60 degrees here today and I’m thinking flowers! For this project I chose a commercial pink print that kept most of its color on the back side.

Fabric

Using a rotary cutter with a pinking blade, I cut a bias strip of fabric 1 1/2 inches wide.

Bias Cut Strip

Next, I set up my sewing machine with a straight stitch at 3 mm and attached a gathering foot. Generally, the longer the stitch length, the greater the gathers. A little trick I use is to put my finger behind the foot as I’m sewing and gently give the fabric feed a little resistance. This foot is easy to use and always does what it was designed to do.

Gathering Foot

To form the flower, I folded right sides together at the stitch line and finger pressed the fabric. I then held one end with my fingers and began wrapping the folded, gathered fabric around the center. When the flower reached the size I desired, I clipped off the remaining fabric strip.

Rolling the Flower

To keep the flower together, I threaded a needle and hand sewed the back, using large stitches.

Back of Flower

I then cut a round piece of craft felt a little smaller than the circumference of my flower and glued it to the back with fabric glue. That completed the flower.

Felt on Back

Flower Front

I then cut my main fabric the size I needed for my project. I backed it with Decor Bond and a thin quilt batting. After threading my sewing machine with a matching thread, I lowered the feed dogs and free motion quilted the top, using a floral design that I thought up as I stitched.

Free Motion Qullting

In part two, I’ll share with you how I made the ruched stem and trim, and the thread painted leaves.

Note: Some of you have asked about the Bernina Aurora 440 QE. I hope to write a little review of this wonderful machine in the next few days . Hang in there!

~~~~~~~~~~~~~~~~~~~~~~~~~~~~~~~

N. Rene West
Time Treasured

Fiber Folio – A Yarn’s Life (part two)

Stencil Outline

Taking another stencil, I repeated the previous process, only this time I turned the stencil diagonally to add a little visual interest to this simple design.

Tacking Stitches

Yarn Cross

I wanted a different look for this piece, so I used the braiding technique that I posted in an earlier tutorial. Using two skeins of Neon Felt It, I tacked down the beginning edges of the yarn and then crossed the yarns every three stitches.

Braid Complete

The colorful variegations combined with the curves of the design resulted in a piece that needed no added embellishment. That being said, I do think a little stippling or meandering inside the curves with a specialty thread might also be nice. If it were the surface of a quilt, I might add a different fabric inside each space delineated by the curves (and I would use a different fiber for the braiding, possibly silk).

Felted Flowers

With yarn to spare, I moved on to a completely different project. I had some needle felted flowers that I had made previously using the technique from Natural Blooms.

Felted Sprial Flowers

I set up the Babylock Embellisher with three needles. Next, starting in the center of the flower, I tacked down the edge of the yarn. Then I slowly moved in a spiral pattern, lightly felting the yarn to the flower.

Felted Petals

For the petals, I simply looped the yarn and continued felting. When the flower was complete, I tucked the tail of the yarn under some previous felting and did a quick tack down.

Felted Flowers

Don’t these look like decorated sugar cookies? In the second flower, I skipped the spiral center, felted the petals, and then tacked down cut pieces of yarn. A little fluffing and my flower was finished.

Knitted Scarf

This yarn was just too pretty to put away, so out came the needles and you know the rest of the story.

~~~~~~~~~~~~~~~~~~~~~~~~~~~~~~

N. Rene West
Time Treasured Read the rest of this entry »

Fiber Folio – A Yarn’s Life

Yarn

I found these skeins of spun wool roving at the store last week. With a name like “Felt It,” I knew I had to take them home with me. I immediately saw their potential as detail yarns in needle felting projects, but I knew they would surprise me with many other talents as well.

Recently, I had been looking at all those old quilt stencils hanging on the back of the studio door. If you’ve been quilting for any amount of time, you probably have a collection of them yourself. So I took a few off the rack and decided to put them to work.

Stencil

First, I cut two pieces of 100% wool fabric that had already been through the fulling process in my washing machine. Taking the first stencil and a #2 pencil, I lightly outlined the design onto the wool.

Felted Stencil Design

Next, I took the “Wildflowers” yarn and needle felted it along the outline with the Babylock Embellisher.

Machine Stitch

The felted design looked rather nice just as it was, but I wanted to play with it a little more. I chose a decorative stitch (#113 on the Bernina Aurora 440 QE) and stitched around the felted outline, using a royal blue 40 wt. matte embroidery thread. What a dramatic difference that made! Not quite ready to call it a day, I then took some Czech glass beads and attach them to the outline by machine.

Bead Work

Attaching beads by machine can be a little tricky at first. For this project, I set my machine on a blanket stitch (the stitch often used around appliques) and counted four left swings of the needle, setting my bead inside the presser foot (a Babylock braiding foot) at the beginning of the fifth swing. Using my right hand to turn the wheel, I carefully guided the needle into the hole of the bead and back to the right again and continued this way until I had completed the full design. I could have chosen to attach the beads by hand, but I thought the blanket stitch might work well with this particular design.

I was pleased that I had found a secondary use for the quilting stencils. Although I worked on wool yardage, the process would be the same on the surface of a quilt. Such wonderful textures can be created playing around with this technique.

Knitted Scarf

With quite a bit of the skein left, this yarn still had work to do. I paired it up with a furry little novelty yarn that matched perfectly and began knitting a scarf. It was pure pleasure.

(to be continued)

~~~~~~~~~~~~~~~~~~~~~~~~~~~~~~~

N. Rene West
Time Treasured

Tool Trove (2) – The Happy Union of Needle and Thread

Needle Threaders

Quilters and fiber artists love their tools. They love buying them, talking about them, and most of all using them. Even those little tools that most of us take for granted can be pretty exciting for someone who didn’t know such a thing was available. Also, we’ve all made purchases that we regretted later. So when a friend or acquaintance recommends something, we feel a little safer parting with our money.

I realize that needle threaders don’t conjure up the same interest as the Babylock Embellisher, but they play a very important role in the studio. My favorite two are pictured above, and I don’t know what I’d do without them.

The first is manufactured by Clover. You place your hand sewing needle head first into the needle slot provided on the top. Next, you drape your thread through the thread slot. To the right you will see a little spring handle that you push down, resulting in a threaded needle. There’s even a thread cutter to the left of the needle slot. All parts are clearly marked. Occasionally, there’s a needle with too small an eye, but for the most part the Clover does a great job. You can find this tool online or at most fabric and quilting stores.

An even more versatile little tool is the Universal Needle Threader and Needle Inserter. Manufactured in Australia by Perfect Sew, this needle threader works on hand needles, sewing machine needles, and serger needles. Even though many of us have high tech machinery in our studios, there are times when built in needle threaders do not work owing to the interference of a particular presser foot or to the wire bending and missing the hole. (I have one machine that this happens to frequently.) This tool comes to the rescue every time. Eventually, the little wire on this tool does break, but all is not lost; you still have a needle inserter. I purchase this tool at Nancy’s Notions.

~~~~~~~~~~~~~~~~~~~~~~~~~~~~~~~

N. Rene West
Time Treasured

Felted Finery – Leaves by the Season

Felted Leaves

Several years ago I ordered a product online that I would like to share with you. I was looking for a light weight embroidery stabilizer that I could use in the studio for test samples, meaning something that was sold in large quantities at a reasonable price. Somehow I ended up on a web site (Cariff) that sold engineered fabric for landscaping. However, they also offered a product for embroidery that peaked my interest. It was available in several weights, the lightest being 0.5. I took a chance and ordered a large roll. Thankfully, it was exactly what I had been looking for.

When I first started needle felting with the Babylock Embellisher, wash away stabilizers such as Vilene were the standard. One day the idea came to me to try the light weight stabilizer. I feared it might be too light and tear. To my surprise, it worked extremely well and never seemed to weaken. I have used this product in the project below and have posted the company information on the Fiber Art Resources page in the sidebar.

There are several advantages in using this product. (1) It’s so light weight that it disappears into the felting, yet it’s strong enough to withstand the countless punches of the barbed needles. (2) You don’t have to wash your project to remove anything. (3) It’s inexpensive, especially when compared to the price of Vilene.

Now to the project. Using a stabilizer of your choice, secure it in a small embroidery hoop. You may like to draw a leaf shape on the stabilizer or just freehand cut a leaf when the needle felting is complete. To begin, simply take a small amount of roving and place it in the middle of your stabilizer. (I usually start with the darkest shade of the colors I’m going to be working with.) Take a few tack down stitches and then slowly start felting. There’s no need to overdo it. (Notice the sheer quality of the light weight stabilizer.)

Start of Roving

Once the roving is secure, remove the stabilizer from the hoop and turn it over to the back side. Reposition it in your hoop. Place another small amount of roving over the area where you previously felted and repeat the process. You may like to change to a lighter color.

Felting the back side

Continue flipping your work back and forth, layering small amounts of roving until you’re happy with the result. Consider using some Angelina or other special fiber. As a final step, needle felt around the edges using a wavy motion just to make sure all fibers are completely felted.

Fall colors

Take a look at both sides of the piece and decide which one you like best. At this point you can embellish the leaf with some free motion machine stitching or felt some thin veins with pieces of yarn. You can cut your leaf before or after you embellish it – the choice is up to you. Simply cut away all remains of the surrounding stabilizer.

This process can be used for all kinds of shapes, not just leaves. Experiment, experiment, experiment!

~~~~~~~~~~~~~~~~~~~~~~~~

N. Rene West
Time Treasured

Felted Finery – Sand Dollar Shallows

This piece of needle play is difficult to categorize. True, it does involve needle felting silk to silk. However, it also involves free motion embroidery and a little trapunto. So, it really belongs in Fabrications as well. That said, here is a helpful lesson on all of the above.

Marked Silk

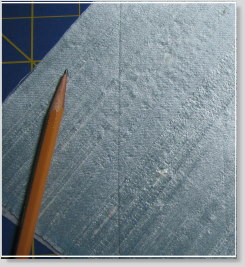
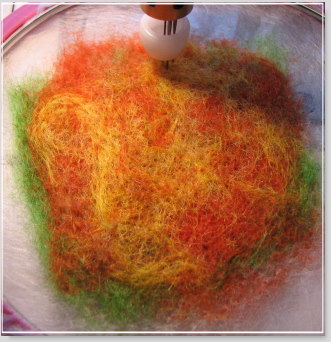
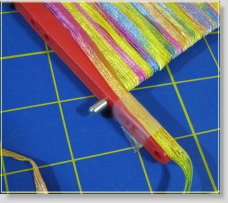
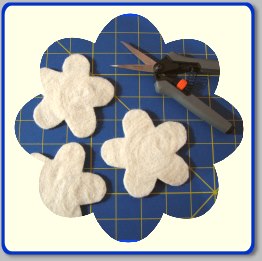
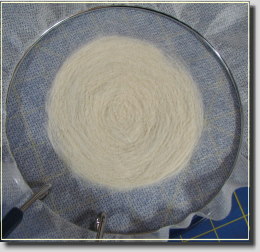
Starting with a piece of silk dupioni (any size you want), stabilize it with a heavy fusible stabilizer. I used Decor Bond. Draw some diagonal lines with the light stroke of a pencil or any marker of your choice. Next, cut some freehand circles out of a contrasting color of silkdupioni, varying the sizes for more visual interest.

Silk Circles

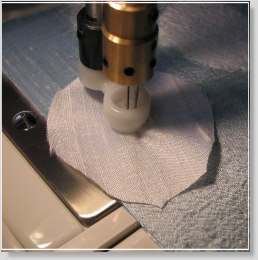
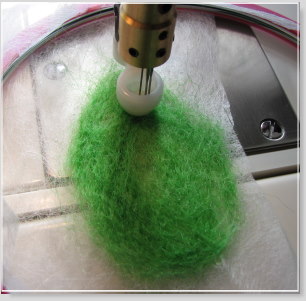
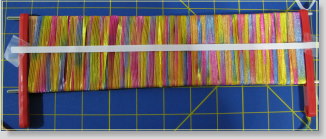
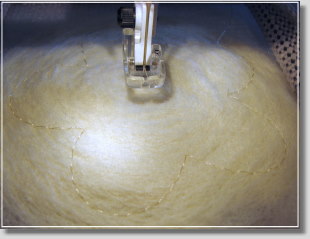
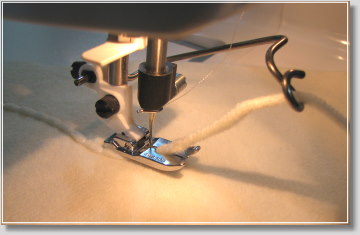
Place one of your circles of silk at the beginning of a pencil line. Using about three needles in your Babylock Embellisher (or other needlepunch machine), tack down the first circle in the center.

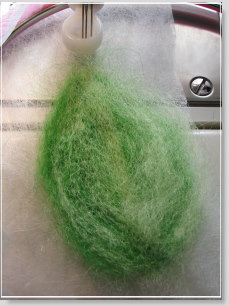
Slowly begin working your way around the silk, lightly securing it with your fingers so that it doesn’t form folds. It helps to felt a cross pattern after the tack down and then continue felting the circle until complete. Your goal here is texture; a light felting is all that is needed.


Continue felting circles, alternating their sizes. Don’t worry about the distortion in the base fabric. The next step will take care of it.

Garnet Stitch

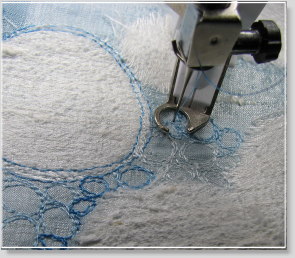
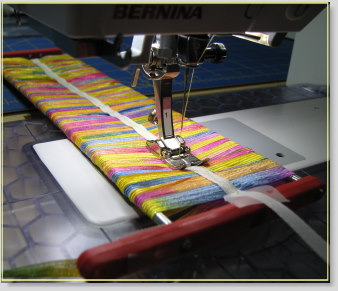
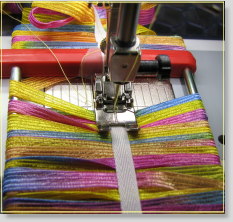
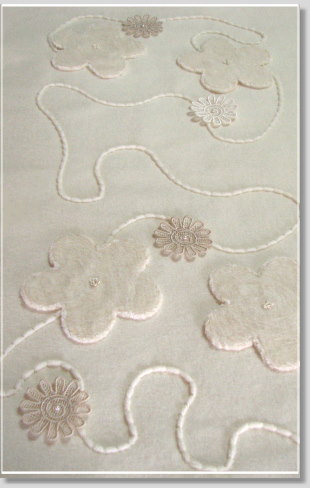
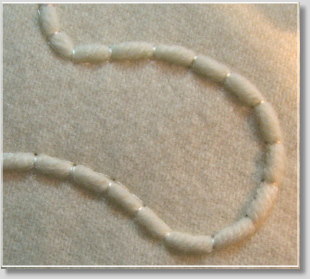
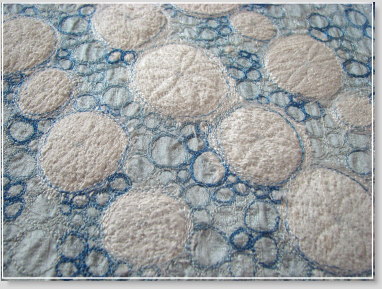
When your circles are complete, thread your sewing machine with some variegated rayon thread and attach a free motion foot. Drop the feed dogs. To form the appearance of water, you are going to embroider the surface around the silk circles with a garnet stitch. This versatile stitch is fun to create and easy to do.

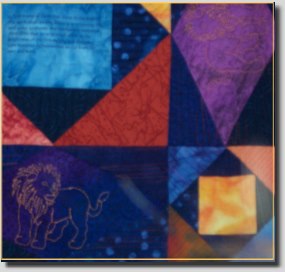
Using a straight stitch setting, begin making circle shapes with the needle. Go around and around, stitching over the previous round of stitches. When you are satisfied with the circle’s appearance, move on to the next circle. Vary the sizes, making some small, some large, and some in between. Within a few minutes you will feel like an expert at the garnet stitch. This wonderful stitch can be used for adding detail to animals, birds, reptiles, insects, flowers, leaves, water, rocks, and a myriad of other things.

Garnet Stitches Complete

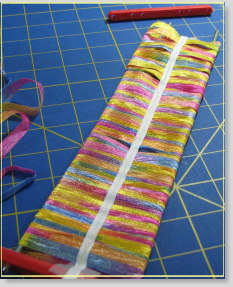
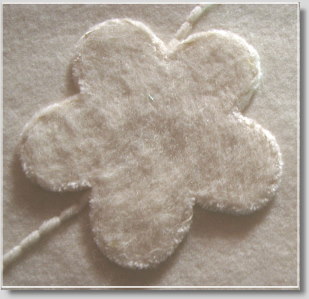
When you have completely filled the background fabric with garnet stitches, thread your machine with a rayon thread the color of your silk circles. Using the same method, stitch around the circumference of each circle until all frayed edges are covered with stitches.

Batting Circles

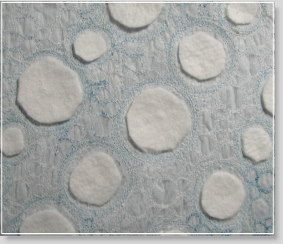
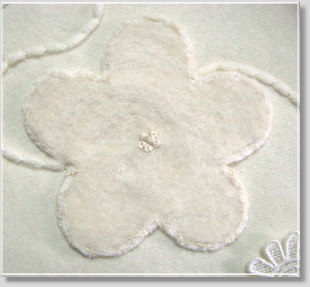
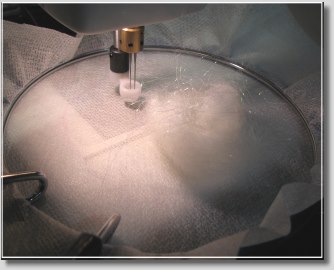
You now have a relatively flat background with rows of circular “puffs.” Turn your piece over to the wrong side. With scraps of cotton batting, cut freehand circles a little smaller than each of your silk circles. Use a very light dab of Glue Pins or a similar water soluble product to attach them to the underside of each circle.

Sand Dollar Motif

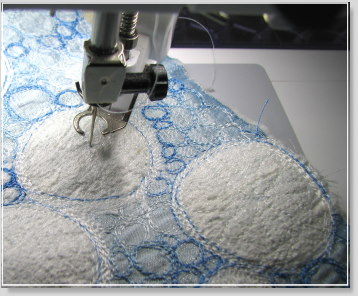
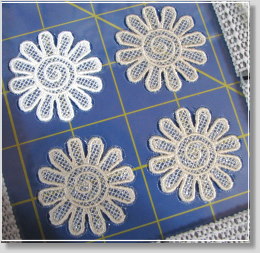
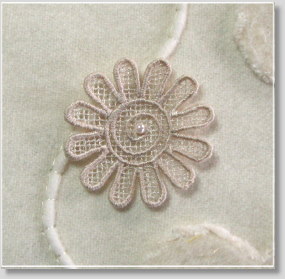
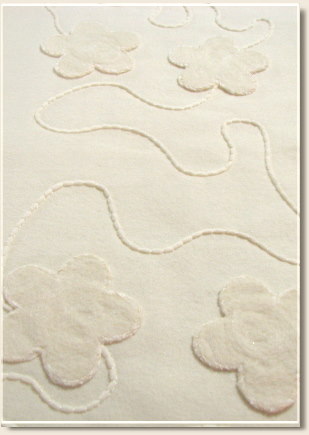
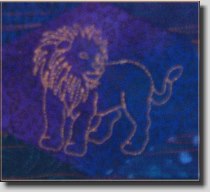
Turn your fabric to the right side and return it to the sewing machine. With the same thread and settings, lower the needle into the middle of a silk circle. Sew a few securing stitches and cut your tread tail. Now free motion stitch a sand dollar design (or any design of your liking) over the surface of the silk circle. Repeat with each circle until finished.

Sand Dollar Close Up

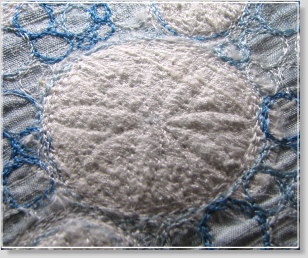
When I completed my piece, I auditioned several different beads that I thought would look nice in the center of the sand dollars. However, I found that the wonderful surface texture created by these methods needed no further embellishment.

Completed Design

I hope you will experiment with this exercise and use the methods in larger works. Silk is an excellent choice when texture and sheen are required. Needle felted silk increases the textural quality of your work and can add realism to individual elements.

Note: I chose blue and white for this project because blue, white, and grey are Project Spectrum’s color choices for February and March. If you’re not familiar with Project Spectrum, click on the banner in the side bar and visit their website.

~~~~~~~~~~~~~~~~~~~~~~~~~~~~~~

N. Rene West
Time Treasured

How To Make Ribbon Trim to Match Your Projects

Hairpin Lace Maker

Do you know what this is? To be perfectly honest, I had to go by the craft store where I originally purchased it to find out myself. I often shop with an eye as to how something can be used rather than what the manufacturer intended. In this case, the picture above is of a hairpin lace maker. I’ve never made hairpin lace and I doubt I ever will, but I have found a great use for this simple little tool.

Notice the holes on the red side pieces. The metal tubes can be adjusted, creating several different widths. When I saw this tool hanging next to the crochet hooks, I knew I had found the perfect trim maker!

Here is how I make special ribbon trims to coordinate with my designs. First, I decide how wide I want my ribbon and adjust the metal tubes on the hairpin lace frame. Next, I tape the end of the ribbon to one of the metal tubes near the red tube holder but not so close that it will interfere with the presser foot.

Secured Ribbon

With ribbon end secure, I now wind the ribbon around the tubes, overlapping each ribbon about 1/4″. When I reach the end, I tape the ribbon tail to the red holder.

Wrapped Ribbon

Secured Ribbon End

After checking the ribbon to make sure there are no gaps, I then tape twill tape along the entire length of the wrapped ribbon. Do not cut the twill unless you only need your trim one length of the tubes. Just let it hang over the edge.

Twill Tape

I set my sewing machine on a straight stitch at 2.5 mm and use a bobbin thread that matches my ribbon. With presser foot raised, I carefully position the ribbon so that the twill tape is centered under the needle. With my left hand, I pull gently pull the ribbon towards me (just a little) so that the needle comes down right before the ribbon starts. It’s a good idea to take a few securing stitches.

I then sew all the way to the other end of the ribbon and take a few more securing stitches.

Sew End to End

I now remove the red tube holder from the end where I began and slip the sewn ribbon off of the tubes.

Remove Red Tube Holder

When I come to the end, I replace the red tube holder and start the process all over again, securing the loose ribbon with a small piece of tape. (Do not cut the ribbon from the previous length; just tape it.)

Slide Ribbon Off Tubes

When I have completed wrapping the ribbon, I take the twill tape that is hanging from the previous length and tape it end to end and sew down the middle once again.

Rewind Ribbon

Begin Second Length

I do this over and over again until I have the length that I desire. I then locate all the gaps, fold them right sides together, pin, and sew a seam close to the ribbon. After the gaps are taken care of, I dab a little fabric glue on each seam extension (the little loops I just sewed) to flatten the twill tape.

Sew Gaps

I now have a beautiful piece of ribbon trim that perfectly matches my project design!

Completed Trim

~~~~~~~~~~~~~~~~~~~~~~~~~~~~~~~

N. Rene West
Time Treasured

Felted Finery – Natural Blooms (Part Three)

With the basic structure of this piece complete, I now had to decide whether I liked it just as it was or whether a few additional embellishments were in order. I leaned more towards the latter and thought a few small embroidered flowers might be a nice addition.

Embroidered Flowers

I chose a freestanding lace flower (purchased from Embroidery Library) and prepared my 100 mm hoop with some heavyweight clear wash away stabilizer. Since the flowers only measured 45 mm each, I was able to embroider all four with one hooping. I removed the flowers from the stabilizer and gave them a quick soak in some warm distilled water. Most American homes deal with some degree of hardness in their water, which can effect the removal of wash away stabilizers. I bypass the whole conversation and just use inexpensive distilled water with perfect results every time.

Flower with Bead

When the embroidered flowers were dry, I began moving them around on the surface until I was happy with their placement. I then threaded a thin sewing needle with regular polyester sewing thread and attached each little flower with a small pearl bead.

French Knots

I wanted to give the felted flowers a little more dimension as well, so I threaded a tapestry needle with 6 strands of silk floss and made six french knots in the center of each one. And with that, Natural Blooms was complete.

Natural Blooms Completed

~~~~~~~~~~~~~~~~~~~~~~~~~~~~~~~

N. Rene West
Time Treasured

Tool Trove (1) – The Babylock Embellisher

BabyLock Embellisher

Several companies produce needle felting or embellishing machines and the list is slowly growing. I use the Babylock Embellisher in my studio along with a hand felting needle tool that holds up to six felting needles. The hand tool is useful for detail work as well as preparation work on a piece that will be finished with the Embellisher.

When the Babylock first hit the market, my local quilt shop put one on the floor for demonstrations. The samples produced consisted of fabric with a few yarns and ribbons. I must confess, I watched the demonstration and thought, “Why would anyone pay over $1000 to needle couch a few decorative yarns to some fabric?” Well, as it turned out, this machine was capable of doing a whole lot more than that.

Months later, I ran into a fiber artist friend of mine who had recently purchased the Embellisher and was producing beautiful art-to-wear and wall hangings using this incredible machine. I stood mesmerized before her work and knew that I had to have one. Within twenty-four hours I visited my local dealership and made an offer on a new machine. At the time, these machines weren’t exactly flying off the shelves so the dealer accepted my offer.

The Babylock, a stand-alone machine, uses 7 barbed needles that enter seven small holes in the throat plate. The needles catch fiber from the top layer and pull it down to the bottom layer, eventually creating a meshed double-sided fabric. The Embellisher allows you to use anywhere from one to seven needles at a time. Replacement needles are available through dealerships at about $3 a pop, something to think about during the decision making process. Necessity being the mother of invention, some clever owners have cut hand felting needles to size and used them in the Embellisher quite successfully. You can even order cut needles online at substantial savings.

Since its entry into the market, the Babylock Embellisher has dropped in price. If you are interested in this machine, visit a Babylock dealer and don’t be afraid to negotiate the price. Do give some consideration to the importance of warranties and dealerships. Dealers often offer free classes with the purchase of a new machine. Additionally, they offer support when you have a problem (and this is no small thing).

The rising interest in needle felting has not gone unnoticed by Babylock’s competitors. Bernina sells a Decorative Needlepunch Attachment for some of their CB Hook sewing machines. I’m considering purchasing the attachment as a backup to my Embellisher. Brother also sells an attachment for some of their machines Janome offers a stand-alone felting machine, and in the latest Nancy’s Notions catalog, Nancy Zieman lists a Sewing With Nancy Fab Felter for $299.00. Another company listed below sells a battery operated machine as well as a universal attachment (I have no familiarity with these products).

Here is a list of online sites that provide helpful information regarding felting machines and felting attachments. The list is neither complete nor comprehensive. I simply offer it as a starting point for those who have written me requesting information on this subject.

http://www.babylock.com/sewing-embroidery/product.asp?Product_ID=EMB7

http://www.babylock.com/embellisher/

http://www.berninausa.com

http://www.janome.com (Xpression Needle Punch Felting Machine)

http://fiberella.com/

http://nancysnotions.com

http://www.tryourdesigns.com/felting_machines.htm

http://www.feltcrafts.com/index.htm

There is also a yahoo group dedicated entirely to the Babylock Embellisher. You can join the group at this address:

http://groups.yahoo.com/group/BabyLockEmbellisher/

A great way to do research before purchasing any machine is to join a yahoo group whose members already own the particular machine in which you are interested. By doing this, you will gather a wealth of information and reduce your frustration level when you actually make the purchase. You’ll also make some new friends who share your interests.

~~~~~~~~~~~~~~~~~~~~~~~~~~~~~~

N. Rene West
Time Treasured

Felted Finery – Natural Blooms (Part Two)

With four felted circles completed, I was now ready to begin embroidering the flower outline that I had previously digitized for this project. The flowers measured 90mm and the stabilizer was already part of the felting process, so all I had to do was hoop each circle and push the start button.

Embroidery Outline

After the outlines completed stitching, I took by little pair of Fiskars clippers and began carefully cutting out each flower just inside the stitching line. This is easy to do and results in tidy shapes every time. Also, all those little pieces that fall away as I cut can be gathered up for another project, such as a little felted flower embellishment. This process could also be accomplished with a template and a fabric marking pen, so an embroidery machine isn’t an essential part of the method.

Cut Flowers

Once the flowers were completely cut out, I flipped them to their reverse sides, which now became their front sides. Felting produces a two-sided fabric; one side will be more textured than the other. Usually the reverse side has a smoother appearance, and this was the look I desired for my flowers.

Next, I picked out a medium weight chenille yarn that was wrapped in rayon thread. Rather than couching or machine felting the yarn, which would have changed its appearance, I chose to attach it to the edges of my flowers with a light touch of permanent fabric glue (easily accomplished with a thin bamboo stick).

Edge Embellishment

For the base fabric, I chose natural 100% wool yardage that had been previously felted in the washing machine. This piece will eventually become a handbag, so I backed it with Decor Bond, a heavy fusible stabilizer.

I auditioned several yarns for the couched vines, but finally decided upon an Italian cable twist wool, liking its round quality. I then attached a braiding foot and a braiding guide to my sewing machine and threaded it with a natural color rayon thread. The braiding guide is optional but it sure helps. I used the following machine settings:

Stitch – Blanket Stitch
Stitch Length – 4.5mm
Stitch Width – 4.0mm
Upper Tension – 2.6

Braiding Foot and Guide

I could have sketched a winding pattern to follow on the base fabric, but instead I just took my time and formed winding curves as I stitched. The beginning and ending stitches were deliberately placed so that a flower would cover them. After completing the couching, I gently brushed the yarn towards the stitching so that the one-sided straight stitches were covered.

Couched Wooll Cable

I placed the first two flowers over the beginning and ending stitches, measured their edges from the side of the fabric to make sure there was plenty of seam room (about a 2 inch allowance), and then placed the remaining two flowers here and there until I found positions that visually pleased me. Again, I didn’t want to change their appearance in any way by machine felting them, so I attached them with fabric glue.

In part three, my natural blooms will receive some additional embellishments.

~~~~~~~~~~~~~~~~~~~~~~~~~~~~~~~

N. Rene West
Time Treasured

Felted Finery – Natural Blooms (Part One)

Felted Flowers

Felting machines and machine attachments provide wonderful opportunities to explore new dimensions in needlework. Some felting projects are freeform, some are planned but still partly intuitive, and some are structured. This project falls more or less into the third category. White on white patterns, whether china or embroidery, hold a certain ineffable grace that continually attracts me to them. I had my “pattern” in mind and proceeded as follows.

I began by digitizing a fast little flower outline that would serve as my size template as well as my cutout line. Next, I hooped a light stabilizer, Soft ‘n Sheer Cut-Away by Sulky, into a small embroidery hoop. These hoops are great for small projects that require tension on the base fabric. Also, I love the way they enable me to use one hand during the felting process.

After hooping the Soft ‘n Sheer, I set the hoop over my flower template to get a basic idea of how much territory needed to be felted. I then gathered a small amout of natural roving and two finger “pulls” of Angelina (Blaze Crystalina). Before I began felting, I flipped my little pile over so that the Angelina would be closest to the stabilizer.

Hoop

For cutout projects such as this one, I work in a circular motion. Starting dead center, I slowly moved my hoop around and around, doing a light tack down rather than any serious felting. Little by little I added small wisps of roving, layering the wool and filling in bare spots. When the circle appeared complete, I did a more thorough felting, continuing in a circular motion. The final felting step was to go over the edges using a wavy motion (think rick rack). To make sure the surface was completely covered, I held the hoop up to a window, allowing light to reveal any areas that needed further work.

I repeated this process three more times for a total of four felted circles. The final product should make you think of hurricane season because that’s exactly what the pieces look like at the completion of this first stage.

Roving Circles

In part two, I’ll share with you how I embroidered the flower outline, precision cut the flowers, and embellished them with a special edge treatment.

~~~~~~~~~~~~~~~~~~~~~~~~~~~~~~~

N. Rene West
Time Treasured

Quilts – Like the Stars (part 4)

The making of Like the Stars coincided with my birthday. In the early stages of planning, I began thinking about quilting motifs that would carry the various themes of Daniel onto the surface of the quilt. One thing I knew: Like the Stars was predestined for some heavy quilting. Well, back to my birthday. Would you believe my wonderful husband gave me a new Bernina Aurora 440 QE, BSR (stitch regulator) and all, as a birthday present! It was love at first stitch and certainly a timely gift considering the project at hand.

With the piecing completed, the time had arrived for surface work. Daniel is best known for his short stay in the lions’ den, so I chose this motif for the border. First, I digitized a lion (redwork style) and saved an additional file in mirror image. Next, I stabilized the areas on the underside of the quilt top where the lions would be embroidered. There is a great stabilizer on the market that is 100% cotton and can be ironed on. It’s the perfect choice for quilters who integrate machine embroidery into their quilts.

Digitized Lion

With the quilt border stabilized, I now marked the positioning of each lion using printed templates. Rather than hooping the quilt, I chose to hoop a tear-away sticky stabilizer that I could completely removed after the embroidery was finished. This way the quilt could be easily positioned and there would be no hoop marks to deal with afterwards.

Lion Quilt Border

When I completed the embroidery phase (Shadrach, Meshach, and Abednego were also embroidered in the center of the quilt), I put together top, batting (100% cotton), and backing with a light spray of 505 Spray and Fix. The emphasis is on “light.” Also, a word of warning for owners of Bernina machines that use the stitch regulator. Do NOT use other adhesive sprays such as Sullivans. Trust me, I know!

Each section of the quilt had its own quilting motifs. For example, I used a fire motif around Shadrach, Meshach, and Abednego, a thin looping motif around the photo transfer verses, and a wavy motif in the diamonds. The quilting stage proved rather time intensive, but I loved experimenting with the stitch regulator and various needles and threads. And speaking of thread, I used multiple colors on this quilt, which accounts for lengthy time element. Also, I still use some hand quilting methods when I machine quilt, the main one being the popping of thread tails. Yes, I still knot those ends and pop them into the quilt sandwich.

After applying the binding and sleeve, I blocked the quilt for about twenty-four hours. First, I covered a large carpeted area with plastic sheeting. Using t-pins and large rulers, I squared the quilt while at the same time misting it with distilled water. Next, I took a steam iron filled with distilled water (set on cotton) and slowly hovered it over the surface of the quilt, making sure it never actually touched the quilt itself. To speed up the drying stage, I placed a fan nearby and left it running the entire twenty-four hours.

And that completes the story of Like the Stars. It now hangs in a private collection in Charlotte, North Carolina.

~~~~~~~~~~~~~~~~~~~~~~~~~~~

N. Rene West
Time Treasured

« Older entries