Fabrications – Encased (part four of case construction)

Our case is now ready for the final steps that will bring it to completion. First, cut a strip of your base fabric on the straight of grain 2″ x 10″. Fold both long raw edges evenly towards the center (wrong sides together) and press. Fold again at the center line; press.

Topstitch along both sides.

Topstitch Edges of Band

Cut your strip into six 1 1/2″ pieces. Fold each one in half and zig zag stitch along the raw edges. These pieces will form the bands that secure the cording to your case.

Six Bands

Take a measurement for the length you want your case’s cording. I measured from the base point of where I would want my case to be positioned up around my neck and back down again. Using three coordinating colors of rat’s tail, make a knot at one end (leaving about a 5-6 inch tail), braid the cords the desired length, knot again, and then trim, leaving an equal length of tail.

Cording

Take your six bands and string them onto your braided cording.

Cording With Bands

Fold your case in half and position the cording with three bands on each side. Using fabric glue, place each band within the folds of the case at bottom, center, and top. The bands should fit snugly in order to secure the cording.

Attaching Bands

Stitch along the folded edges using a stitch length of 2.5mm. You may like to backstitch at each band for extra security.

Final Stitching

I hope you enjoy making these little cases as much as I do. They make great “canvases” on which to experiment with all types of fiber art techniques.

~~~~~~~~~~~~~~~~~~~~~~~~~~~~~

Rene
Time Treasured

SaveSave

Fabrications – Encased (part one of case construction)

We’ll come back to the felted floral round created in the previous tutorial during part three. For the next step, you will need a base fabric, a sheer print fabric, some Angelina, and a stiff stabilizer such as Timtex, and fusible interfacing. These supplies will be transformed into the body of the MP3 case/carrier.

First, cut two pieces of base fabric twice the length of your desired case size. For example, my case is 6 1/2″ wide and 6 1/2″ tall. So I cut my fabrics 6 1/2″ x 13″. (The finished fabric will be folded in half to form the case.)

Cut Base Fabric

Next, press fusible interfacing to the back side of each base fabric piece.

Interfaced Base Fabric

From your sheer print fabric (I used a print organza), cut one piece using the same measurements as you did for your base fabric. This is probably the most important element of this project since the sheer print totally changes the appearance and texture of the base fabric. Although I used yardage, sheer print scarves would probably work quite well in this project.

Sheer Print Organza Layer

To stabilize the case, cut a piece of Timtex or similar heavy stabilizer the same size as your base fabric. If you would prefer a softer case, a cotton batting would make a good substitute. Set it aside for now.

Heavy Stabilizer

Take one piece of your base fabric and spray it with 606 fusible spray, following the directions on the can. I chose 606 because it leaves no evidence of its presence when working with sheer fabrics.

606 Fusible Spray

After your spray dries for a few minutes, pull a small amount of Angelina and sprinkle the fibers on top of the sprayed fabric. (I used Ultraviolet and Peacock.)

Angelina Fibers

Place the sheer print on top of the fibers and move the piece to your pressing area. Top the layers with parchment paper and press for about three seconds on a silk setting. The layers should adhere to each other and now form a single piece of fabric.

Pressing Layer Together

Next, spray the surface of your heavy stabilizer with 505. Position the second (unmodified) piece of base fabric evenly on the stabilizer, and press it in place with your fingers. Turn the stabilizer over, spray the second side with 505, and position your transformed fabric in the same manner.

505 Spray

Your project is now ready for stitching, which we will take up next time.

~~~~~~~~~~~~~~~~~~~~~~~~~~~~~~

Rene
Time Treasured

SaveSave

Fiber Folio – Colorforms Nouveau (part three)

The collection grows. I keep thinking of more shapes that I would like to use in future projects and adding them to my little box.

Angelina Colorform Collection

As I looked at the orange triangles, I thought about what cute fish they would make, so fish they became! Angelina really lends itself to ocean scenes owing to its luminosity. This project takes on a different look from every angle as the various fibers catch the light.

You will find the digitized triangle file in the Fem-Gratis box on the left sidebar. Of course, you can make the shapes without the aide of an embroidery machine.

First, I chose three water fabrics and cut them with wavy edges. I then arranged the Angelina scraps to see how I liked the basic composition.

Water Fabrics and Angelina Scraps

Next, I cut a piece of chiffon on the bias and layered it in the center. I then placed some dark green and light blue tulle (cut with wavy edges) over the entire piece. If you look closely at the introductory picture above, you can see the various shading effects that this produced.

Chiffon, Angelina, and Tulle Layers

When I was happy with the placements, I used a little temporary spray adhesive (505) on the backs of the different pieces and repositioned them.Using 35 weight cotton thread (Valdani Mediterrana), I free motion quilted the water areas.

Free Motion Water Quilting

I then switched to Valdani Midnight Sea and stitched small round loops on the ocean bottom, creating the look of seaweed.

Free Motion Stitched Seaweed

With the same color, I thread painted a few sea plants.

Thread Painted Sea Plants

I tacked the orange triangles down with a dab of fabric glue to keep them in place as I worked.

Tacked Down “Fish” Triangles

The edges were worked with a free motion zig zag stitch using Sulky Holoshimmer thread. When the edges were complete, I worked the fish tails and then the stripes on the bodies. That completed the machine work.

Fish Detail

I chose some metallic colored beads for the eyes and for some of the bead work on the lower reef.

Fish Bead Work

I also used bugle beads on the reef along with a copper star for a star fish.

Reef Bead Work

For bubbles, I applied clear glass beads. And with that, the project was complete.

Glass Bead Bubbles

~~~~~~~~~~~~~~~~~~~~~~~~~~~~~~

Rene
Time Treasured

SaveSave

Fiber Folio – Colorforms Nouveau (part two)

After cutting out some newly digitized shapes this afternoon, I noticed that the Angelina scraps looked so pretty together. So I arranged them as a background for a colorform flower.

Angelina Scrap Arrangement

Next, I covered the Angelina arrangement with a piece of parchment paper and pressed it for about three seconds (on silk setting). Angelina scraps can always be refused to each other. To attach the arrangement to the backing fabric, I sprayed the Angelina with 606 spray on fusible web (on the back). After is dried, I positioned it on the backing fabric, covered it with parchment paper, and pressed it.

Using white rayon thread, I added some decorative stitches to various areas around the center.

Decorative Stitches

I then prepared my sewing machine for free motion stitching and threaded the needle with green Sulky Holoshimmer thread. I used a viney leaf motif to quilt the area covered with lime green Angelina.

Free Motion Stitching with Holoshimmer

For the remaining areas, I used Sulky Sliver Metallic thread (wonderful stuff!!).

Sulky Sliver

The center motif was created with 5 fan shapes and one small circle, which were attached with fabric glue. I further embellished the flower motif with beads.

To complete the design, I free motion stitched the outer edges with Sulky Sliver.

You will find another colorform stitch file (fjleaves.dst) to download for your personal use in the Fem-Gratis sidebar box.

~~~~~~~~~~~~~~~~~~~~~~~~~~~~~~

Rene
Time Treasured

SaveSave

Fiber Folio – Colorforms Nouveau (part one)

While working on a project the other day, I was thinking about Angelina and how I might integrate it into a decorative trim that I could use on various accessories. My first thought went to small circles that I could attach to ribbon with beads.One thing led to another, and soon I was cutting out various shapes and playing around with ways I could mix them up to create new designs. The whole thing had a very familiar feel to it, and then it suddenly hit me. I’ve done this before!

Back in 1951, a couple of art students were doing the very same thing I had just been doing, only they were using vinyl. They noticed that the pieces stuck to glossy surfaces and began experimenting (playing) with the shapes. What has been described as the “ultimate creativity toy” was born and given the name “Colorforms.” The original Colorforms, consisting of basic shapes, were selected for the Toy Hall of Fame.

So, here I was playing with Colorforms again, only this time the fiber art version. I must admit that it has been a huge distraction every since.

To create the shapes, I digitized circles, triangles, etc., and stitched them out on an embroidery machine. I have uploaded the circle file for your personal use and placed it in the “Fem-Gratis” sidebar box for you to download. It is labeled “fjcircles.dst” and fits the 100mm (4″x4″) hoop. I will upload more shape files with future blog posts. (You will need to convert the dst format to one that works with your particular machine.)

An embroidery machine isn’t absolutely necessary, but it does facilitate the project. Alternately, you could simply draw the shapes on the backing stabilizer and cut them out if you don’t have an embroidery machine.

First, create a piece of Angelina fabric that measures approximately 4″ x 4″. If you are new to Angelina, you can find my previous instructions for working with this fiber here and here.

Angelina “Hot Fix” Fiber – Ultraviolet

Next, cut a piece of acrylic felt (the same color as your Angelina fabric) to fit your 4′ x 4″ hoop. Saturate it with spray starch and iron. I use a 50-50 mix of starch and water. By starching the felt, you end up with a nice flat piece of colorful stabilizer. I chose felt as the stabilizer because it comes in so many colors and is readily available. However, you could also use any cutaway stabilizer and simply paint it with fabric paint before stitching the shapes. The felt adds a little more dimension, but any backing you like will do the job.

Starched Acrylic Felt

Hoop the felt and give it a light spray of 505. You will notice that my hoop has shelf liner attached to the sides. The shelf liner is a great embroidery aide, gripping whatever fabric you hoop. (If you would like to add this to your hoops, purchase the thin, inexpensive variety of mesh shelf liner found in dollar stores.) I also use a topless, bottomless, “box” made out of template plastic shaped to fit my various hoop sizes for spraying. The box protects the hoop itself from sticky residue.

Hoop Protector – 505 Spray

Position your Angelina fabric over the sprayed felt and attach the hoop to your embroidery machine.

Angelina Fabric Positioned in Hoop

Embroider the shapes, cut the jump threads, and then remove the fabric from the hoop.

Paisley Shapes Being Embroidered

Using a sharp pair of craft scissors, cut out the shapes about 1/16″ – 1/8″ beyond the stitching line.

Cut Shapes

I think you’ll find many creative uses for these little shapes in your projects.

Multiple Colored Shapes

They can be mixed and matched indefintely, giving you countless design opportunities.

Circle, Paisley, and Leaf Shapes

They would be great embellishments on ATCs (artist trading cards), trims, accessories, etc. Additionally, if you have daughters or granddaughters, this is a great way to introduce them to the world of fiber art (and an enjoyable summertime activity).

Watch for more shape files this week and see the design possibilities grow. Have fun!

~~~~~~~~~~~~~~~~~~~~~~~~~~~~~~~

Rene
Time Treasured

Felted Finery – Angel Petals (part two)

Angel Petals is a three-layered flower consisting of a felted wool center sandwiched between two layers of Angelina. To create the Angelina layers, pull some fibers from a mix of Angelina “Hot Fix” colors, and place them on a piece of parchment paper or a Teflon pressing sheet. I used Raspberry Sparkle, Cotton Candy, Sugar Plum, and Violette Crystalina. Pull enough fiber to create two flower layers. Better results are usually obtained when colors are mixed well.

Angelina “Hot Fix” Fiber Mix

Place a piece of parchment paper on top of your mixture and press at a “silk” setting for about 3-4 seconds. Let cool and then check to see if all the fibers bonded. You should have a nice piece of flat iridescent fabric.

Angelina Fabric

For the next step, make a new four-petal flower template a little smaller than the template used in step one. Place the template on the Angelina fabric and cut out two flowers. If your piece of Angelina isn’t large enough for two flowers, simply repeat the previous step for the second flower. (Remember to save your scraps for future projects.)

Cut Angelina Petal Layer

Attach the Angelina layers to the top and bottom of your flower center with a tiny dab of fabric glue placed strategically at the outer area of the flower centers. Offset their position so that the petals fall between the felted flower petals. Just a slight touch of glue will do the job since the edges of the cut Angelina will naturally want to adhere to the felted wool. Also, you will be felting the center of the flower, so keep the glue clear of this area.

Sandwiched Flower Layers

Next, cut a small circle of craft felt for the flower backing.

Craft Felt Backing

Attach it to the back of your flower using the method above. Just a touch of glue will do the job since this piece will be secured by the felted center.

For the fluffy center, cut six short strands of yarn in a contrasting color. I used a yellow boucle. Any yarn that can be pulled apart should work well.

Position two strands in the center of your flower front, forming an “X” shape. Lightly felt them in place with you needle punch machine, keeping the flower stationary and only felting the very center.

Felting Yarn Strands

Now take two more strands of yarn and wrap them with a coordinating color of Angelina. A few twists should do the job.

Angelina Wrapped Yarn Strands

Place them in an offset position on top of the previous felted strands of yarn and needle punch them in place. Use the last two strands of yarn to fill inany open areas.

Check the back of your flower to make sure the yarn has felted through to the back. Using your fingers, pull the yarn strands apart until they fluff up and fill the center. You can cut the strands to any length you desire.

Felted Through to the Back

To complete your flower, sew a brooch pin on the back, using a strong polyester thread. I like to place a little glue on the pin before sewing so that it stays in place.

You now have a beautiful little flower to give as a gift or to embellish your summer wardrobe.

~~~~~~~~~~~~~~~~~~~~~~~~~~

N. Rene West
Time Treasured

Felted Finery – Angel Petals (part one)

Embellishment Village now offers a new crimped “Hot Fix” Angelina in twenty colors. The individual fibers are finely cut and wavy.

New Crimpled “Hot Fix” Angelina

Their website states that the crimped Angelina has a softer texture when bonded and drapes nicely. Additionally, the colors are more intense, adding a little more glitz to your projects. I’m not so sure Angelina really needed more glitz, but someone must have thought more is better at EV.

I received a shipment a few weeks ago and have been excited about using the new product in a project. I believe I ordered all twenty colors!

To make the Angelina felted flower, you will need a few colors of roving (mine drank the Kool-Aid), a few colors of Angelina (regular or crimped), and some yellow yarn, such as boucle.

Angelina and Wool Roving

Begin by drawing a simple four-petaled flower to use as your template. Give it enough of a center to attach other pieces during later stages. Draw around your template on a piece of lightweight stabilizer. I painted my pink so that it would blend with the flower. ( A used dryer sheet would work.)

Template Outline on Light Weight Stabilizer

Pull out a small amount of roving with which to fill in your felted flower. Mix in some Angelina strands, using pulling and folding motions until you have a well mixed ball. Shape the roving mixture to fit within the outline as you needle felt it with your Babylock Embellisher or other needle punch machine.

First Layer of Felting

When you complete the first color, pull roving and Angelina in a second color, mix it as described above, and felt it around the inner part of the petals to add more visual interest.

Second Layer of Inner Petal Felting

Cut your flower out with a sharp pair of craft scissors, removing the outline as your cut.

In part two, we’ll create the Angelina petals and fluffy center.

~~~~~~~~~~~~~~~~~~~~~~~~~~~

N. Rene West
Time Treasured

Fabrications – Mayflower Medley (part four)

We’ve arrived at the final stage of Mayflower Medley. The furry-edged little flowers are fun to create and share continuity with the grassy knoll.

First, outline the shape of your flowers at the top of each stem, allowing a little of the stem to remain in the interior. I used a compass to form my circles, but you can use anything you like. Use a marker the shows up well on fabric.

Flower Outlines

Next, attach a tailor tack foot to your sewing machine and thread the needle with a heavy embroidery thread in a color that contrasts with your flowers. I used Valdani #35 cottons. Set your machine at 1 mm stitch length and 1.5 mm stitch width. As in part three, test to make sure these settings work for your machine.

Sewing the fringe is a little tricky since it’s difficult to see your sewing line. I find it helpful to move slowly and keep my eye one the line ahead as I turn the fabric. Sew the fringe around all of your circles. Use as many thread colors as you like. You can even sew several rows of fringe around each flower if you’re really adventurous.

S ewing Fringe with Tailor Tack Foot

For the center of the flowers, choose colors of Angelina “Hot fix” fibers that you like. I used Lemon Sparkle and Raspberry. Pull enough fiber to make a small ball and place it on parchment paper or a Teflon pressing sheet. Top with parchment or fold your pressing sheet over the Angelina ball. Set your iron on the “silk” setting and press for about three (3) seconds. Check to see that the fibers have bonded. If not, press again for another second or two. Do not over heat. Allow to cool before removing the Angelina.

Angelina “Hot Fix” Fiber

Mark the bonded Angelina circles with the same shape as your flowers. I used my compass, which left a slight indentation as a cutting line. Cut out each flower center.

Always save your leftover Angelina scraps for another project. They can be rebonded to other Angelina fibers, cut up and used in fabric collages, appliquéd here and there for a little bling, sandwiched with other fibers to create new fabric, etc. I find Angelina to be one of the most versatile and easy fibers with which to work.

There are several ways you can attach your flower centers. I used a dab of fabric glue to position them and then marked the centers and embellished with beads. You could also free motion stitch the surface, work some French knots at the center, or embellish in other imaginative ways.

Marked Centers

Bead Embellishment

For the final step, thread your sewing machine with a green embroidery thread and attach a free motion foot. Lower the feed dogs and stitch some leaf shapes next to the stems.

Your project is now complete. I hope you enjoyed playing with the tailor tack foot and discovering its many possibilities for fiber art.

____________________________________

[Note: One reader voiced concern that the tailor tacking would unravel. I always begin and end decorative stitching with a few securing stitches. However, I tested the fringe without security stitches at the settings I stated in the above tutorial and could not get the stitching to unravel from either end. This would probably be a problem with looser settings, in which case you could add the line of straight stitching I previously mentioned. Also, you could knot the thread ends and pop them into the stabilizer in a way similar to hand quilting. A third alternative would be to iron a fusible interfacing over the stitching on the back side of your work. Keep these remedies in mind when working with decorative stitching.]

~~~~~~~~~~~~~~~~~~~~~~~~~~~~~~~

N. Rene West
Time Treasured

Fabrications – Mayflower Medley (part one)

I woke up this morning and was greeted by the most beautiful day we’ve had this year. The thermometer said 36 degrees, but it has slowly warmed hour by hour. What a great day to share these whimsical little Angelina flowers growing on a grassy knoll.

For this project you will need two background fabrics (a sky and a grass fabric), two or three green hand dyed, hand painted, or batik fabrics, some variegated #35 quilting thread (greens, yellows, and roses), green perle cotton and/or heavy rayon fibers, and a wavy edged ruler.

Cut your sky and grass fabrics any size you like, using about a 50/50 ratio. Place right sides together and stitch, using a 1/4 inch seam allowance. Press the seam to the dark side.

Back your fabric with a heavy stabilizer. I actually used acrylic felt, which I applied with 505 spray. Decor Bond would also work well.

On the right side of you fabric, evenly mark for stem placement. For example, my project measured 15 inches wide, and I marked at 3″, 6″, 9″, and 12″.

Measure to figure how long you want your stems to be. Multiple that number by the number of flowers you want to create. Using your measurement, cut about six lengths of green perle cottons and rayons, and tape them together at one end. You can cut the strands into quarters and work one stem at a time or leave the strands in one grouping.

Attach a braiding or cording foot to your sewing machine and thread the needle with a decorative thread. Pass the taped end of your fibers through the hole in the foot. Set your machine on a zig zag stitch and test to make sure the needle clears both sides of the fibers. It helps to twist them slightly as they feed through the hole. I like the look of the cord after several passes since the cord takes on an organic appearance as the thread builds up.

When you cord is complete, couch each section on your background fabric (as previously marked) using the same foot.

There should be about an inch of stem on the grass fabric. Make sure you leave enough clearance room for your flowers on the sky fabric.

In part two, we will create the grassy knolls. I think you’ll enjoy the technique and find many uses for it in other projects.

~~~~~~~~~~~~~~~~~~~~~~~~~~~~~

N. Rene West
Time Treasured – Making time for the things you love

Fabrications – Garden Gazing (part three)

With the free motion embroidery of flowers and leaves now complete, we turn back to the Angelina gazing ball, which is the final stage of this project.

First, iron your leaf fabric to a fusible such as Heatn’Bond or Steam-A-Seam. Cut about six free form leaves and position them around the Angelina. Using a Teflon pressing sheet (or parchment paper), press according to the manufacturers directions.

Leaves

Set up your sewing machine for free motion embroidery, making sure the feed dogs are lowered. Using a decorative thread, free motion quilt around all the leaf appliqués. I used Sulky Holoshimmer.

When using decorative threads, it’s usually necessary to loosen the upper tension. With Holoshimmer, I set the tension at 1.5 and use an embroidery needle.

When you complete the leaves, rethread your machine with another color of decorative thread and free motion quilt the Angelina between the leaves with whatever motif you like.

To make the flower center, cut a circle from a piece of satin about double the size you want your finished center. Free motion stitch large circles. The fabric will naturally pucker.

Next, baste around the outer circumference of the satin and then pull the thread ends so that the circle gathers in on itself.

Turn to the right side and attach to your flower center with seed beads. You may like to dab a tiny amount of fabric glue on the wrong side to keep the center in place as you bead.

Your project is now complete! I hope you all have a wonderful Easter.

~~~~~~~~~~~~~~~~~~~~~~~~~~~~~~~

N. Rene West
Time Treasured

Fabrications – Garden Gazing

We put a gazing ball in our garden a few years ago and I would find myself walking around it, looking at it from different angles, and being thoroughly captivated by its image reflections. In spite of the fact that the weather people are telling us to expect snow this weekend, it is nonetheless spring and I’m stitching flower gardens.

For this project, you will need a commercial fabric with garden images or a hand painted fabric with the basic colors and shapes applied to the fabric. This is very easy to do with fabric paint. You might want to do a little sketch first and then paint your garden scene in abstract form. Stabilize your main fabric with a light weight fusible and back it with batting or craft felt. If you use batting, place a piece of light weight stabilizer under it so that the batting doesn’t get caught by the feed dogs. Sandwich these with a light spray of 505.

You will also need about three colors of Angelina “Hot Fix” fibers. I used Blaze Crystalina, Mint Sparkle, and Raspberry. An assortment of cotton embroidery thread will be used to define your flowers and grasses. To appliqué the leaves and embellish the Angelina, you will need some decorative threads, such as Sulky Holoshimmer.

For the main flower, you will need a small piece of satin, some seed beads, and some hand dyed or painted fabric for the leaves. I used hand dyed silk. These will be applied with a fusible backing.

After you stabilize your main fabric, cut a large circle from another coordinating fabric and position it on the surface. This will be your gazing ball. A little of it will show through so choose something appropriate.

Give the back side a light spray with 505 and then quilt it to the surface with a meandering stitch.

Now place your project on your ironing surface and begin pulling out strands of Angelina from each of the colors you chose. Drop them right on top of the gazing ball base fabric. Mix the colors well and make sure you have pulled enough to completely fill the round area.

Angelina

Place a Teflon sheet or a piece of parchment paper on top of the Angelina and press for 3-4 seconds on a silk/wool setting. Let the area cool and then remove the pressing sheet/parchment paper. Spray a little 505 on the underside to keep the Angelina in place. (Remember, only use sprays in a well ventilated area.)

The basic foundation of the project is now complete. In part two, we will begin stitching the background flowers and grasses using free motion embroidery.

~~~~~~~~~~~~~~~~~~~~~~~~~~~~~~~

N. Rene West
Time Treasured

Fiber Folio – Illuminations

Angelina Sun Bag

Working with unusual fibers stretches my creative thinking. In fact, I often have trouble falling asleep at night because my brain refuses to stop thinking up ways to use a particular item. Angelina certainly fits into this category.

If you’re not familiar with Angelina, it comes in two varieties: Hot Fix and metallic. Hot Fix Angelina is a soft polyester fiber that bonds to itself when heated. The metallic Angelinas are aluminum and do not bond to each other.

The iridescent fibers of Hot Fix Angelina are absolutely gorgeous. The names themselves give you a hint of their star power: Calypso Blue, Lemon Sparkle, Ultra Violet, Peacock, Forest Blaze, and many others. Making things even more interesting, you can mix the different colors and arrive at a totally new palette.

For fiber artists, Angelina holds a world of possibilities because it can be bonded, spun with other fibers, painted, embossed, stitched, mixed with roving or silk fibers, cut into shapes, appliquéd, and overheated. It’s also nontoxic, readily available, and easy to work with.

With that little introduction, here’s a fun project to get you acquainted with this unique fiber. You will need a package of Angelina, a nonstick pressing sheet or some parchment paper, some decorative thread clippings, an iron, a stencil, a chalk marker, some decorative sewing threads, and a piece of fabric cut to any size you desire.

Supplies

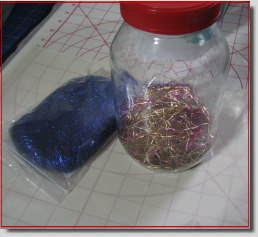
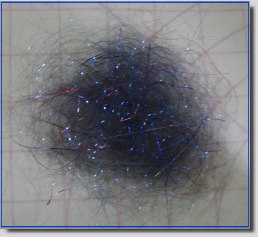
First, pull out a small amount of Angelina and lay it on your pressing sheet. Next, drop some decorative (preferably metallic) thread clipping on top of the Angelina. Pull a little more Angelina out of its bag and place it on top of the pile. Fold your pressing sheet over on top of the pile or top with parchment paper.

Angelina and Threads

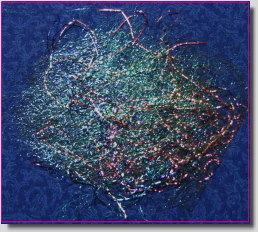
With your iron set at “silk,” gently iron back and forth on the surface for approximately three (3) seconds. It doesn’t take long for the fibers to bond. Lift the pressing sheet or parchment to see if the Angelina has bonded. If not, iron for another second or two and check again. You should have a thin, web-like piece of sparkling fabric.

Angelina Fabric

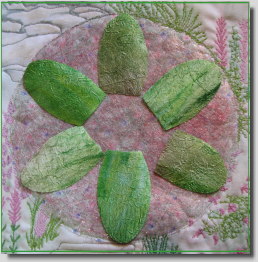
Using your stencil, mark the Angelina where you would like to cut out part of the design. I chose the center of my sun.

Design Cutout

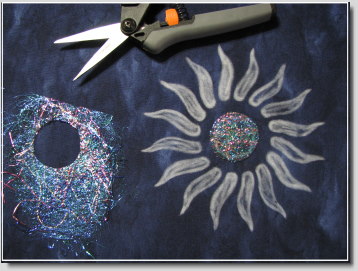
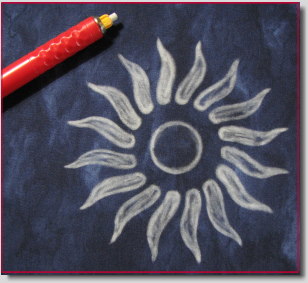
Choose a heavy fusible stabilizer or interfacing and adhere it to the back of your base fabric. You may want to double interface the area where your design will be stitched. On the surface of your fabric, position your stencil and fill in the spaces with a chalk pencil. You could also do this with a spray chalk or with fabric markers.

Chalk Stencil

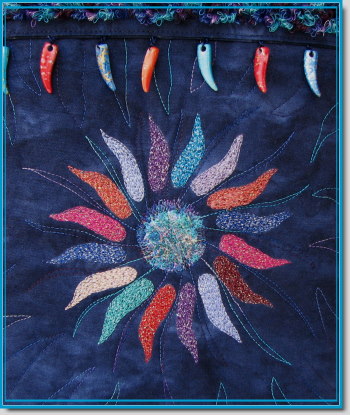
Now thread your sewing machine with a decorative thread, attach a free motion foot, drop the feed dogs, and outline stitch the parts of your design that you would like to thread paint. I used Halo thread and thread painted the rays of my sun design using multiple colors.

Outline Stitch

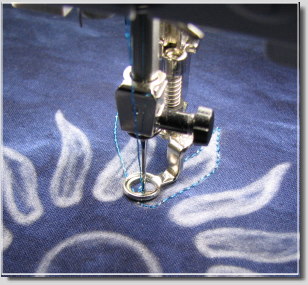
If you have never tried thread painting, this is a great place to start. Simply follow the chalk line for your outline stitching and then sew some stabilizing stitches in the center. To thread paint, just keep moving your fabric in the direction you want the stitches to go.

When you finish your design, attach the Angelina cutout with a tiny dab of fabric glue. You will be free motion stitching around it, so go light on the glue. As an alternative, you could use a basting spray such as 505.

Center Design

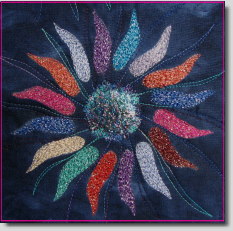
Back your fabric with batting and backing. Now free motion quilt using any pattern you like. When you reach the Angelina cutout, work in a zig zag motion to secure it. I used a variegated cotton quilting thread.

Quilting

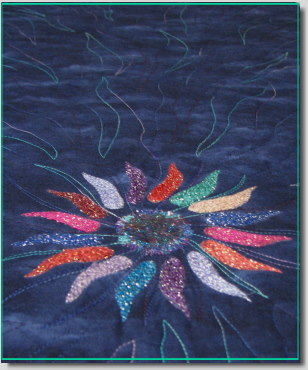
Finish your project with a binding or create another item out of it such as a tote bag, eyeglass case, place mat, etc.

Creative Project

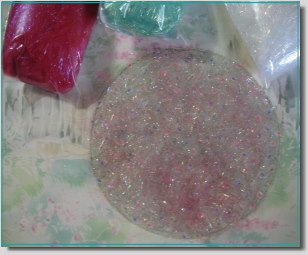
You probably noticed my jar full of shiny threads. I have lots of these around the studio. Some are filled with metallic clippings, some rayon clippings, some silk clippings, and on and on it goes. You never know when you may need a little bling here or there, and with Angelina around, it may be frequently!

~~~~~~~~~~~~~~~~~~~~~~~~~~~~~

N. Rene West
Time Treasured

« Older entries