Fabrications – Straw Flower Blossom (part two)

Once your first circle is completely stitched with embroidery floss, choose a secondary color of floss for your second scrim circle. I chose antique white. Fill this circle with stitches exactly as you did with the first circle.

Stitched Embroidery Floss

Don’t worry if your stitched “V” shapes vary in size. This only gives a more natural look to your flower.

Individual Scrim Flower Layers

Aren’t these little flower layers delightful? I can picture them used individually as flower appliqués embellished with some beads, a button, or French knots in the center. Since you can paint the scrim any color you like and choose from hundreds of floss colors, the variations are virtually endless.

For the flower center, you will need some thin ribbon. I chose two neutral organza ribbons. Silk would also work well. Thread a tapestry needle with your ribbon of choice, place your two flower circles one on top of the other, and pass the needle through the layers from the top side. Bring the needle back through the layers, returning to the top side. Pull to adjust the ribbon and then clip it. Repeat as many time as you like until the center is full of ribbon ends.

Ribbon Center

Since the scrim is so loosely woven, the ribbon work is relatively easy to stitch. However, as the center begins to fill, it helps to hold down the previous ribbon ends (as you stitch) so that they’re not pulled out of place.

Completed Flower Center

Mark a small circle on a piece of craft felt and cut.

Craft Felt Backing

With a light hand, cover the felt circle with fabric glue and position it on the back of your flower.

Backing and Brooch Pin

Allow the glue to dry and then attach a brooch pin to the center back. Your flower embellishment is now complete.

~~~~~~~~~~~~~~~~~~~~~~~~~~~~~~~

Rene
Time Treasured

Fabrications – Straw Flower Blossom

Spring has given way to summer weather here in the mountains, and flowers are in bloom everywhere I go. Over the Memorial Day weekend, my husband and I drove to Virginia and enjoyed the most beautiful scenery the entire trip. Red poppies filled the medians along highways, while private gardens offered a rainbow of floral colors. It’s inspiring!

Well, my little Straw Flower embellishment isn’t the most colorful bloom of the season, but it sure is fun to make.

First, let me say a few words about scrim since it frequently solicits questions from those who haven’t worked with it. You can find my previous entry on scrim here if you would like more information.

Scrim Yardage

Scrim comes in many forms, but the one used is fiber art is a loosely woven 100% cotton. Drapery stores sell it on large rolls, and it’s quite reasonably priced. You can dye it, paint it, stitch it, and manipulate it any way you see fit.

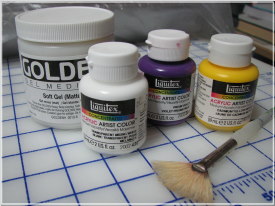
To make the Straw Flower, you will need some fabric paints, a gel medium (found in art stores), white cotton scrim, embroidery floss, craft felt, and a brooch pin.

Paints and Gel Medium

Prepare a work area for painting, covering the surface with plastic sheeting. Cut two circles out of scrim the size you want your flower to be. Place them on a piece of plastic. Mix your fabric paint with a little gel medium and paint the scrim. I mixed yellow, violet, and white to get the nice golden tan color that I desired.

Painted Scrim

If the paint mixture is too thick, add a touch of water, but not too much. Allow the painted scrim circles to dry.

Gel mediums are very useful in fiber art. Once dry, your scrim circles should have a firm body, yet be quite flexible. The gel medium will dry clear, leaving only the paint color behind. Best of all, the scrim will no longer fray since the medium acts somewhat like a glue.

When your circles are dry, draw two chalk lines to mark center. These are simply visual aides for the next step.

Mark Center

Thread a tapestry needle with embroidery floss. Choose any color you like, using all six strands. Do not knot. Working with one circle at a time, stitched from the outside edge towards the center, weaving your needle in and out about every quarter inch. Stop short of the center, pivot, and stitch back towards the outer edge, creating a “V” with the floss. Leave a tail on the floss that extends beyond the scrim edge and clip. Repeat this process until the entire circle is filled with floss.

Stitched Floss

In part two, we’ll complete the flower.

~~~~~~~~~~~~~~~~~~~~~~~~~~~~~~

Rene
Time Treasured

SaveSave

Fabrications – In Bloom One (part two)

Before I get to the second part of the project, I was asked about scrim by one of my readers. Scrim is a lightweight gauzelike fabric made of cotton or flax. Owing to its airy nature, it’s often used in the construction of draperies. That being the case, the best place to find it is in stores that sell home decor fabrics, such as Hancocks. The scrim I use is 100% cotton and can be dyed, painted, and stitched. Medical gauze resembles scrim but is more loosely woven. Both scrim and gauze can be used creatively in fiber art projects.

~~~~~~~~~~~~~~~~~~~~~~~~~~

Now, on to part two of In Bloom. This is one of those projects that I could have been stopped at an earlier stage and called complete. However, I wanted to take it further and add texture to the flowers and some thread embellishment around the scrim squares.

To give the flowers dimension, I took some leftover painted Carriff stabilizer and cut it into little snippets.

I then dusted the base flowers with Bo-Nash 007 Bonding Agent and sprinkled the snippets onto the surfaces. Bo-Nash is a granular fusing agent. It leaves your fabric soft and can be sewn, washed, and dry cleaned.

Using a Teflon pressing sheet and an iron set on wool, I pressed the flowers for about 5 seconds.

Fused snippets; base flower before fusing

Next, I prepared my sewing machine for free motion embroidery and threaded the needle with a matching rayon thread. I used two different motifs to give the flowers definition.

For the two leaves, I threaded the machine with dark green Holoshimmer. Moving at a slow speed, I detailed the leaves with veins.

When using Holoshimmer, loosen your top tension, lengthen your stitches, and use an embroidery or topstitching needle. Also, use a thread net on your spool if the Holoshimmer needs taming.

With the same green Holoshimmer, I worked a free motion buttonhole stitch through the center and around the outside of the squares.

When I completed the buttonhole stitches, I rethreaded the machine with a pink Glitter Hologram thread by Superior. This time I retraced the previous path with a free motion zig zag stitch, using a stitch width of 3.5 mm.

I recently purchased a bottle of Liquitex Glass Beads, a painting medium that contains micro beads, that I wanted to use with this project. In a plastic container, I mixed a small amount of glass beads, a tiny amount of Pearl Ex gold powdered pigment, and a few drops of Liquitex medium viscosity cadmium yellow acrylic paint.

Using a stiff paintbrush, I painted the center of the flowers with this mixture and then set the project aside to dry. As a final embellishment, I sewed glass beads around each of the flower centers.

~~~~~~~~~~~~~~~~~~~~~~~~~~~~~~~

N. Rene West
Time Treasured

Fabrications – In Bloom One

It’s good to be back home. As much as I enjoyed seeing thousands of bolts of fabric and new fiber art products, I missed the peaceful hum of my sewing machines.

I decided last week that I wanted to do a series of flower projects using various techniques and materials. Of course, I already do a lot of projects like that, but my desire is to challenge and stretch myself through the interpretation process. I really enjoy using textiles in unique and unusual ways. So I gathered together some of my floral line drawings and photographs and began jotting down notes of different ways I might recreate them in fiber (along with a few additional embellishments).

For the first project, I decided I wanted to use pink, yellow, and green, the colors for Project Spectrum, and sheer fabrics and fibers. I didn’t have a definite plan in mind, but I began by preparing a base of felt stabilized with a fusible mid-weight stabilizer. I then cut four 4-inch squares of cotton scrim.

Scrim

Next, I set up my paint area and chose two Jacquard Lumiere paints: pearl magenta and met olive green. The met olive green has metallic gold highlights that are quite beautiful on leaves.

I mixed one paint at a time with Liquitex Gloss Gel Medium (about 2/3 gel medium to 1/3 paint) and painted it onto the scrim pieces. The mixture of gel and paint stiffens the scrim slightly and also leaves it tacky while still wet.

After letting the scrim dry for a few minutes on a paper towel, I then positioned the four squares on the felt background. Because the scrim was still tacky, it adhered to the felt enough for me to work on the piece. While the scrim continued drying, I cut two pieces of Carriff 0.5 stabilizer (engineered fabric) and painted one with the pearl magenta and the other with met olive green, using a wet paint brush. (A used dryer sheet would work just as well.)

After these pieces dried, I freeform cut two magenta flowers and two olive green leaves. I adhered the leaves to the green scrim squares with a light spray of 505.

In part two, I’ll share with you how I added texture to the flowers and used decorative threads to define the flowers and leaves.

Note: In this project, I use a couple of products with which you may not be familiar or that you don’t associate with fiber art, particularly gel mediums. Actually, gel mediums are quite useful to fiber artists. They can be mixed with acrylic paints, metallic powders, micro beads, and other items, and them painted onto fabrics, especially when doing detail work. When working with gels, I usually useLiquitex acrylic medium viscosity paint because it’s of a high quality and I always get good results. Also, it’s easily obtainable through art stores, craft stores, and online. Liquitex and Golden both produces quality gels.

For fabric painting, I use several brands of paint, such as Setacolor, Jacquard, Liquitex, and Dye-na-flow. Usually the technique I’m using dictates what brand of paint I choose.

~~~~~~~~~~~~~~~~~~~~~~~~~~~~~~~

N. Rene West
Time Treasured