For the flower centers, I used a similar Stitch Witchery technique. First, I cut a small square of fabric and Stitch Witchery. I then backed the fabric square with a fusible interfacing.

Stitch Witchery

Second, I painted the Stitch Witchery square with Lumiere Pearl Magenta.
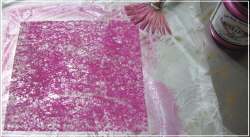
Painted Stitch Witchery
Third, I dropped some metallic threads on top of the fabric square. I then topped it with the painted Stitch Witchery and covered the layers with parchment paper. I pressed them on a wool setting for about 10 seconds.

Metallic Threads

Fused Threads
Using a small circle template, I penciled cutting outlines on the back of the fabric and then cut out the circles.

Marked interfacing
Next, I placed the circles on the background fabric in a somewhat random fashion. The only important thing here was to leave enough room between them for the petals. When I was happy with their positions, I tacked them down with a tiny dab of fabric glue so that they would stay in place as I continued working.

Placement of Center Flowers
The next step was the flower stems. I decided to use green quarter-inch organza ribbon. To get a nice rounded shape, I twisted the ribbon as I couched it down using the Bernina free motion couching foot. (This could be done just as easily with a cording or braiding foot or an open toe foot.)

Couched Organza Ribbon
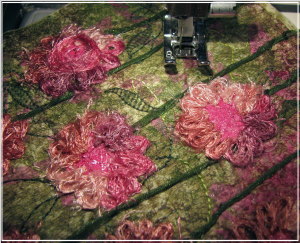
The flower petals were created with Moda Dea Jai Alai (Bloom) eyelash yarn. I couched the yarn around the center, first working in a loopy motion to form the petals and then taking a final round at the outer edge of the center.

Free Motion Couched Yarn Petals
A free motion couching foot would be necessary to apply the yarn exactly as I did. However, you could achieve very nice petals through bobbin work with perle cotton or another heavy thread or fiber of your choice. To do this, sew a straight stitch around each circle. Wind your bobbin by hand and then prepare your machine for free motion work. Turn your fabric to the wrong side and stitch the petals around the previous sewing lines. (It’s always a good idea to work on a test piece first to make sure your tensions are correct.)
When my flowers were complete, I chose a leaf stitch on my sewing machine and added leaves to the stems. I could have thread painted the leaves, but sometimes I like to use the built-in stitches on my sewing machine simply because they so often go unused!
Machine Stitched Leaves
To complete the piece, I added a yellow glass bead to each flower. Instead of sewing the beads on with the hole to the side, I stitched them with the hole facing up and used a lighter yellow thread. The stitches formed a small “Y” design on the surface of each bead.
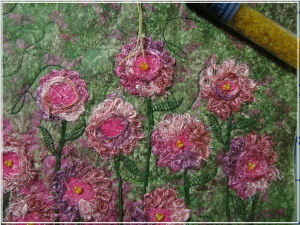
Bead Work
I really liked the role that Stitch Witchery played in this project. It performed well both as a fusible and as a paint transfer medium without leaving its own footprint.
Note: I’ve added another colorform file (fjsquare.dst) to the Fem-Gratis box in the sidebar. Enjoy!
~~~~~~~~~~~~~~~~~~~~~~~~~~~~~~
Rene
Time Treasured