Fabrications – Garden Gazing (part two)

Free motion embroidery is a very relaxing activity. With just a few stitches in your repertoire, you can thread paint beautiful embellishments onto a variety of projects. In Garden Gazing, I used several stitches that I would like to share with you. Remember to stabilize your fabric well before thread painting. All those stitches need something to wrap themselves around.

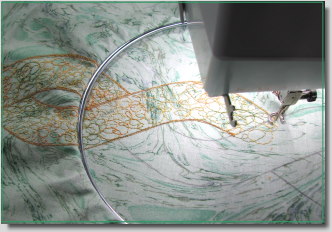
Probably the most versatile of stitches is the free motion zig zag stitch. By changing the position of your fabric, the width of the stitch, or your tensions, you can alter the look to suite your purposes.

I often slant my fabric ever so slightly so that my grasses take on a wavy effect.

Other times I alter the width of the stitch or use a lighter or darker thread in the same color family.

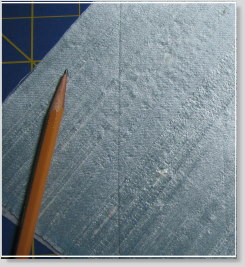
In the following photos, you can see the progression of thread painting grass. In the first two photos, I used a stitch width of 0.7. When I switched to a darker color in the third photo, I also changed the stitch width to 0.9.

A wide stitch width can be used for filling in background areas where you don’t need definition. By moving your fabric quickly, you can cover a large area in a short amount of time. You can also layer this stitch, using a variety of colors for an interesting effect.

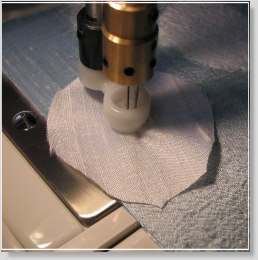
To thread paint ferns or variegate your flora, the whip stitch comes in handy.

To accomplish this stitch a little machine adjustment is needed. First, tighten your top tension. On a Bernina, I set the top tension at 7. Next, loosen your bobbin tension slightly and fill your bobbin with a decorative thread, such as rayon. Use a cotton embroidery thread (or something similar) in the needle. Make sure you use two different color values when choosing threads. Set your machine on a zig zag stitch, drop the feed dogs, and free motion stitch a pretty little plant or fern.

To thread paint small leaves, simply us a narrow free motion zig zag stitch and move slowly as you create your shapes. You can use even tension adjustments or play with the tensions for interesting effects.

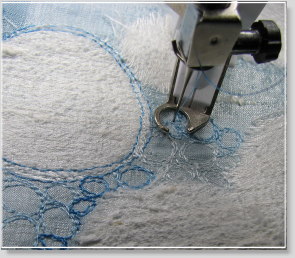
Flowers are formed in a similar fashion.

For the tall hyacinth, I used a stitch width of 1.3 and created “V” shapes, covering my stitch path twice.

For hanging flowers, I used the same stitch but changed the shape of the flower.

Individual petals are very easy to stitch. I used a 1.1 stitch width in this example, forming the outline first and then filling in the petal. You can also build these stitches up for more texture.

Although I didn’t use them in this project, built up free motion straight stitches can be used to thread paint fields of grass, leaf veins, tree trunks, flowers, fruit, and a host of other wonderful things. They’re also very useful in shading.

If you’ve never tried your hand at free motion embroidery, I hope you will experiment with a few of these techniques and begin embellishing your projects with a little thread painting.

~~~~~~~~~~~~~~~~~~~~~~~~~~~~~~~~

N. Rene West
Time Treasured

Quilting – Out of the Blue (part two)

Out of the Blue

Our painted fabric is now ready for the next stage where we will define the different areas of the flower with color and stitches. Remember that any number of these blocks could be created for a larger project, such as a quilt.

Look at your project and decide where you would like to divide the various sections, i.e., the center, the petals, the surrounding areas. This should be easy to do since the salt would leave some of the defining areas mottled. With a sharp chalk marker, draw around the center section, the petals, and the outer areas. Of course, your wall ornament may be completely different from mine, but I think you get the idea.

Chalk Outlines

Cut batting and backing a little larger than your project and sandwich together using 505 spray or whatever method you prefer. Prepare your sewing machine for free motion quilting, making sure the feed dogs are lowered.

For the center of the flower, use a light colored thread that coordinates well with your fabric. Free motion whatever design you like in this area. I began by sewing around the perimeter and then working towards the center.

Center Motifs

Thread your machine with a darker thread and use a different motif to free motion quilt the next area. I used navy thread and the garnet stitch, making circles and ovals with my needle. Remember, it is the contrast of colors and stitches that gives this piece its visual interest.

Now return to a lighter color thread and begin outlining your flower petals. Add a little dimension to the upper petals with three or four short lines of stitching radiating outward.

Petals

When your petals are compete, thread your machine with a darker thread and once again free motion quilt with a new motif. I used a meandering stitch in this area.

Continue in this alternating pattern until you finish your quilted project.

Radiating Stitches

Dimensional objects in fabric painting can reward us with spectacular outcomes that open up new avenues of creativity. I hope you will think of this tutorial as a mere starting point.

~~~~~~~~~~~~~~~~~~~~~~~~~~~~~~~

N. Rene West
Time Treasured

Fabrications – Gilded Gardens (part four)

Gilded Gardens

[Note: Part three and four of Gilded Gardens provide a greater amount of technical information than most of my tutorials. Therefore, I would recommend that you read them through at least once before beginning the second level of thread work.]

The final stage of this secondary thread work involves working with perle cottons #3 and/or #5. These heavier threads cannot go through a machine needle so we must use other methods. The most common way of using these decorative weight threads is through bobbin work.

Before the day of specialty bobbin cases, I would simply bypass the tension mechanism on my Bernina 1230 and bring the bobbin thread up directly. This worked okay for very heavy threads and ribbon floss, but wasn’t ideal. I then purchased a second bobbin case and made adjustments as I mentioned in part three. Sewing machine companies now produce specialty bobbin cases, and if you like using decorative threads in your work, they are a nice accessory to have.

Specialty Bobbin Cases

To begin the second phase of heavy thread work, hand wind your bobbin with perle cotton #3 or #5, place it in the specialty bobbin case (or adjusted secondary bobbin), and set up your machine for free motion embroidery (according to your previous test results), making sure the feed dogs are in the down position.

Hand Wound Bobbin

Specialty Bobbin Case

Turn your work to the backside and position the needle at a point on the circumference of one of your circular flowers. Sounds like geometry, doesn’t it?

Backside Bobbin Work

Now check to make sure the bobbin thread tail is positioned towards the back of the machine so that it doesn’t get caught up in the securing stitches and make an unpleasant mess on the front side of your work. Take a few slow securing stitches moving every so slightly forward, clip your top thread tail, and then begin working your way around the circle. Before the second pass, clip your bobbin thread tail. On the second pass, work some spirals, scrolls, and circles in the areas surrounding your flowers.

Bobbin Work

Bobbin Work on Surface

Surface View of Bobbin Work

When you are happy with the decorative bobbin work around your flowers, go back to some of the flowers and fill the interior completely with stitches, working in a spiral motion. Next, work some vein stitching on one or two of your leaves.

Leaf Veins

On other leaves, work a row of stitching down one side and continue in a winding motion past the tip of the leaf.

Leaf Bobbin Work

An alternative to free motion bobbin work would be standard bobbin work. Keep your feed dogs in the normal up position and sew around your flower circles from the back side of your project. It’s possible to make scroll designs around your flowers using this method, but you will need to keep your lines simple.

Another alternative would be to use a couching or braiding foot and couch the thicker threads around your flowers.

Braiding Feet

Couching and Braiding Feet

Couching allows you to use a contrasting top thread color to add even more interest to your work. Make sure you switch to a needle plate that allows for zig zag stitching and adjust your stitch length and width. Leave a small top thread tail and sew over it in your second pass.

Couching Perle Cotton

Couched Perle Cotton

Work slowly so that you can keep your thread close to the previous round of stitches. When you complete your couching, do a few stationary zig zag stitches to secure your thread and then clip it.

Couching Heavy Threads

My favorite way to apply heavy threads is with the Bernina Free Motion Couching Foot #43. I hope other sewing machine companies will produce a similar foot for their machines because it’s a wonderful accessory that I wouldn’t want to be without. The look of free motion couching is quite similar to bobbin work. I did free motion couching on two of the leaves in Gilded Gardens. (This design work can also be created through free motion bobbin work.)

Free Motion Couching

Bernina Free Motion Couching Foot

If you have this accessory, I recommend that you move your needle one position to the right and set your machine on a zig zag stitch width of 1.1 mm. This helps to catch the threads or yarns with every stitch. Some decorative threads are too thin (perle cottons #8 and #12) or too thick for this foot, but many work well. I especially like using this foot with perle cotton #3.

Perle Cottons

One of the special stitches in Gilded Gardens is the pod stitch.

Pod Stitch

This stitch is formed by building repeated rounds of stitches on top of each other. I created some of my pod stitches with the Bernina Free Motion Couching Foot and some with bobbin work. Your feed dogs must be down in order to work on such a small design.

Pod

Pod Stitch

Begin by forming your outer circle and then spiral in towards the center, allowing the thread to build up on top of itself. You can only go so far with this before your machine needle or bobbin case will say “enough.” By that point, you should have a nice round pod decoration formed on the surface of your work. I would suggest that you practice this on a test piece before attempting it on your project.

So, with all the above options, you’re sure to find one that suites you well and aides you in completing this phase of the project.

Your work should now look complete. However, we still have several flowers and leaves that beg for further embellishment, which they will receive in part five.

~~~~~~~~~~~~~~~~~~~~~~~~~~~~~~~

N. Rene West
Time Treasured

Quilting – Celtic Moon (part two)

Felted Quilt

The next stage of Celtic Moon involved felting the land piece. After backing it with stabilizer, I followed the lines of the print and felted wool roving here and there, using three different shades of green. I then positioned the piece on the background and prepared my sewing machine for free motion quilting.

Felting Shapes

There are several items that I find helpful for machine quilting. Of course, good quality quilting needles are important. I also attach a straight stitch plate to my machine, which results in nice stitches on the back of the quilt. Sometimes I use quilting gloves (usually in the winter) and other times I prefer the banker’s tips sold in office supply stores. A newer item that I really like is the free motion slider, a Teflon sheet that allows the quilt to move freely under the needle.

Quilting Supplies

I chose a 35 wt. variegated cotton thread and quilted the land piece, following the general shapes on the print. Next, I picked out another variegated thread for the water and quilted it quite densely. The marble design made the quilting quite easy since it already resembled the flow of water. When the quilting was complete, I stitched around the Celtic garnet stitch design, which gave it the look of trapunto.

The final stage of the quilt made me a little nervous. I had thought of several ways I could put a moon on the surface, but finally decided to use chiffon and a heat gun since it allowed for the background to show through and also rendered the look of the moon’s craters.

Since chiffon shifts easily, I pinned my pattern on top of it and then cut around it, leaving plenty of fabric around the edges. I then sewed around the moon pattern.

Moon Pattern

Next, I repeated the method had I used for the Celtic design, only this time I made my circles much larger. When I completed the garnet stitches, I trimmed off the excess fabric.

Large Garnet Stitches
I took the quilt outside and used a heat gun to melt the holes in the chiffon. As soon as the holes would begin forming, I would move the heat gun to the next area. This is a technique that takes practice and demands careful attention. You can easily burn your fabric if you’re not careful. If you try this method, do a test sample first so that you know how close to position your heat gun to your fabric.

To complete the moon, I painted outlines with Lumiere metallic bronze around the burned out holes.

Lumiere Metallic Paint

This certainly isn’t the most colorful quilt I’ve every made, but the techniques used to construct it made it a very interesting project. I hope you will try some of the methods and incorporate them into your projects.
~~~~~~~~~~~~~~~~~~~~~~~~~~~~~~~

N. Rene West
Time Treasured

Quilting – Celtic Moon (part one)

Celtic Moon

With National Quilt Day and St. Patrick’s Day falling on the same weekend, I decided to make a Celtic-themed quilt using several techniques that I think you will enjoy using in your own work.

Of course, the quilt is predominantly green. It’s kind of funny. I was listening to an Alex Anderson pod cast the other day regarding color. She shared how she disliked fall colors in her early quilting days but grew to appreciate all colors. Greens and browns would be my early “dislike” colors. Now I notice that the two colors show up frequently in the things I create.

When I began designing this quilt, I wanted the feeling of motion to play a large part, so I chose a marbled fabric for the water background and a print with lots of fluid lines for the land.

The first stage of the quilt involved the winding Celtic design. I thought about painting the design onto the fabric but decided that some kind of thread work would be a better choice. After backing the fabric with Decor Bond, I penciled in the outline of the design. I then chose a variegated cotton thread (35 wt.) and set up my sewing machine for free motion embroidery.

This technique is fun, easy to do, good practice for other kinds of free motion work, and adds a unique quality to your work. I call it a meandering garnet stitch since you work in a circular motion but alter the size and shape of your circles as you move across the fabric. You could use this technique with just about any shape imaginable.

Lower the feed dogs on your sewing machine. Hoop your design and begin with a few securing stitches. Clip you thread tail.

Clip Thread Tail

Now move the hoop in a circular motion, creating small, medium, and large circles, covering the interior of your outlined shape. Allow some of your circles to elongate and cross over previous stitching lines, forming a web-like appearance.

Meandering Garnet Stitch

When the interior of your design is complete, make a few rounds of outline stitches, allowing them to build up on each pass.

Outline Stitches

You can use any kind of thread you like with this technique. Decorative and metallic threads work well. You could also sandwich fibers under tulle and then stitch the meandering garnet stitch over them. The choices are yours to make.

Garnet Stitch

In part two, I will share with you how I machine felted the land piece, free motion quilted the water and land shapes with lots and lots of thread, and with fear and trepidation, formed the moon on the surface.

Celtic Motif

~~~~~~~~~~~~~~~~~~~~~~~~~~~~~~~

N. Rene West
Time Treasured

Felted Finery – Sand Dollar Shallows

This piece of needle play is difficult to categorize. True, it does involve needle felting silk to silk. However, it also involves free motion embroidery and a little trapunto. So, it really belongs in Fabrications as well. That said, here is a helpful lesson on all of the above.

Marked Silk

Starting with a piece of silk dupioni (any size you want), stabilize it with a heavy fusible stabilizer. I used Decor Bond. Draw some diagonal lines with the light stroke of a pencil or any marker of your choice. Next, cut some freehand circles out of a contrasting color of silkdupioni, varying the sizes for more visual interest.

Silk Circles

Place one of your circles of silk at the beginning of a pencil line. Using about three needles in your Babylock Embellisher (or other needlepunch machine), tack down the first circle in the center.

Slowly begin working your way around the silk, lightly securing it with your fingers so that it doesn’t form folds. It helps to felt a cross pattern after the tack down and then continue felting the circle until complete. Your goal here is texture; a light felting is all that is needed.


Continue felting circles, alternating their sizes. Don’t worry about the distortion in the base fabric. The next step will take care of it.

Garnet Stitch

When your circles are complete, thread your sewing machine with some variegated rayon thread and attach a free motion foot. Drop the feed dogs. To form the appearance of water, you are going to embroider the surface around the silk circles with a garnet stitch. This versatile stitch is fun to create and easy to do.

Using a straight stitch setting, begin making circle shapes with the needle. Go around and around, stitching over the previous round of stitches. When you are satisfied with the circle’s appearance, move on to the next circle. Vary the sizes, making some small, some large, and some in between. Within a few minutes you will feel like an expert at the garnet stitch. This wonderful stitch can be used for adding detail to animals, birds, reptiles, insects, flowers, leaves, water, rocks, and a myriad of other things.

Garnet Stitches Complete

When you have completely filled the background fabric with garnet stitches, thread your machine with a rayon thread the color of your silk circles. Using the same method, stitch around the circumference of each circle until all frayed edges are covered with stitches.

Batting Circles

You now have a relatively flat background with rows of circular “puffs.” Turn your piece over to the wrong side. With scraps of cotton batting, cut freehand circles a little smaller than each of your silk circles. Use a very light dab of Glue Pins or a similar water soluble product to attach them to the underside of each circle.

Sand Dollar Motif

Turn your fabric to the right side and return it to the sewing machine. With the same thread and settings, lower the needle into the middle of a silk circle. Sew a few securing stitches and cut your tread tail. Now free motion stitch a sand dollar design (or any design of your liking) over the surface of the silk circle. Repeat with each circle until finished.

Sand Dollar Close Up

When I completed my piece, I auditioned several different beads that I thought would look nice in the center of the sand dollars. However, I found that the wonderful surface texture created by these methods needed no further embellishment.

Completed Design

I hope you will experiment with this exercise and use the methods in larger works. Silk is an excellent choice when texture and sheen are required. Needle felted silk increases the textural quality of your work and can add realism to individual elements.

Note: I chose blue and white for this project because blue, white, and grey are Project Spectrum’s color choices for February and March. If you’re not familiar with Project Spectrum, click on the banner in the side bar and visit their website.

~~~~~~~~~~~~~~~~~~~~~~~~~~~~~~

N. Rene West
Time Treasured