Fabrications – Heliocentricities (part three)

I wanted some dimensional leaves for the surface of my nameless quilt, so I pulled out some sheer fabrics in the autumn color range. As I moved the fabrics around, a nest of threads began to build around my fingers. Most of the threads were organza and chiffon. I thought they looked interesting, so I cut the little cluster away from their sources and decided to use them in my first leaf.

For the bottom layer, I cut a circle of copper organza. I then placed a piece of Heat n’ Bond Lite in the center. Actually, it was a piece of Heat n’ Bond that had separated from its paper backing. Next came the thread nest, which was topped with a piece of copper tulle.

Organza, Thread, and Tulle Sandwich

I set the layers on a Teflon pressing sheet, placed a piece of parchment paper on top, and then ironed the sandwiched items on a wool setting for about 8 seconds.

Next, I set up my sewing machine for free motion stitching and threaded the needle with a #40 variegated rayon. To secure the layers and add a little extra decoration, I free motion stitched some wavy lines back and forth, filling the entire sandwiched area.

Free Motion Stitching

I then positioned the stitched organza in a round embroidery hoop. Back in my hand quilting days, I would sometimes use contact paper to make removable templates. I used this same technique for the maple leaf shape.

Contact Paper Template

After positioning the leaf, I stitched around the template about 8 times, allowing the thread to build up.

Leaf Outline Stitching

Thread Buildup

I then cut around the stitching and used a heat tool (stencil cutter) to finish the edges. When using a heat tool, always work in a well ventilated area. For more information on this technique, see In Bloom, Part Three.

Completed Leaf

~~~~~~~~~~~~~~~~~~~~~~~~~~~~~~~

Rene
Time Treasured

Fabrications – Heliocentricities (part two)

I received an email from a reader asking whether Setacolor Transparent fabric paint was the only paint one can use for sun painting. I have always used Setacolor Transparent since it works so well and is available both online and in art stores. Additionally, Setacolor is a quality product that can be used with numerous fabric painting techniques. However, Jacquard Textile Paint and Dye-na-Flow are also reported to work with this technique.

The question piqued my curiosity, so I took out the other brands of fabric paint and returned to the picnic table where I usually do my sun painting. Wouldn’t you know it, the minute my brush touched the fabric, I heard thunder and felt raindrops. I transported my two pieces to the gazebo and there they sit as I write.

Jacquard Textile Paint with Wood Cut Dragonfly

Dye-na-Flow with String

So I would like to put the question out to all of my readers. What fabric paints do you use for sun painting? Please take a moment to comment if you have the time.

When sun painting, the design possibilities are virtually endless. I once made a photo transfer baby pillow using foam alphabet letters for the child’s name.

Sun Painted Letters

Here’s a list of other items you might like to try on your painted fabrics:

pasta shapes
toothpicks
paper clips of various shapes and sizes
rubber bands
yarn, thread, string
rice
wood shapes
foam shapes
lace, lace doilies
keys
dry cereal
sequins
hair pins
buttons
bottle caps
wire mesh
cheese cloth
netting
flowers and leaves
feathers
cut paper shapes
stickers
die-cut shapes
washers
nails

As you walk around your home, garage, and yard, you’ll probably find lots of items you can add to this list. Additionally, keep your eyes open next time you visit your favorite craft, hardware, or office supply store. Their isles hold countless treasures for the alert fiber artist.

~~~~~~~~~~~~~~~~~~~~~~~~~~~~~~~

Rene
Time Treasured

Fabrications – Heliocentricities (part one)

Several years ago I met a woman at a guild meeting who shared my interest in fiber art. We talked for hours, well after the meeting had closed and all participants had departed. We’ve been fast friends ever since. Every time we talk, I come away recharged and anxious to begin some new project. I hope you have someone like this in your circle of friends.

All this to say, I hung up the phone last week after a long conversation with this same friend and headed for the paints. It was a beautiful sunny day, and I was itching to apply color to fabric. I chose four colors of Setacolor Transparent Paint and took them outside.

Setacolor Transparent Paints

Next, I gathered the usual painting supplies and set up an area to paint on our picnic table. I then walked around the yard and gathered some maple, poplar, oak, fern, and boxwood leaves.

Collection of Leaves

I took my little nature collection inside and pressed the assorted greenery between two paper towels, adding the weight of a quilting ruler on top. Flat items work best with sun painting.

“Leaf Press”

When I returned to the picnic table, I noticed a few clouds in the sky but kept working. First, I placed my PFD Kona cotton fabric square in a stainless steel pan and sprayed it with a little water.

Dampened Fabric

I then painted the first piece of fabric, making sure the entire piece was covered. White areas do not work when transferring designs.

Painted Fabric

I placed the wet piece on a prepared foam board covered with a white trash bag. Next, I placed fern leaves on the surface, pressing them down with my fingers. Items usually stick to the paint, which helps to keep them flat.

Fern Pattern

As I prepared to paint the second piece, I felt a few sprinkles. My beautiful sunny day quickly changed into a stormy, windy, downpour of a day. So I grabbed my painting supplies and headed for the patio. Since the air had become so damp, I knew my piece wouldn’t dry very quickly.

After a short time, the sun returned and I went back to work. I painted three more pieces of fabric and placed the leaves I had collected on the surfaces. I then set them all in the sun. Since there was a lingering breeze, I placed a few pebbles on top of the leaves to hold them in place.

Maple Leaf Patterns

About 20 minutes later, my four fabric squares were dry. My husband had just returned from the golf course, saw my leaf-covered fabrics, and told me to wait for him before I removed the all the toppings. There’s always the “Ahhhh” effect when you first see the transferred patterns on the fabric and he didn’t want to miss it.

So off came the leaves and there we stood gazing at our little gifts from the sun. It’s never loses its thrill.

Sun Painted Ferns

In recounting my day of sun painting, I mentioned most of the information you need to do this yourself. Here it is in review.

1.  Use Setacolor Transparent paints. You can mix them or apply as many colors as you like to your fabric. Cover all white areas.
2.  Prepare your cotton fabric by prewashing to remove any sizing or use PFD fabric. Iron it to remove wrinkles.
3.  Have all your supplies close at hand (brushes, paper towels, water, spray bottle, paints)
4.  Flatten the items you wish to use as patterns.
5.  Protect the painting surface.
6.  Work quickly.
7.  Keep fabric flat.
8.  Spray fabric with water before painting.
9.  Remember, painted fabric always looks darker when wet.
10. Secure your patterns if it’s a windy day.
11. Peak under one of your patterns when the fabric appears to be dry to see whether you have achieved the desired effect.
12. When fabric is thoroughly dry, press for 2-3 minutes at a cotton setting to set the paint.

So what kinds of things can you use as patterns when sun painting? We’ll explore the possibilities in part two.

~~~~~~~~~~~~~~~~~~~~~~~~~~~~~~~

Rene
Time Treasured

Fabrications – Heliocentricities (Coming Soon)

Nameless at the moment

I apologize to those of you who visited the blog Saturday and found most of the pictures missing. Our website was down for awhile, and we store most of the Fembellish graphics on that server.

I think this is the longest I’ve ever gone between posts. I’m afraid work before pleasure has ruled this week, but I have been stealing a few hours here and there to do some fabric painting, heliographic fabric painting to be more exact.

The pieced quilt above frames a sun painting of some maple leaves from my yard. I finished the piecing early this morning and hope to start on some embellishments next week. This is a work in progress, but I’ll share the process from start to finish as time permits. If I haven’t said it before, I LOVE painting fabric, and of all the fabric painting methods out there, I think I love sun painting the best.

I hope you all have a wonderful weekend, and while I’m at it, let me thank you again for your kind, encouraging comments via the blog and email. I appreciate every one of them (and all of you).

Note: I’ve uploaded another colorform shape file (fjrectangel.dst) for those of you with embroidery machines.

~~~~~~~~~~~~~~~~~~~~~~~

Rene
Time Treasure

Fabrications – Gathered into the Fold (part two)

To prepare my background fabric for the reverse appliqués, I stabilized it with a fusible interfacing. I then penciled a free form design onto some freezer paper, cut out the shape, and ironed it to the front of the fabric. Using sharp craft scissors, I carefully cut around the freezer paper pattern.

First Cut

I repeated the process for the second cut.

Second Cut

Since these were reverse appliqués, I placed the gathered red rayon pieces under the cut out areas. Owing to the gathers and folds in the appliqués, I didn’t perform traditional reverse appliqué where the top fabric gets cut out after the appliqués are stitched to the main fabric. (I didn’t want to risk accidentally cutting into the gathers.)

Reverse Gathered Appliques

To keep the appliqués in place, I dabbed a tiny bit of Glue Pins around the inner edges. I then set my sewing machine on a narrow buttonhole stitch and worked around the raw edges.

Narrow Blanket Stitch Edging

After adding some embroidery stitches with perle cotton, I further embellished the areas surrounding the appliqués with pearl, bugle, and glass beads, along with sequins and buttons.

Beading

Note: I’ve uploaded another colorform file (fjfan.dst) to the Fem-Gratis box in the sidebar (for your personal use).

~~~~~~~~~~~~~~~~~~~~~~~~~~~~~~

Rene
Time Treasure

Fabrications – Gathered into the Fold (part one)

One way to add texture to a project is by manipulating fabric. I recently purchased a supply of rayon yardage in various colors and used some of it to make the reverse appliqués in this piece. If you’ve ever worked with rayon, you know that it’s a shape-shifter. That very quality makes it perfect for this project.

First, I cut a few pieces of red rayon about 8″ x 8″. I set up my sewing machine with a gathering foot and a straight stitch at 3.5 mm. The gathering foot is a great accessory to have. For one thing, it’s easy to use and always works well. Additionally, it provides normal gathers rather than the little pleats created by the ruffler attachment.

Gathering Foot

Next, I began stitching the rayon in a very random pattern, holding my left index finger behind the foot to gently add some resistance as the fabric fed under the foot. This helps the gathers to form more densely. As the gathers build, it helps to slow down and adjust the fabric so that you don’t sew over any pleats, although it wouldn’t be the end of the world if you did.

Random Gathering

When the piece was complete, it looked nice and puckered all over the surface.

Gathering Complete

To flatten the piece, I set my iron at the wool setting and turned on the steam. I then pressed it from the wrong side for a few seconds. Since the shape-shifting quality was no longer desired, I pressed a light fusible interfacing to the back side.

Pressed Gathers

I thought it might be nice to cover the stitch lines with a decorative stitch, so I chose a star stitch and simply followed the lines of the previous stitching.

Decorative Stitching

Since I planned on doing further embellishments to the piece as a whole, I didn’t want to over work this area. If the appliqués were the main focal point, such as in a quilt square, I would have used decorative threads, couching, and/or beads as further embellishments.

I’ll complete this little piece in part two.

Note: I’ve uploaded another colorform shape file (fjdiamond.dst) for those of you with embroidery machines.

~~~~~~~~~~~~~~~~~~~~~~~~~~~~~~

Rene
Time Treasure

Quick Tips – How to Use Every Last Scrap of Solvy (WSS)

Sulky Solvy and other film-type water soluble stabilizers have wonderful recycling attributes. I use a lot of this stuff and always place the little leftovers into a glass jar. When the scraps start to add up, I do one of two things with them:

1) I iron small pieces together to make one new larger piece. To do this, I arrange the WSS scraps on parchment paper or a Teflon pressing sheet (you can also use a brown paper grocery bag) so that they all overlap and form a solid shape. I then place parchment paper over the scraps and press for about 8-10 seconds on a wool setting or until the pieces adhere to each other. Allow the parchment paper to cool before touching it.

or
2) I make Solvy soup by mixing the scraps with water. Here is the general recipe.

Ingredients:

About a 1 yard equivalent of WSS scraps
1/2 cup hot distilled water
2-3 tablespoons rubbing alcohol

Directions:

Place WSS scraps and hot water in a glass jar and shake well until dissolved. If the solution is to be stored, add the alcohol and keep the covered jar in your refrigerator.

To apply, dip a sponge brush or small paint brush into the WSS solution and paint onto your fabric. Allow to air dry or use a hair dryer to speed the process. When dry to touch, cover with a press cloth and quickly press with a dry iron to remove any remaining moisture. Stitch as usual and then remove WSS with water (I usually spritz it away).

~~~~~~~~~~~~~~~~~~~~~~~~~~~~~~

Rene
Time Treasured

Fabrications – All in a Row (part two)

For the flower centers, I used a similar Stitch Witchery technique. First, I cut a small square of fabric and Stitch Witchery. I then backed the fabric square with a fusible interfacing.

Stitch Witchery

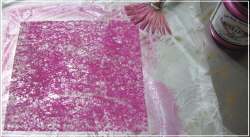
Second, I painted the Stitch Witchery square with Lumiere Pearl Magenta.

Painted Stitch Witchery

Third, I dropped some metallic threads on top of the fabric square. I then topped it with the painted Stitch Witchery and covered the layers with parchment paper. I pressed them on a wool setting for about 10 seconds.

Metallic Threads

Fused Threads

Using a small circle template, I penciled cutting outlines on the back of the fabric and then cut out the circles.

Marked interfacing

Next, I placed the circles on the background fabric in a somewhat random fashion. The only important thing here was to leave enough room between them for the petals. When I was happy with their positions, I tacked them down with a tiny dab of fabric glue so that they would stay in place as I continued working.

Placement of Center Flowers

The next step was the flower stems. I decided to use green quarter-inch organza ribbon. To get a nice rounded shape, I twisted the ribbon as I couched it down using the Bernina free motion couching foot. (This could be done just as easily with a cording or braiding foot or an open toe foot.)

Couched Organza Ribbon

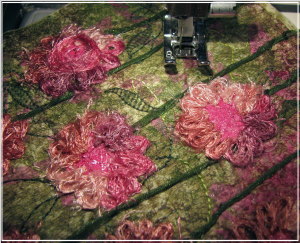
The flower petals were created with Moda Dea Jai Alai (Bloom) eyelash yarn. I couched the yarn around the center, first working in a loopy motion to form the petals and then taking a final round at the outer edge of the center.

Free Motion Couched Yarn Petals

A free motion couching foot would be necessary to apply the yarn exactly as I did. However, you could achieve very nice petals through bobbin work with perle cotton or another heavy thread or fiber of your choice. To do this, sew a straight stitch around each circle. Wind your bobbin by hand and then prepare your machine for free motion work. Turn your fabric to the wrong side and stitch the petals around the previous sewing lines. (It’s always a good idea to work on a test piece first to make sure your tensions are correct.)

When my flowers were complete, I chose a leaf stitch on my sewing machine and added leaves to the stems. I could have thread painted the leaves, but sometimes I like to use the built-in stitches on my sewing machine simply because they so often go unused!

Machine Stitched Leaves

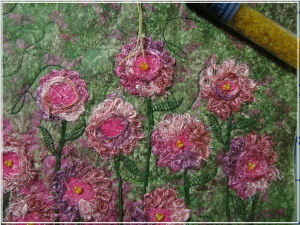
To complete the piece, I added a yellow glass bead to each flower. Instead of sewing the beads on with the hole to the side, I stitched them with the hole facing up and used a lighter yellow thread. The stitches formed a small “Y” design on the surface of each bead.

Bead Work

I really liked the role that Stitch Witchery played in this project. It performed well both as a fusible and as a paint transfer medium without leaving its own footprint.

Note: I’ve added another colorform file (fjsquare.dst) to the Fem-Gratis box in the sidebar. Enjoy!

~~~~~~~~~~~~~~~~~~~~~~~~~~~~~~

Rene
Time Treasured

SaveSave

Fabrications – All in a Row (part one)

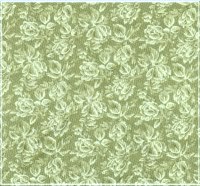
Sometimes I order fabric online. Occasionally, it’s not what I had hoped for so it becomes a makeover candidate. This floral print came with a grainy looking surface that I disliked.

I thought it might be nice to trap some snippets on the surface. When considering what kind of fusible to use to accomplish this, I decided to experiment with Stitch Witchery. First, I cut a piece the same size as the floral background fabric. I then painted it with Liquitex Medium Viscosity paint, mixing burnt sienna and green for the dark green area. I used magenta for the corner.

Painted Stitch Witchery

While the paint was drying, I placed painted (Lumiere Pearl Magenta) Cariff .50 stabilizer snippets on the surface, creating a heavier concentration in one corner.

Painted Cariff Snippets

I then placed the painted Stitch Witchy square over the fabric and snippets, covered it with parchment paper, and pressed the layers for about 10 seconds on a wool setting.

Altered Surface

Owing to the web-like quality of the Stitch Witchery, the resulting surface retained some of the background while allowing the snippets to shine through without being totally subdued. However, the original floral was now completely transformed.

Next, I set up my sewing machine for free motion quilting and threaded the needle with Valdani 35 wt. Green Grass cotton thread. After stabilizing the fabric with thin cotton batting and backing, I stitched the green surface with a free form leaf design.

Free Motion Leaf Design

For the magenta area, I used Valdani 35 wt. Hawaiian Orchid cotton thread and stitched a meandering design.

Meandering Quilting

In part two, I’ll share how I created the flowers.

For those of you experimenting with the colorform shapes, I’ve uploaded another file (fjpaisley.dst) to the Fem-Gratis box for you to download.

~~~~~~~~~~~~~~~~~~~~~~~~~~~~~~

Rene
Time Treasured

SaveSave

Quick Tips – How to Knit on the Go

I knit all year long and like to carry my projects with me for appointments, when I travel , etc. I’ve tried several methods of keeping my yarns neat, tidy, and convenient all at the same time and found that an empty 5 quart plastic ice cream container works best.

I usually work with more than one yarn at a time, so the ice cream container supplies plenty of room for my multiple balls or skeins. Using a regular hole punch, I created three holes at the outer edges of the top, separating them equally. The yarns flow freely from each hole and never tangle. The container already has a carrying handle, so I’m good to go at all times.

Of course, I had to embellish the container, so I pasted a pretty floral picture over the “Vanilla” imprint.

~~~~~~~~~~~~~~~~~~~~~~~~~~~~~~

Rene
Time Treasured

Fiber Folio – Colorforms Nouveau (part three)

The collection grows. I keep thinking of more shapes that I would like to use in future projects and adding them to my little box.

Angelina Colorform Collection

As I looked at the orange triangles, I thought about what cute fish they would make, so fish they became! Angelina really lends itself to ocean scenes owing to its luminosity. This project takes on a different look from every angle as the various fibers catch the light.

You will find the digitized triangle file in the Fem-Gratis box on the left sidebar. Of course, you can make the shapes without the aide of an embroidery machine.

First, I chose three water fabrics and cut them with wavy edges. I then arranged the Angelina scraps to see how I liked the basic composition.

Water Fabrics and Angelina Scraps

Next, I cut a piece of chiffon on the bias and layered it in the center. I then placed some dark green and light blue tulle (cut with wavy edges) over the entire piece. If you look closely at the introductory picture above, you can see the various shading effects that this produced.

Chiffon, Angelina, and Tulle Layers

When I was happy with the placements, I used a little temporary spray adhesive (505) on the backs of the different pieces and repositioned them.Using 35 weight cotton thread (Valdani Mediterrana), I free motion quilted the water areas.

Free Motion Water Quilting

I then switched to Valdani Midnight Sea and stitched small round loops on the ocean bottom, creating the look of seaweed.

Free Motion Stitched Seaweed

With the same color, I thread painted a few sea plants.

Thread Painted Sea Plants

I tacked the orange triangles down with a dab of fabric glue to keep them in place as I worked.

Tacked Down “Fish” Triangles

The edges were worked with a free motion zig zag stitch using Sulky Holoshimmer thread. When the edges were complete, I worked the fish tails and then the stripes on the bodies. That completed the machine work.

Fish Detail

I chose some metallic colored beads for the eyes and for some of the bead work on the lower reef.

Fish Bead Work

I also used bugle beads on the reef along with a copper star for a star fish.

Reef Bead Work

For bubbles, I applied clear glass beads. And with that, the project was complete.

Glass Bead Bubbles

~~~~~~~~~~~~~~~~~~~~~~~~~~~~~~

Rene
Time Treasured

SaveSave

Fiber Folio – Colorforms Nouveau (part two)

After cutting out some newly digitized shapes this afternoon, I noticed that the Angelina scraps looked so pretty together. So I arranged them as a background for a colorform flower.

Angelina Scrap Arrangement

Next, I covered the Angelina arrangement with a piece of parchment paper and pressed it for about three seconds (on silk setting). Angelina scraps can always be refused to each other. To attach the arrangement to the backing fabric, I sprayed the Angelina with 606 spray on fusible web (on the back). After is dried, I positioned it on the backing fabric, covered it with parchment paper, and pressed it.

Using white rayon thread, I added some decorative stitches to various areas around the center.

Decorative Stitches

I then prepared my sewing machine for free motion stitching and threaded the needle with green Sulky Holoshimmer thread. I used a viney leaf motif to quilt the area covered with lime green Angelina.

Free Motion Stitching with Holoshimmer

For the remaining areas, I used Sulky Sliver Metallic thread (wonderful stuff!!).

Sulky Sliver

The center motif was created with 5 fan shapes and one small circle, which were attached with fabric glue. I further embellished the flower motif with beads.

To complete the design, I free motion stitched the outer edges with Sulky Sliver.

You will find another colorform stitch file (fjleaves.dst) to download for your personal use in the Fem-Gratis sidebar box.

~~~~~~~~~~~~~~~~~~~~~~~~~~~~~~

Rene
Time Treasured

SaveSave

« Older entries