A Bead, Indeed!

Fiber Art Beads

Want to add dimension and lots of visual interest to your projects? Fiber art beads will do the trick. There are many ways to create these little gems, but here is the way that I make them.

You will need the following supplies:

plastic drinking straws
fabric glue
fabric scraps
assorted yarns or fibers
beads
craft wire, 22 or 24 gauge

Begin by cutting your straws into 1 1/2″ widths (or whatever size you desire). Cut fabric scraps on the bias about a quarter inch wider than your straws and about 4 inches long. Dab a little fabric glue on the straw and begin wrapping the fabric around it. Reapply more glue as you wrap the fabric.

Wrapped Bead

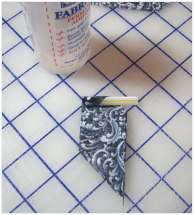
Wrapping fabric around plastic straw

Check to make sure the fabric is completely secured with fabric glue. This add stability and a little stiffness to the beads.
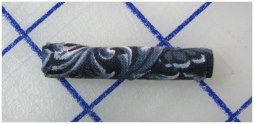
Wrapped Straw

Wrapped Straw Piece

Cut some stands of various yarns or fibers. Place a small dab of fabric glue at one end and secure the end of the first yarn. Wrap the yarn around the bead in a spiral motion. Secure the end with fabric glue. Repeat this step for additional yarns.
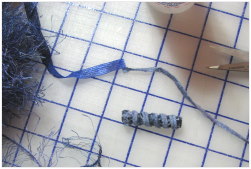
Yarns

Secondary yarns

Wrapped Yarns

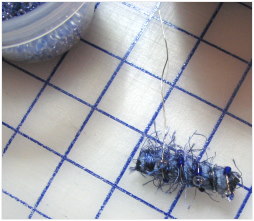
String craft wire through the center of the straw and wrap it around the exterior of the bead, leaving about a one inch tail. Twist the tail around the center wire to secure.

Twisted wire

Wrapped Craft Wire

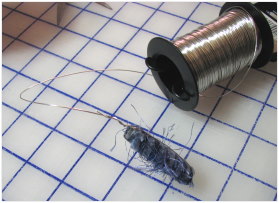
Measure out about 10 inches of wire from the end of the bead and cut.

Cut wire

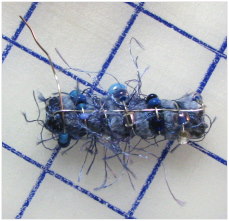
String various size beads onto the wire and begin wrapping them around the bead in a spiral motion. I like to string a few beads at a time, wrap, and then repeat the process until I come to the opposite end of the bead.

Stringing beads

Stringing Beads

Once the beading is complete, push the wire end under the original wrapped wire and twist it back on itself to secure. I like to push the end of the wire into the bead so that there are no sharp edges on the surface of the bead.

End wire

Securing End of Wire

You may like to experiment with Angelina “fabric” rather than cloth. Also, try wrapping ribbon rather than fabric. Metal beads and other embellishments can be used in place of glass beads. Craft wire comes in many colors, so don’t limit yourself to silver and gold.

Note: I want to thank you again for your many comments, emails, and prayers for my family during this difficult time. My mother’s condition remains the same; we just take it one day at a time.

~~~~~~~~~~~~~~~~~~~~~~~~~~~~~~~

Rene

Time Treasured

Fabrications – Sand In My Shoes (part two)

Batiks serve as the perfect fabrics for making these little flowers since they are tightly woven and quite colorful.

Once you have completed the free motion stitching on each of the circles, remove the Solvy from you hoop. Clip around each flower, leaving all the loose extended threads in place.

Circles Clipped from Solvy

Place each flower circle on a terry towel and spray with water to remove the Solvy. Spraying rather than soaking works well here because some of the melted Solvy remains in the fabric, adding a little stiffness to the bubbly texture.

Sprayed Circles

When you circles are semidry, center the small circles on top of the large circles. If you have used an assortment of colors, you may like to mix and match until you are pleased with the results.

Layered Flowers

Apply beads or buttons to embellish the flower centers. I used “tye dye” glass beads.

Tye Dye Beads

Take each flower and scrunch it into a little ball. Gently open the ball and shape it back into a flower.

Scrunched Flower

Allow to dry completely, and your flowers will be ready to add colorful embellishment wherever you place them.
~~~~~~~~~~~~~~~~~~~~~~~~~~~~~~~

Rene
Time Treasured

Fabrications – Sand In My Shoes

Batiks always make me think of summer vacations at the beach. If you’re like me, you probably have lots of batik scraps from past projects. Here’s a great way to transform them into beautifully embellished flowers.

For this project you will need some regular Solvy, a heavy variegated cotton thread (I used Valdani #35 “Autumn”), colorful beads, an embroidery hoop, circular templates, and assorted batik fabrics.

Supplies

First, mark large and small circles on your batiks. I used a mechanical pencil, which makes a very thin cutting line. For templates, I used metal eyelet charms that I found in the scrap booking department of my local craft store. These charms are quite thin, making them very useful around the studio. My large circle measured 1 3/4″ and my small circle measured 1 1/4″.

Circle Templates

Cut the circles out and press to flatten if necessary.

Cut Batik Circles

Hoop you Solvy and lightly spray the back of the individual large circles. Position them in the hoop.

Hooped Solvy

Set up your sewing machine for free motion work. Use a coordinating color and similar weight of thread in the bobbin. Drop the feed dogs and attach a closed free motion foot. Free motion stitch each of the circles, using meandering and circular motions. Allow the thread work to extend beyond the edges of your circles. Fill each circle with stitching, creating a bubbled texture.

Free Motion Stitched Large Circles

Repeat this process for the small circles.

Free Motion Stitched Small Circles

Your completed stitching should look something like this. Notice that the thread work extends well beyond each circle.

Free Motion Thread Work

We’ll finish these little batik blooms in part two.

~~~~~~~~~~~~~~~~~~~~~~~~~~

Rene
Time Treasured

Felted Finery – Play It Again

When I was working on the Encased project, I felted several of the floral rounds in assorted colors. Here’s another little project using these versatile flower shapes.

First, you will need to felt a floral round in any color you like. Cut it out of the organza and match it up with some colorful rick rack.

Felted Floral Round

Turn your floral round to the back side, and dab some fabric glue around the edges.

Dab Fabric Glue Around Edge of Back Side

Position the rick rack so that the rounded points form the look of petals.

Glue Rick Rack to Form Petals

Your flower/flowers should look something like this when you are finished.

Completed Flowers

To create leaves, fold some green rick rack at a point as shown.

Step One of Rick Rack Leaves

Now wrap the rick rack back and forth around itself. The inner loops will lock together. Trim off at the length you would like your leaves.

Step Two of Rick Rack Leaves

Cut a piece of fabric whatever size you would like you project to be. The size will depend upon what you are making. Stabilize it with a heavy fusible stabilizer or interfacing. Alternately, you could sandwich it with batting and quilt it.

Cut a piece of the colorful rick rack to form a stem. Dab it in a few places on the back side with some fabric glue, and position it on the front of your project. Dab the raw edges of the leaves with fabric glue and position the ends under the rick rack.

Secure Stem and Leaves

Secure the outer edges of the leaves with beads.

Leaf Beading

Embellish the rick rack stem with seed beads at each point.

Seed Bead Embellishment

Position your flower at the top of the stem. Secure it will a little fabric glue in the center back to keep it from shifting. Embellish the petal points with bugle beads.

Bugle Bead Petals

I’m sure you’ll find all sorts of creative ways to embellish these little felted flower. Have fun!

~~~~~~~~~~~~~~~~~~~~~~

Rene
Time Treasured

SaveSave

Fabrications – Encased (part four of case construction)

Our case is now ready for the final steps that will bring it to completion. First, cut a strip of your base fabric on the straight of grain 2″ x 10″. Fold both long raw edges evenly towards the center (wrong sides together) and press. Fold again at the center line; press.

Topstitch along both sides.

Topstitch Edges of Band

Cut your strip into six 1 1/2″ pieces. Fold each one in half and zig zag stitch along the raw edges. These pieces will form the bands that secure the cording to your case.

Six Bands

Take a measurement for the length you want your case’s cording. I measured from the base point of where I would want my case to be positioned up around my neck and back down again. Using three coordinating colors of rat’s tail, make a knot at one end (leaving about a 5-6 inch tail), braid the cords the desired length, knot again, and then trim, leaving an equal length of tail.

Cording

Take your six bands and string them onto your braided cording.

Cording With Bands

Fold your case in half and position the cording with three bands on each side. Using fabric glue, place each band within the folds of the case at bottom, center, and top. The bands should fit snugly in order to secure the cording.

Attaching Bands

Stitch along the folded edges using a stitch length of 2.5mm. You may like to backstitch at each band for extra security.

Final Stitching

I hope you enjoy making these little cases as much as I do. They make great “canvases” on which to experiment with all types of fiber art techniques.

~~~~~~~~~~~~~~~~~~~~~~~~~~~~~

Rene
Time Treasured

SaveSave

Fabrications – Encased (part three of case construction)

With our fabric embellishments complete, we now move on to the basic construction of the case. First, measure across the top or bottom of your fabric. Cut two strips of the base fabric 1 1/4″ wide by the length of your measurement plus an extra inch. For example, my strips measured 1 1/4″ x 7 1/4″.

Place one strip at the top of your fabric, right sides together, and stitch. Repeat this step at the bottom of your fabric.

Top and Bottom Strip

Fold the raw edge, press, and fold again, lining the folded edge up with the seam line. Pin in place (or secure with Glue Pins) andtopstitch. Trim the edges so that they are flush with the sides.

Topstitching

Now measure the length of your fabric sides. Cut two strips that measure 1 3/4″ wide by the length of your measurement plus an extra two inches. Stabilize these strips with fusible interfacing.

Side Strips

Place the first strip on one side, right sides together, with an inch extending on each end. Stitch using a 3/8″ seam allowance. Repeat this step on the opposite side.

Side Strips with 3/8″ Seam Allowance

Take your project to your pressing area and make a 3/8″ fold down the raw edges of both strips. Press in place.

Pressed 3/8″ Edge

Next, turn the fold back on itself (right sides together), lining it up with the seam line on the right side of the fabric. Mark a line at each corner even with the finished edge of the top and bottom. Stitch all four lines, securing the beginning and ending stitches with a few back stitches.

Stitched Corners

Your project should now look like this.

Untrimmed Corners

Trim each corner, leaving about 1/8″ seam allowance at each edge.

Trimmed to 1/8″ Seam Allowance

Turn each of the corners to the right side. You may like to use a stiletto to get nice crisp edges. Press the sides in place and pin (or use Glue Pins).Topstitch down each side.

Finished Corners

Topstitched Sides

If you feel the sides of your project, the finished trim should extend a little beyond the inner seam allowance. This will be helpful when we begin the next phase of the project.

~~~~~~~~~~~~~~~~~~~~~~~~~~~~~~

Rene
Time Treasured

SaveSave

Fabrications – Encased (part two of case construction)

Machine quilting this little case is quite easy since you can simply use the patterns found on your organza overlay and base fabric.Set up your sewing machine with a free motion foot, drop your feed dogs, and change your needle to one that is appropriate for the thread you will be using. I chose a green rayon thread for the leaves in my organza fabric. Loosen your top tension if necessary.

Begin quilting around the patterns in your fabric.

Quilting Around Leaves

Quilting Around Flower

Switch to another decorative thread and continue machine quilting. I chose Sulky Sliver for some of the scrolling patterns in my base fabric. Sliver can be a little tricky to work with. I use a net and stand it vertically on a thread stand. I also loosen my top tension a good bit with this thread. It’s a good idea to test stitch before working on your actual project since thread tension is key when working with Sliver. If the tension is too loose, it will cause thread buildup on the wrong side of your fabric. If it’s too tight, the Sliver will break.

Quilting with Sulky Sliver

When your quilting is complete, position your felted floral round on the surface. Once you’re happy with its placement, tack it down with a small amount of fabric glue.

Felted Floral Round

To embellish your flower, choose an assortment of beads in various shapes. I chose bugles and rounds. Hand stitch the beads around the circumference of your flower. Use a strong thread (not cotton).

Hand Beading Around Flower

In the same manner, create a stem for your flower with an assortment of green beads.

Hand-Beaded Stem

In part three, our little case will begin to take shape.

~~~~~~~~~~~~~~~~~~~~~~~~~~~~~~

Rene
Time Treasured

Fabrications – Encased (part one of case construction)

We’ll come back to the felted floral round created in the previous tutorial during part three. For the next step, you will need a base fabric, a sheer print fabric, some Angelina, and a stiff stabilizer such as Timtex, and fusible interfacing. These supplies will be transformed into the body of the MP3 case/carrier.

First, cut two pieces of base fabric twice the length of your desired case size. For example, my case is 6 1/2″ wide and 6 1/2″ tall. So I cut my fabrics 6 1/2″ x 13″. (The finished fabric will be folded in half to form the case.)

Cut Base Fabric

Next, press fusible interfacing to the back side of each base fabric piece.

Interfaced Base Fabric

From your sheer print fabric (I used a print organza), cut one piece using the same measurements as you did for your base fabric. This is probably the most important element of this project since the sheer print totally changes the appearance and texture of the base fabric. Although I used yardage, sheer print scarves would probably work quite well in this project.

Sheer Print Organza Layer

To stabilize the case, cut a piece of Timtex or similar heavy stabilizer the same size as your base fabric. If you would prefer a softer case, a cotton batting would make a good substitute. Set it aside for now.

Heavy Stabilizer

Take one piece of your base fabric and spray it with 606 fusible spray, following the directions on the can. I chose 606 because it leaves no evidence of its presence when working with sheer fabrics.

606 Fusible Spray

After your spray dries for a few minutes, pull a small amount of Angelina and sprinkle the fibers on top of the sprayed fabric. (I used Ultraviolet and Peacock.)

Angelina Fibers

Place the sheer print on top of the fibers and move the piece to your pressing area. Top the layers with parchment paper and press for about three seconds on a silk setting. The layers should adhere to each other and now form a single piece of fabric.

Pressing Layer Together

Next, spray the surface of your heavy stabilizer with 505. Position the second (unmodified) piece of base fabric evenly on the stabilizer, and press it in place with your fingers. Turn the stabilizer over, spray the second side with 505, and position your transformed fabric in the same manner.

505 Spray

Your project is now ready for stitching, which we will take up next time.

~~~~~~~~~~~~~~~~~~~~~~~~~~~~~~

Rene
Time Treasured

SaveSave

Felted Finery – Floral Rounds

My husband gave me a PMP (portable media player) for our wedding anniversary. I love tech toys and this one is no exception. I decided I wanted a special case for it that I could wear as I went about my day. Now I can listen to podcast and music regardless of where I am or what I’m doing. The construction of the case/carrier really falls under more than one category, so I will be dividing this tutorial between Felted Finery and Fabrications.

You can make these little case/carriers any size you like. I think they would make very nice gifts for anyone with an iPod or MP3 player.

For the felted flower, you will need two colors of organza and some wool roving. I purchased a package of organza circles in the wedding section of my local craft store because they are the perfect size for hooping. (Sadly, they are of a lesser quality than organza yardage, but they work okay.)

Organza Yardage; Organza Circles

Hoop a circle of organza in a color that is close to the color of your wool roving. Although it’s not necessary, it helps to mark your small circular flower centers on the organza. Use a color that matches your roving since markings can show on the surface after felting.

Flower Center Markings

Place your hoop under the needles of your felting machine and position a small amount of roving on the outside edge of one of your marked circles. Working in a circular motion, slowly tack the roving down.

First Round of Roving

Pull a little more roving and work around the previous roving circle. When you are happy with the size of your flower, give it a more thorough needle punching.

Second Round of Roving

For the flower center, cut a circle of organza about three times larger than the bare center of your felted flower. Remove the organza base from the hoop and turn it to the wrong side. Place the cut organza circle over the center of your flower and slowly needle punch it, holding the edges of the organza so that it doesn’t bunch up under the needles.

Needle Punched Organza Center (Wrong Side)

Turn your flower to the right side. The needle punched organza should fill the center. If it does not, needle punch it a little more until your center flower is lofty and textural. Turn the piece back to the wrong side and clip off any extra organza. (I felted a few leaves just for the fun of it, but they’re not necessary for this project.)

Trimmed Organza

Completed Flowers

That completes the felting stage of this project.

~~~~~~~~~~~~~~~~~~~~~~~~~~~~~~~

Rene
Time Treasured

SaveSave

Fabrications – Heliocentricities (part seven)

With my leaves complete, I’m ready to move on to the quilt top embellishment phase. However, I thought I should backtrack a little and share how I pieced the quilt for those of you who are new to the art of quilting.

I chose the maple leaf sun print for the center of this quilt. To set the paint as well as prepare the piece for cutting, I pressed it for several minutes on each side. I then chose a large number of fabrics that I liked for the rest of the piecing.

Heat Set Sun Print

Next, I rotary cut the edges off the maple sun print so that I had an irregularly shaped center.

First Cuts

To prepare my sewing machine for quilting, I threaded the needle and filled the bobbin with 100% cotton thread. I then attached a patchwork foot. The new patchwork feet with guides are absolutely wonderful accessories for achieving perfect 1/4″ seams.

Patchwork Feet – Bernina #57 with Guide, Bernina #37, and Baby Lock

The free form piecing of this quilt made is both enjoyable and easy. For the first round, I rotary cut strips of fabric in random shapes as I worked my way around the center piece. After sewing each strip, I pressed the seam and then cut its edges to prepare it for the next strip.

First Strip

Squaring of First Strip

I repeated this process all the way around the center sun print. If you’ve ever pieced a log cabin or pineapple quilt, this will have a familiar feel for you.

First Round Complete

I deliberately kept my first round of strips on the narrow side. For the second round, I cut my strips wider than the first but used the same process in my piecing.

I continued strip piecing the quilt top until I reached the approximate size I desired. Towards the end, I shaped my strips so that they would begin to square up the corners of the quilt top.

Piecing Complete

Once I completed all the piecing, I then did a more accurate squaring of the quilt top to prepare it for the next stage.

~~~~~~~~~~~~~~~~~~~~~~~~~~

Rene
Time Treasured

SaveSave

Fabrications – Heliocentricities (part six)

The fourth and last leaf design in this series uses a technique that produces a luminous web-like surface. I saw a similar technique in Quilting Arts Newsletter several months ago. My method is a little different, but it works well for me.

To create the leaves, first cut some synthetic organza a little larger than the size of your leaf templates. I used an organza print.

Cut Organza

Next, cut pieces of Stitch Witchery the same size as your cut organza. Place the organza on a pressing sheet. Top the pieces with the Stitch Witchery. Cover these layers with parchment paper. With an iron set on the “silk” setting, press the pieces for about 2 seconds. Very important! Do not over press or the Stitch Witchery will melt. The goal is to have the Stitch Witchery somewhat attached to the base organza but not melted into it.

Lightly Fused Stitch Witchery

Cover your work area with plastic or glass. Gather the following supplies: a stiff bristle paintbrush, a respirator, and several colors of Pearl Ex Powdered Pigments. Pearl Ex pigments are nontoxic, but when I use powders I always use a respirator.

Pearl Ex Powdered Pigments

Dip your paintbrush into one of the powdered pigments and brush it around on the surface of the Stitch Witchery. There’s no right or wrong way to do this. Add as many colors as you like, or use a single color if you prefer.

When you’re finished, transfer the pieces to a pressing sheet, and set your iron on a cotton setting with steam activated. You are NOT going to press the pieces. Pick your iron up and hover it over the organza pieces about 1-2 inches above the ironing surface. Do not let the iron touch your work. Move slowly above the pieces, allowing the steam to adhere the fusible to the base organza and set the powdered pigments. About 5-6 seconds should do the trick. Let the surface cool before touching your pieces.

Set Pigments

Transfer the pigmented organza to a glass or heat proof flat surface. Place your leaf templates on top of the pieces. (I used template plastic, which can be melted by the heat tool, but moved quickly so that the hot tip would not damage the edges.)

Leaf Templates

With a hot heat tool (stencil cutter or wood burning tool), move quickly around the edges of your template. The organza should melt away easily. Save your scraps for a future project.

Heat Tool Finished Edges

Transparency and luminosity give each leaf a truly unique appearance. Of course, leaves aren’t the only things you can create with this technique.

Rene
Time Treasured

SaveSave

Fabrications – Heliocentricities (part five)

I was asked a question about heat tools. When I’m working with organza or other synthetic sheers, I usually use a stencil cutter for cutouts or edge finishing. Some people use a wood burning tool. Both of these accomplish the same end. I recently purchased the Creative Versa-Tool by Walnut Hollow, and I must say this is one nice toy! You’ll probably be seeing it used in my blog entries soon.

Leaf one and two left me with lots of pretty little scraps that I decided to use in leaf three. I cut a circle of copper organza and placed a piece of Heat n’ Bond Lite (minus the paper backing) on top of it. I then cut the scraps into various random shapes and placed them on top of the Heat n’ Bond. I topped these layers with copper tulle and moved the group to a Teflon pressing sheet.

Scrap Sandwich

Next, I placed a piece of parchment paper on top of the layers and pressed on a wool setting for about 7-8 seconds.

I then prepared my sewing machine for free motion stitching and threaded the needle with a variegated rayon thread. The rest of leaf three was worked in the same manner as leaf two. First, I free motion stitched the surface. I then marked the outline of an oak leaf with a chalk marker and hooped the organza circle.

Hooped Organza; Chalk Outline

I stitched around the chalk outline eight times, building up thread.

Stitched Outline

Completed Stitching

Using sharp craft scissors, I carefully cut the leaf out, leaving a tiny bit of organza showing around the edges. I then used a heat tool (stencil cutter) to finish the edges.

The trapped scraps gave this leaf wonderful shading and texture. Additionally, I could make any number of these leaves, and they would all have a different appearance.

~~~~~~~~~~~~~~~~~~~~~~~~~~~~~~~

Rene
Time Treasured

SaveSave

« Older entries