
Spring has given way to summer weather here in the mountains, and flowers are in bloom everywhere I go. Over the Memorial Day weekend, my husband and I drove to Virginia and enjoyed the most beautiful scenery the entire trip. Red poppies filled the medians along highways, while private gardens offered a rainbow of floral colors. It’s inspiring!
Well, my little Straw Flower embellishment isn’t the most colorful bloom of the season, but it sure is fun to make.
First, let me say a few words about scrim since it frequently solicits questions from those who haven’t worked with it. You can find my previous entry on scrim here if you would like more information.

Scrim Yardage
Scrim comes in many forms, but the one used is fiber art is a loosely woven 100% cotton. Drapery stores sell it on large rolls, and it’s quite reasonably priced. You can dye it, paint it, stitch it, and manipulate it any way you see fit.

To make the Straw Flower, you will need some fabric paints, a gel medium (found in art stores), white cotton scrim, embroidery floss, craft felt, and a brooch pin.
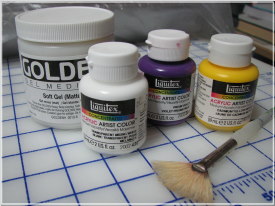
Paints and Gel Medium
Prepare a work area for painting, covering the surface with plastic sheeting. Cut two circles out of scrim the size you want your flower to be. Place them on a piece of plastic. Mix your fabric paint with a little gel medium and paint the scrim. I mixed yellow, violet, and white to get the nice golden tan color that I desired.

Painted Scrim
If the paint mixture is too thick, add a touch of water, but not too much. Allow the painted scrim circles to dry.
Gel mediums are very useful in fiber art. Once dry, your scrim circles should have a firm body, yet be quite flexible. The gel medium will dry clear, leaving only the paint color behind. Best of all, the scrim will no longer fray since the medium acts somewhat like a glue.
When your circles are dry, draw two chalk lines to mark center. These are simply visual aides for the next step.

Mark Center
Thread a tapestry needle with embroidery floss. Choose any color you like, using all six strands. Do not knot. Working with one circle at a time, stitched from the outside edge towards the center, weaving your needle in and out about every quarter inch. Stop short of the center, pivot, and stitch back towards the outer edge, creating a “V” with the floss. Leave a tail on the floss that extends beyond the scrim edge and clip. Repeat this process until the entire circle is filled with floss.

Stitched Floss
In part two, we’ll complete the flower.
~~~~~~~~~~~~~~~~~~~~~~~~~~~~~~
Rene
Time Treasured


sara said,
June 30, 2007 at 2:12 pm
I’ve had an unfinished clematis quilt lying doggo for two years because I could not figure out how to make the flower centers. This is the perfect technique.
Thanks so much.
Can’t wait to try it out–just have to find some scraps of scrim somewhere, the local fabric shop [there’s only one] doesn’t carry it and since I’ll only need half yard or less, or even 4 by 4 scraps, I am not really anxious to pay shipping charges to get it online.
Sara