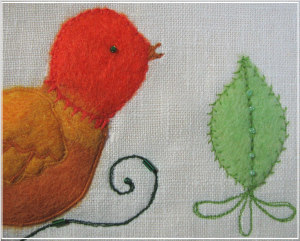
I saved my favorite leaf for last. After free motion stitching a center vein, I worked three loops of outline stitches. I then appliquéd the leaf down with a feather stitch. I think the feather stitch creates a really nice edge finish for the wool pieces.

Feather Stitch
The final section of the circular design consisted of a center bud motif, two petals, and two leaves. Using a dark gold embroidery thread and a decorative seed stitch, I worked a diagonal crosshatch pattern on the surface of the yellow bud, something often seen in crewel work.
Crosshatching
I then finished the edge by couching yellow perle cotton with a blanket stitch.

Couched Perle Cotton
Next, I positioned the red petals in place and secured them with a decorative triple-circle stitch down the center.

Decorative Center Vein
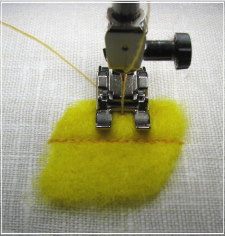
The edges were appliquéd in two stages. First, I worked a reverse blanket stitch in a matching embroidery thread.

Reverse Blanket Stitch
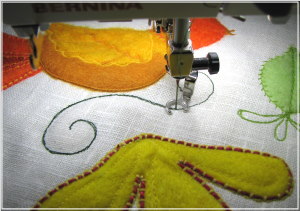
I then switched to a green embroidery thread and couched lime green perle cotton next to the previous round of stitches.

Double Edge Finish
The third and final step of the motif was the leaves. After free motion stitching some veins down the center of each leaf, I raised the feed dogs and couched green perle cotton around the edges.

Free Motion Veins; Couched Perle Cotton
I added a simple scroll design below the bird, which I free motion stitched with dark green embroidery thread.
Free Motion Scroll
As the final embellishment, I beaded the bud motif between the crosshatching. I also added beads to several of the leaves and the scroll below the bird.

Beading
This particular design will eventually become a pillow, but I’m sure I’ll be using the same technique to embellish other items with these fun-to-make felted wool appliqués.
~~~~~~~~~~~~~~~~~~~~~~~~~~~~~~
Rene
Time Treasured


Sheila said,
May 29, 2007 at 10:21 pm
You are amazing! How do you think this stuff up?
textiledreamer said,
June 4, 2007 at 4:00 pm
Looks great! Your photography is very clear and shows the process really well. Makes me want to try this.
Filzen (Hand- und Maschinenfilzen) - Linkliste | Kostenlose-Schnittmuster.de said,
October 26, 2008 at 10:24 am
[…] Mit dem Embellisher gestalten – Teil 1 – Teil 2 – Teil 3 – Teil 4 […]
June Hansen said,
April 5, 2010 at 11:23 am
Your work and Ideas are amazing! Looking forward to new posts.
Sherilyn, Cherished Needle Creations said,
December 20, 2012 at 1:14 pm
I love all your ideas. I’m glad I found your blog! Now I want to run to my sewing room to try these things out! Thank you for sharing!